Job Aid: Replacing the Avaya S8710 Media Server ... - Avaya Support
Job Aid: Replacing the Avaya S8710 Media Server ... - Avaya Support
Job Aid: Replacing the Avaya S8710 Media Server ... - Avaya Support
- No tags were found...

You also want an ePaper? Increase the reach of your titles
YUMPU automatically turns print PDFs into web optimized ePapers that Google loves.
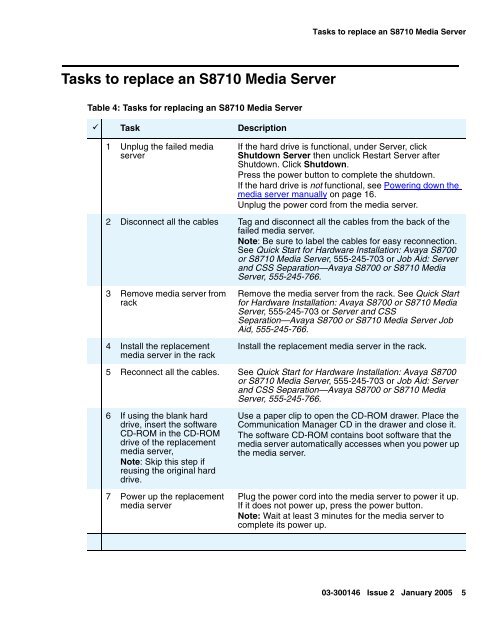
Tasks to replace an <strong>S8710</strong> <strong>Media</strong> <strong>Server</strong>Tasks to replace an <strong>S8710</strong> <strong>Media</strong> <strong>Server</strong>Table 4: Tasks for replacing an <strong>S8710</strong> <strong>Media</strong> <strong>Server</strong>9 Task Description1 Unplug <strong>the</strong> failed mediaserverIf <strong>the</strong> hard drive is functional, under <strong>Server</strong>, clickShutdown <strong>Server</strong> <strong>the</strong>n unclick Restart <strong>Server</strong> afterShutdown. Click Shutdown.Press <strong>the</strong> power button to complete <strong>the</strong> shutdown.If <strong>the</strong> hard drive is not functional, see Powering down <strong>the</strong>media server manually on page 16.Unplug <strong>the</strong> power cord from <strong>the</strong> media server.2 Disconnect all <strong>the</strong> cables Tag and disconnect all <strong>the</strong> cables from <strong>the</strong> back of <strong>the</strong>failed media server.Note: Be sure to label <strong>the</strong> cables for easy reconnection.See Quick Start for Hardware Installation: <strong>Avaya</strong> S8700or <strong>S8710</strong> <strong>Media</strong> <strong>Server</strong>, 555-245-703 or <strong>Job</strong> <strong>Aid</strong>: <strong>Server</strong>and CSS Separation—<strong>Avaya</strong> S8700 or <strong>S8710</strong> <strong>Media</strong><strong>Server</strong>, 555-245-766.3 Remove media server fromrack4 Install <strong>the</strong> replacementmedia server in <strong>the</strong> rackRemove <strong>the</strong> media server from <strong>the</strong> rack. See Quick Startfor Hardware Installation: <strong>Avaya</strong> S8700 or <strong>S8710</strong> <strong>Media</strong><strong>Server</strong>, 555-245-703 or <strong>Server</strong> and CSSSeparation—<strong>Avaya</strong> S8700 or <strong>S8710</strong> <strong>Media</strong> <strong>Server</strong> <strong>Job</strong><strong>Aid</strong>, 555-245-766.Install <strong>the</strong> replacement media server in <strong>the</strong> rack.5 Reconnect all <strong>the</strong> cables. See Quick Start for Hardware Installation: <strong>Avaya</strong> S8700or <strong>S8710</strong> <strong>Media</strong> <strong>Server</strong>, 555-245-703 or <strong>Job</strong> <strong>Aid</strong>: <strong>Server</strong>and CSS Separation—<strong>Avaya</strong> S8700 or <strong>S8710</strong> <strong>Media</strong><strong>Server</strong>, 555-245-766.6 If using <strong>the</strong> blank harddrive, insert <strong>the</strong> softwareCD-ROM in <strong>the</strong> CD-ROMdrive of <strong>the</strong> replacementmedia server,Note: Skip this step ifreusing <strong>the</strong> original harddrive.7 Power up <strong>the</strong> replacementmedia serverUse a paper clip to open <strong>the</strong> CD-ROM drawer. Place <strong>the</strong>Communication Manager CD in <strong>the</strong> drawer and close it.The software CD-ROM contains boot software that <strong>the</strong>media server automatically accesses when you power up<strong>the</strong> media server.Plug <strong>the</strong> power cord into <strong>the</strong> media server to power it up.If it does not power up, press <strong>the</strong> power button.Note: Wait at least 3 minutes for <strong>the</strong> media server tocomplete its power up.03-300146 Issue 2 January 2005 5