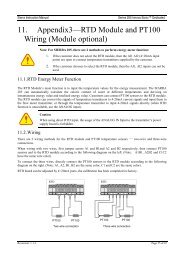
Sierra Series 830/840/860 Side-Trak™ and ... - Sierra Instruments
Sierra Series 830/840/860 Side-Trak™ and ... - Sierra Instruments
Sierra Series 830/840/860 Side-Trak™ and ... - Sierra Instruments

You also want an ePaper? Increase the reach of your titles
YUMPU automatically turns print PDFs into web optimized ePapers that Google loves.
Chapter 4 Maintenance<strong>Series</strong> <strong>830</strong>/<strong>840</strong>/<strong>860</strong> Instruction Manualslowly, 1/8 turn at a time <strong>and</strong> observe until the desired voltageis obtained.4. Now apply a 5% setpoint signal <strong>and</strong> confirm that the voltagedoes not drop below 11 volts on the 30-volt circuit or 6 voltson the 15-volt circuit. Go back <strong>and</strong> forth between these settings<strong>and</strong> make sure that the voltages stay within these boundaries.When this voltage “window” is obtained, the symptomsshould disappear <strong>and</strong> the lock nut can be re-tightened.5. Re-install the electronics cover by powering down the controller,removing the cable, putting the cover back on <strong>and</strong> replacingthe access door plugs. Reconnect the cable <strong>and</strong> apply thepower. A final check for leak-by with a zero set point <strong>and</strong>proper flow with various control signals should be conducted.Notes: Adjusting the valve voltage does not change thecalibration of the controller. If these adjustments do notobtain the desired operation, contact <strong>Sierra</strong> directly.4-14 IM-83/84/86-H