Installation Instructions - Clipsal
Installation Instructions - Clipsal
Installation Instructions - Clipsal

You also want an ePaper? Increase the reach of your titles
YUMPU automatically turns print PDFs into web optimized ePapers that Google loves.
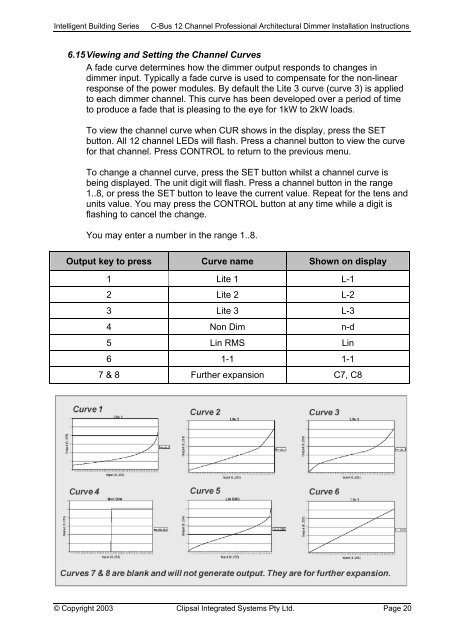
Intelligent Building SeriesC-Bus 12 Channel Professional Architectural Dimmer <strong>Installation</strong> <strong>Instructions</strong>6.15 Viewing and Setting the Channel CurvesA fade curve determines how the dimmer output responds to changes indimmer input. Typically a fade curve is used to compensate for the non-linearresponse of the power modules. By default the Lite 3 curve (curve 3) is appliedto each dimmer channel. This curve has been developed over a period of timeto produce a fade that is pleasing to the eye for 1kW to 2kW loads.To view the channel curve when CUR shows in the display, press the SETbutton. All 12 channel LEDs will flash. Press a channel button to view the curvefor that channel. Press CONTROL to return to the previous menu.To change a channel curve, press the SET button whilst a channel curve isbeing displayed. The unit digit will flash. Press a channel button in the range1..8, or press the SET button to leave the current value. Repeat for the tens andunits value. You may press the CONTROL button at any time while a digit isflashing to cancel the change.You may enter a number in the range 1..8.Output key to press Curve name Shown on display1 Lite 1 L-12 Lite 2 L-23 Lite 3 L-34 Non Dim n-d5 Lin RMS Lin6 1-1 1-17 & 8 Further expansion C7, C8© Copyright 2003 <strong>Clipsal</strong> Integrated Systems Pty Ltd. Page 20