Manual - AEQ International
Manual - AEQ International
Manual - AEQ International

You also want an ePaper? Increase the reach of your titles
YUMPU automatically turns print PDFs into web optimized ePapers that Google loves.
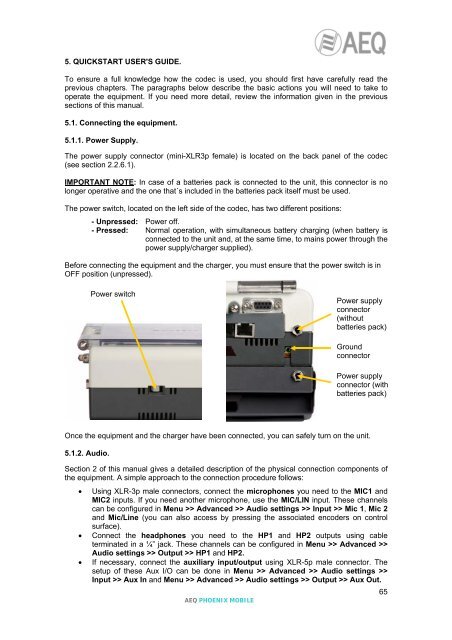
5. QUICKSTART USER'S GUIDE.To ensure a full knowledge how the codec is used, you should first have carefully read theprevious chapters. The paragraphs below describe the basic actions you will need to take tooperate the equipment. If you need more detail, review the information given in the previoussections of this manual.5.1. Connecting the equipment.5.1.1. Power Supply.The power supply connector (mini-XLR3p female) is located on the back panel of the codec(see section 2.2.6.1).IMPORTANT NOTE: In case of a batteries pack is connected to the unit, this connector is nolonger operative and the one that´s included in the batteries pack itself must be used.The power switch, located on the left side of the codec, has two different positions:- Unpressed: Power off.- Pressed: Normal operation, with simultaneous battery charging (when battery isconnected to the unit and, at the same time, to mains power through thepower supply/charger supplied).Before connecting the equipment and the charger, you must ensure that the power switch is inOFF position (unpressed).Power switchPower supplyconnector(withoutbatteries pack)GroundconnectorPower supplyconnector (withbatteries pack)Once the equipment and the charger have been connected, you can safely turn on the unit.5.1.2. Audio.Section 2 of this manual gives a detailed description of the physical connection components ofthe equipment. A simple approach to the connection procedure follows:• Using XLR-3p male connectors, connect the microphones you need to the MIC1 andMIC2 inputs. If you need another microphone, use the MIC/LIN input. These channelscan be configured in Menu >> Advanced >> Audio settings >> Input >> Mic 1, Mic 2and Mic/Line (you can also access by pressing the associated encoders on controlsurface).• Connect the headphones you need to the HP1 and HP2 outputs using cableterminated in a ¼” jack. These channels can be configured in Menu >> Advanced >>Audio settings >> Output >> HP1 and HP2.• If necessary, connect the auxiliary input/output using XLR-5p male connector. Thesetup of these Aux I/O can be done in Menu >> Advanced >> Audio settings >>Input >> Aux In and Menu >> Advanced >> Audio settings >> Output >> Aux Out.<strong>AEQ</strong> PHOENIX MOBILE65