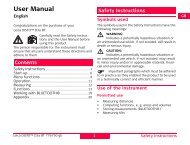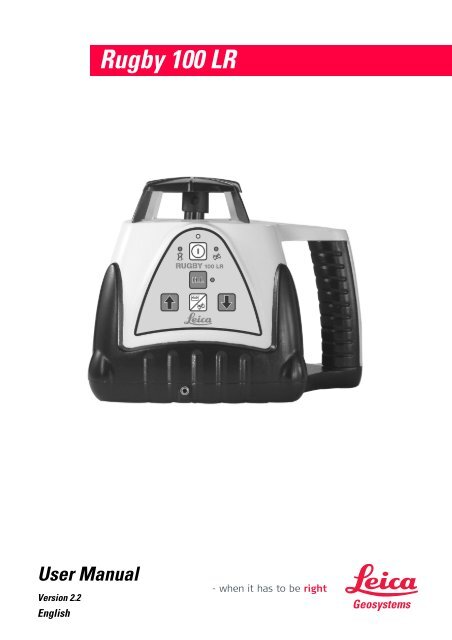
Rugby 100LR User Manual - Opti-cal Survey Equipment
Rugby 100LR User Manual - Opti-cal Survey Equipment
Rugby 100LR User Manual - Opti-cal Survey Equipment

You also want an ePaper? Increase the reach of your titles
YUMPU automatically turns print PDFs into web optimized ePapers that Google loves.
Generalized Boltzmann Physi<strong>cal</strong> Kinetics - Boris V. AlexeevUnstable Singularities And Randomness: Their Importance In The Complexity Of Physi<strong>cal</strong>,Biologi<strong>cal</strong> And Social Sciences - Joseph P. ZbilutBitopologi<strong>cal</strong> Spaces: Theory, Relations With Generalized Algebraic Structures And Applications:Theory, Relations With Generalized Algebraic Structure - Badri DvalishviliHuman Herpesvirus-6: General Virology, Epidemiology And Clini<strong>cal</strong> PathologyThe Langevin And Generalised Langevin Approach To The Dynamics Of Atomic, Polymeric AndColloidal Systems - Ian SnookFluid Mechanics Of Viscoelasticity: General Principles, Constitutive Modelling, Analyti<strong>cal</strong> AndNumeri<strong>cal</strong> Techniques - , N. Phan-ThienFundamentals Of Generalized Recursion Theory - M. FittingNew Generalized Functions And Multiplication Of Distributions - J.F. ColombeauModern General Topology - J.-I. NagataGeneralized Classi<strong>cal</strong> Mechanics And Field Theory: A Geometri<strong>cal</strong> Approach Of Lagrangian AndHamiltonian Formalisms Involving Higher Order Derivatives - , P.R. RodriguesTransform Analysis Of Generalized Functions - , J.L. LavoineNon-Linear Partial Differential Equations: An Algebraic View Of Generalized Solutions - E.E.RosingerGeneral Anesthesia - A Medi<strong>cal</strong> Dictionary, Bibliography, And Annotated Research Guide ToInternet References - ICON Health PublicationsThe 2007-2012 World Outlook For Printing And Binding Of General And Trade Books - Inc. ICONGroup InternationalThe 2007-2012 World Outlook For Hardbound Edition Binding Of General Consumer And TradeBooks Printed Elsewhere - Inc. ICON Group InternationalThe 2007-2012 World Outlook For Thermoset General Decorative Appliance Powder Coatings - Inc.ICON Group International
ButtonsOff/On Power ButtonTurns the unit on, off andchanges head speeds• Press the Off/On Power Buttononce to turn on the <strong>Rugby</strong> <strong>100LR</strong> at10 rps.• Press the Off/On Power Button asecond time to decrease the headspeed to 5 rps.• Press the Off/On Power Button athird time to turn the <strong>Rugby</strong> <strong>100LR</strong>off.When power is applied to the <strong>Rugby</strong><strong>100LR</strong>, it will always start up inautomatic mode, at 10 rps head speed.Units below Serial Number 150-27000 turn on at 5 rps.Automatic/<strong>Manual</strong> ButtonSwitches the unit betweenautomatic self-leveling mode,and manual mode with cross axis selfleveling.• Press the Auto/<strong>Manual</strong> Button onceto enter manual mode with crossaxis self-leveling. The <strong>Manual</strong>Mode Indicator will flash rapidly (5Hz) when in this mode.• Press the Auto/<strong>Manual</strong> Buttonagain to return to automatic mode.The <strong>Manual</strong> Mode Indicator will beoff when in automatic mode.Cross Axis Self-LevelingThe <strong>Rugby</strong> <strong>100LR</strong> has a uniquefeature that will continue to maintainthe level position of the cross axiswhen manual grade is put into themain axis.<strong>Rugby</strong><strong>100LR</strong>-2 <strong>Rugby</strong> top view2.epsMain Axis <strong>Manual</strong> Grade (1-2)Cross Axis Self-Leveling (3-4)Auto/<strong>Manual</strong> Function –<strong>Rugby</strong> <strong>100LR</strong> units with serial number150-5769 and below were producedwith a full manual mode inaddition tothe manual mode with cross axis selfleveling.On these units when the auto/manual switch is pressed a secondtime, neither axis will self-level, and thelevel warning LED will flash slowly (1Hz) to indicate full manual operation.<strong>Manual</strong> Grade Buttons (2)This set of two red buttonscontrols the tilt of the main axiswhen the <strong>Rugby</strong> <strong>100LR</strong> is inmanual mode.• In manual mode the arrow buttonsallow the operator to tilt the head tomatch an existing line or slope.• When facing the switch panel andthe up arrow is pressed, the planeof laser light will tilt upwards as itmoves away from the operator.<strong>Rugby</strong> 100 LR-2.2.1en6 Buttons
• Pressing the arrow buttons willmove the head in small increments.Pressing and holding the buttonmove the head more quickly.<strong>Rugby</strong><strong>100LR</strong>-3 main_axis.epsMain Axis <strong>Manual</strong> GradeH.I. ButtonAlso <strong>cal</strong>led Height ofInstrument or Elevation Alert,when activated will reduce the amountof self-leveling range to preventelevation errors as a result ofmovement of the tripod or othersudden movement.• The <strong>Rugby</strong> <strong>100LR</strong> will always startup with the H.I. Alert activated. The<strong>Rugby</strong> must reach a completelylevel position and remainundisturbed for 30 seconds beforethe Alert becomes active.• The LED at the side of the H.I.Button will turn on solid whenelevation alert is turned on. It willflash rapidly (5 Hz) when the laserhas moved and an alert conditionexists.• Press the H.I. or Automatic/<strong>Manual</strong>Button to stop the alert.• Check for the cause of the alert,adjust the height of the instrument,allow the unit to relevel.• Press the H.I. Button again to resetthe alert.H.I. Function option at powerup – To disable/enable the H.I. Alertfunction at power up, press and holdthe Up and Down arrows, then pressand release the Auto/<strong>Manual</strong> Button.All three LED’s will flash twice toindicate that the H.I. function has beenenabled or disabled. The laser must bein automatic to enable/disable the H.I.Alert function. When enabled, the H.I.function will turn on automati<strong>cal</strong>ly atpower up.Buttons7 <strong>Rugby</strong> 100 LR-2.2.1en
LED IndicatorsCalibration ModeIn Calibration Mode, theLow Battery and <strong>Manual</strong>Mode Indicators will blinkalternately.• In the first axis the Low Battery willblink at 5 Hz, the <strong>Manual</strong> Mode at 1Hz.<strong>Rugby</strong><strong>100LR</strong>-4 <strong>Rugby</strong>_membrane.eps1 Laser Emission Indicator(yellow)Off: The <strong>Rugby</strong> and the laserbeam are off.Flashing: Leveling in progress.On: The <strong>Rugby</strong> has leveled andthe laser beam is on.2 Low Battery Indicator (red)Off: Battery okSlow Flashing 1Hz: Low BatteryFast Flashing 5Hz: Low Battery,turns off soonOn: Turns off in 5 Minutes3 <strong>Manual</strong> Mode Indicator (red)Off: Automatic Self-LevelingFlashing: <strong>Manual</strong>, Cross AxisSelf-Leveling4 Elevation Alert (H.I.) Indicator(red)Off: The H.I. Alert function is off.On: The H.I. Alert function is on.Flashing: H.I. Alert. The <strong>Rugby</strong>has moved.• In the second axis the Low Batterywill blink at 1 Hz, the <strong>Manual</strong> Modeat 5 Hz.• When an arrow button is pressed tochange <strong>cal</strong>ibration, the EmissionIndicator LED will turn off for one halfsecond to indicate a button press.Out of Level IndicationWhen there is an Out ofLevel Failure, the <strong>Rugby</strong>has been set up outsideof its self-leveling rangeand cannot achievelevel. The LED’s willblink in sequence. Turn the unit off,level the top of the tripod and try again.Out of Temperature RangeIf the unit is set up andthe environment is out ofthe specified operatingtemperature range, allthree LED’s will turn onat the same time. The operatingtemperature range for the <strong>Rugby</strong> is -4°to +122 °F (-20 ° to 50 °C).<strong>Rugby</strong> 100 LR-2.2.1en8 LED Indicators
Basic operationAutomatic Operation• Set up the <strong>Rugby</strong> <strong>100LR</strong> on a 5/8”-11 Tripod or flat level surface.• Press the Off/On Power Buttononce to turn on the laser at 10 rps.• Press the Off/On Power Button asecond time to decrease to 5 rps.Units below Serial Number 150-27000 turn on at 5 rps.<strong>Manual</strong> Operation• Set up the <strong>Rugby</strong> <strong>100LR</strong> on a 5/8”-11 Tripod or flat level surface.• Press the Off/On Power Buttononce to turn on the laser at 10 rps ortwice at 5 rps.• Press the Automatic/<strong>Manual</strong> Buttononce to operate the <strong>Rugby</strong> inmanual mode with cross-axis selfleveling.• Align the plane of laser light to thejobsite requirements.• Work can begin.• Press the H.I. Button to activate H.I.Elevation Alert protection• The <strong>Rugby</strong> <strong>100LR</strong> will self-leveland then begin to rotate.• Work can begin.Basic operation9 <strong>Rugby</strong> 100 LR-2.2.1en
Using <strong>Manual</strong> Operation withGradeSetting up the <strong>Rugby</strong> with manualgrade can be accomplished by oneperson, but it is generally easier usingtwo people working together. The<strong>Rugby</strong> should be set up so that theoperator is looking at the switch paneland the area to be graded beyond thelaser.• Set up the <strong>Rugby</strong> at one end of thearea to be graded, put the <strong>Rugby</strong> inmanual mode, and take a readingusing your Rod-Eye receiverdirectly in front of the laser (morethan three feet/one meter from thelaser for best results).• Have a second person move to acontrol point at the other end of thejobsite and adjust the height<strong>Manual</strong>ly increase (decrease) thegrade of the <strong>Rugby</strong> until a beep isheard on the receiver• The second person should hold thegrade rod still and indicate to theoperator when the beam is too highor too low by observing the audiotones and arrow indications on theRod-Eye receiver.• Adjust the manual grade until thecenter bar and/or solid tone isheard from the receiver.<strong>Rugby</strong><strong>100LR</strong>-5 main_axis.epsMain Axis <strong>Manual</strong> Grade<strong>Rugby</strong><strong>100LR</strong>-6 setup for mgrade.epsSetting up the <strong>Rugby</strong> for <strong>Manual</strong>GradeNotes on using manual gradeWhen using manual grade with crossaxis self-leveling, the most accuratealignment will occur when the <strong>Rugby</strong> isrotated to highest point on the axis withgrade. H.I. Alert cannot be activated inmanual mode. The <strong>Manual</strong> ModeIndicator will flash rapidly at5 Hz.To return to AutomaticOperation, press the Automatic/<strong>Manual</strong> Button once or twice until the<strong>Manual</strong> Mode Indicator is turned off.To turn the <strong>Rugby</strong> off, press theOff/On Button once or until the LaserEmission Indicator is turned off.<strong>Rugby</strong> 100 LR-2.2.1en10 Basic operation
NiMH Battery PackGeneral InformationThe battery pack contains four highcapacity D-cell Nickel Metal HydrideBatteries. Fully charged the <strong>Rugby</strong> willrun more than 35 hours in optimalconditions.The charger/adapter is a universalcharger and will accept an inputvoltage from 100 to 240 VAC. Thecharger requires that the correct cablebe ordered for the country of use.<strong>Rugby</strong><strong>100LR</strong>-7 rugby_exploded.epsInstallationThe NiMH Battery Pack will fit into thebottom of the <strong>Rugby</strong> in only onedirection. The three silver tabs on thebattery should be aligned with the tabs(1) in the base of the laser. Lock thebattery pack in place using the largeplastic nut (2).ChargingThe charge jack (3) is located on thefront of the <strong>Rugby</strong>. Insert the plug intothe jack and the AC adapter into theappropriate wall outlet. The NiMHBattery Pack can also be chargedseparately from the laser.Low Battery IndicationThere is a low battery, warningindicator on the switch panel of the<strong>Rugby</strong> that will indicate when thebatteries require recharging. Shouldthe batteries become low, the charger/adapter will both run and charge thelaser at the same time.NiMH Battery Pack CareTo ensure optimal performance andlife of the NiMH Battery Pack, pleasenote the following guidelines:Exposure of batteries toextreme temperatures can causebattery degradation and early failure.Long-term storage of the battery packshould be in moderate temperatures -0°F to 95°F (-18°C to 35°C). If thebatteries are to be stored for anextended period of time, fully chargethem and then remove them from thelaser unit.If stored for more than 60 days, it isrecommended that the batteries berecharged to extend their useful life.Always charge the batteries in an areaof moderate temperatures.NiMH Battery Pack11 <strong>Rugby</strong> 100 LR-2.2.1en
TroubleshootingIf your <strong>Rugby</strong> laser will not take acharge, check the following:• Check the AC input and DC outputof the charger unit.• Check that the <strong>Rugby</strong> has arechargeable pack installed.• Check charger cables for wear ordamage.• Refer to your <strong>Rugby</strong> <strong>User</strong> <strong>Manual</strong>for proper operation.• Contact the nearest authorizedservice center.<strong>Rugby</strong> 100 LR-2.2.1en12 NiMH Battery Pack
Techni<strong>cal</strong> Data<strong>Rugby</strong> <strong>100LR</strong>Operating Range .....................................................2500’ (770 meter) DiameterSelf-Leveling Accuracy ......................... ± 1/16” at 100’ (± 1.5 mm at 30 meters)from 32° to 104°F (0° to 40°C)*Self-Leveling Range ..................................................................................... ± 5°<strong>Manual</strong> Grade..................................................................................... Up to 10%Height ........................................................................................... 7.8” (197 mm)Width............................................................................................. 9.8” (248 mm)Depth ............................................................................................ 6.9” (175 mm)Weight with Batteries ................................................................6.5 lbs. (2.95 kg)Rotation Speeds ....................................................................................5, 10 rpsLaser Diode ............................................................................... 780 nm invisibleLaser Classification.............................. Class I FDA21CFR/Class 1 IEC60825-1Operating Temperature ............................................ -4° to 122°F (-20° to 50°C)Storage Temperature.............................................. -40° to 158°F (-40° to 70°C)Battery Life.................................... 60 hours with alkaline/ 35 hours with NiMH**Batteries........................................................Four D-Cell Alkaline or NiMH PackWater Resistance ...................................................................... Watertight, IP56NiMH Battery PackInput voltage .......................................................................................... 7.5 VDCInput current............................................................................................1.0 ampNiMH Charger/AdapterInput voltage ..............................................................100 to 240 VAC, 50-60 HzOutput voltage ....................................................................................... 7.5 VDCOutput current....................................................................................... 1.0 ampsPolarity................................................................Shaft – negative, Tip – positive* Accuracy is de-rated outside of this temperature range.** Battery life is dependent upon environmental conditions.Specifications are subject to change without notice.Techni<strong>cal</strong> Data13 <strong>Rugby</strong> 100 LR-2.2.1en
WarrantyLeica Geosystems warrants the <strong>Rugby</strong><strong>100LR</strong> to be free if defects in materialsand workmanship under normal useand service for a period of 24 months,provided that the product has beenproperly used and cared for as statedin the <strong>User</strong> <strong>Manual</strong>. Any evidence ofan attempt to repair the <strong>Rugby</strong> by otherthan factory authorized personnelusing Leica Geosystems certifiedreplacement parts will automati<strong>cal</strong>lyvoid the warranty.Knockdown Warranty - In addition tothe standard Leica Geosystems 24month warranty, the internal selflevelingsystem of the <strong>Rugby</strong> <strong>100LR</strong> iscovered regardless of failure. Shouldany accident or knockdown occurwithin the warranty period, all repairsto the internal self-leveling assemblywill be covered under the knockdownwarranty policy.Leica Geosystems liability under thiswarranty is limited to repairing orreplacing any product returned to afactory authorized service facility forthat purpose. The foregoing states theentire liability of Leica Geosystems inconnection with the <strong>Rugby</strong> <strong>100LR</strong>, andthey shall not be held responsible forany consequential damage of anykind. The foregoing is in lieu of all otherwarranties expressed or implied.The user of the <strong>Rugby</strong> <strong>100LR</strong> isexpected to follow all operatinginstructions, periodi<strong>cal</strong>ly checking theinstrument and the work as itprogresses. Checking and ensuringthe <strong>cal</strong>ibration of the <strong>Rugby</strong> <strong>100LR</strong> isthe responsibility of the user.Calibration and maintenance is notcovered by the above warranty.<strong>Rugby</strong> 100 LR-2.2.1en14 Warranty
CalibrationThe <strong>Rugby</strong> is <strong>cal</strong>ibrated to thedefined accuracy specification at thefactory. It is recommended to checkyour laser for <strong>cal</strong>ibration upon receiptand periodi<strong>cal</strong>ly before using the laserto ensure <strong>cal</strong>ibration is maintained.Refer to the warranty card for furtherinformation. If your laser requires<strong>cal</strong>ibration, send it to your nearestauthorized service center, or <strong>cal</strong>ibratethe laser using the followingprocedure.Do not enter this mode orattempt <strong>cal</strong>ibration unless you plan tochange the <strong>cal</strong>ibration. Calibrationshould be performed only by aqualified individual that understandsbasic <strong>cal</strong>ibration principles.Checking Level Calibration:To check level <strong>cal</strong>ibration of your<strong>Rugby</strong> Laser, place the unit on a flat,level surface or tripod approximately100 ft (30 m) from a wall.Align Axis one of the <strong>Rugby</strong> so that it issquare with the wall. Allow the unit toself-level completely approximatelyone minute after the unit begins torotate), and then mark the position ofthe beam (position 1).Rotate the <strong>Rugby</strong> 180°, allow it to selfleveland mark the opposite side of thefirst axis (position 2).Align the second axis of the <strong>Rugby</strong> byrotating it 90° so that this axis is nowsquare with the wall. Allow the unit toself-level completely, and then markthe position of the beam (position 3).Rotate the <strong>Rugby</strong> 180°. allow it to selfleveland mark the opposite side of thesecond axis (position 4).Axis 1 (Position 1)Axis 1 (Position 2)<strong>Rugby</strong><strong>100LR</strong>-8 Axis 1_1.eps<strong>Rugby</strong><strong>100LR</strong>-9 Axis 1_2.epsThe <strong>Rugby</strong> is within its <strong>cal</strong>ibrationspecification if the four marks arewithin ±3/32” (2.6 mm) from center.Calibration15 <strong>Rugby</strong> 100 LR-2.2.1en
To Enter Calibration Mode:1 With the power off, press the PowerButton once to turn on power.2 Press and hold the Up and DownArrow Buttons. While holding thesebuttons, press and release thepower button. Then, release thearrow buttons.3 The <strong>Rugby</strong> is now in <strong>cal</strong>ibrationmode. The low battery indicator willblink at 5 Hz and the out of levelindicator will blink at 1 Hzalternately to confirm that the unit isin <strong>cal</strong>ibration mode for Axis One.<strong>Rugby</strong><strong>100LR</strong>-10 Cal Mode 5 to 1.tifDo not push the arrowbuttons unless you plan to change<strong>cal</strong>ibration! To exit this mode, pressthe power button once. The unit willpower off without making any changes.4 Align the unit so that you are facingthe control panel and looking overthe top of the unit to the <strong>cal</strong>ibrationmarks on the wall. This is Axis One(position 1).Axis One (1-2)Axis Two (3-4)3<strong>Rugby</strong><strong>100LR</strong>-11 <strong>Rugby</strong> top view1.eps5 Use the Up or Down Arrow Buttonsto raise or lower the beam to thedesired elevation for level<strong>cal</strong>ibration in position 1. When thearrow button is pressed, the toplaser emission indicator LED willturn off for one half second toindicate that a key has beenpressed.6 Rotate the laser 180° and check theopposite side of Axis One(position 2).7 Reposition the <strong>Rugby</strong> so that thehandle is now pointing at the<strong>cal</strong>ibration marks on the wall. Thisis Axis Two (position 3).8 Press the Auto/<strong>Manual</strong> Button toenter the <strong>cal</strong>ibration mode for thesecond axis. The low battery andout of level indicators will nowreverse their blink modes to confirmthe <strong>Rugby</strong> is now in <strong>cal</strong>ibrationmode for Axis Two.9 Use the Up or Down Arrow Buttonsto raise or lower the beam to thedesired elevation for level<strong>cal</strong>ibration in Axis Two (position 3).When the arrow button is pressed,the top, laser emission indicatorLED will turn off for one half secondto indicate that a key has beenpressed.10 Rotate the laser 180° and check theopposite side of Axis Two(position 4).11 Once the desired <strong>cal</strong>ibration hasbeen set for both axes, press thePower Button once to store theinformation and turn the power off.The <strong>Rugby</strong> will be set to the new<strong>cal</strong>ibration when power is reapplied.<strong>Rugby</strong> 100 LR-2.2.1en16 Calibration
TroubleshootingSymptomThe <strong>Rugby</strong> <strong>100LR</strong> doesnot turn on.The <strong>Rugby</strong> <strong>100LR</strong> doesnot turn off.The <strong>Rugby</strong> <strong>100LR</strong> isworking, but it does notself-level.The <strong>Rugby</strong> <strong>100LR</strong>continues to level inmanual mode.Possible Causes and SolutionsThe battery charge is low or dead.• If the <strong>Rugby</strong> <strong>100LR</strong> has alkaline batteries,remove the battery pack from the base of the<strong>Rugby</strong> and replace all four batteries with fresh D-cell alkaline batteries.• If the <strong>Rugby</strong> <strong>100LR</strong> has a rechargeable) NiMHbatterypack, plug the battery charger into the<strong>Rugby</strong>'s charge jack and then connect it to astandard electri<strong>cal</strong> outlet. Always plug the batterycharger into the <strong>Rugby</strong>'s charge jack first andthen plug it into the electri<strong>cal</strong> outlet, otherwise the<strong>Rugby</strong>'s charge jack might emit sparks.The Off/On Power Button is used also to changethe speed of the rotating head.• Press once to turn the <strong>Rugby</strong> on at 5 rps. Press asecond time to increase the speed of the rotatinghead to 10 rps. Press a third time to turn the unit off.The <strong>Rugby</strong> <strong>100LR</strong> must be in automatic mode toself-level.• In automatic the emission indicator will blink untilthe laser has completed self-leveling.• In manual mode with cross axis self-leveling the<strong>Manual</strong> Mode Indicator will flash at 5 Hz and onlythe cross axis will self-level.• In full manual mode leveling the <strong>Manual</strong> ModeIndicator will flash slowly at 1 Hz and the <strong>Rugby</strong>will not self-level.The <strong>Rugby</strong> <strong>100LR</strong> has two manual modes.• In manual mode with cross axis self-leveling the<strong>Manual</strong> Mode Indicator will flash at 5 Hz and thecross axis will self-level.Troubleshooting17 <strong>Rugby</strong> 100 LR-2.2.1en
SymptomThe <strong>Rugby</strong> <strong>100LR</strong> hasstopped working and theH.I. LED indicator isflashing.The <strong>Rugby</strong> <strong>100LR</strong> doesnot toggle correctlybetween automatic andmanual operation.The Laser Emission,Low Battery and <strong>Manual</strong>Mode Indicators areflashing sequentially.(Out of Level Indication)The Laser Emission,Low Battery and <strong>Manual</strong>Mode Indicators are allon. (Out of TemperatureRange)The Low BatteryWarning Indicator is on.The <strong>Rugby</strong>’s distance isreduced.The Rod-Eye receiver isnot functioning properly.(See also the Rod-Eye<strong>User</strong> <strong>Manual</strong>.)Possible Causes and SolutionsThe <strong>Rugby</strong> <strong>100LR</strong> is displaying an elevation alert.• The H.I. Indicator will turn on solid when the H.I.is activated and will flash when the laser hasmoved and an alert condition exists.• Press the H.I. or Auto/<strong>Manual</strong> Button to stop thealert. Check and adjust the elevation of the laser,then press the H.I. button to reactivate the H.I.Alert function.On <strong>Rugby</strong> <strong>100LR</strong> units below serial number 150-6135 there is an additional, full-manual mode.• Press the automatic/manual button once to entermanual mode with cross-axis self-leveling, pressthe button a second time to enter full manualmode, and press it a third time to exit and returnto automatic operation.The <strong>Rugby</strong> <strong>100LR</strong> has reached a servo limit or isoutside of its self-leveling range.• In automatic mode the <strong>Rugby</strong> <strong>100LR</strong> must be setup within ± 5° of its upright position to be withinthe self-leveling range.• Reposition the <strong>Rugby</strong>. If the LED’s continue toflash, turn off the <strong>Rugby</strong> and try again.The internal temperature has exceeded its operatingtemperature range of –4° to 122°F (-20° to50°C).• Move the laser out of direct sunlight or shield it.• Allow the <strong>Rugby</strong> to cool and it will automati<strong>cal</strong>lybegin operation.The battery charge is low or dead.• See symptom #1 above.• See explanation of LED indicator functions.Dirt is reducing the output of the laser.• Clean the windows on the <strong>Rugby</strong> and the Rod-Eye receiver to improve performance.Check for proper operation.• The <strong>Rugby</strong> is not rotating. It is leveling or inelevation alert.• The power or audio feature is not active on theRod-Eye.• The Rod-Eye is out of usable range.• The Rod-Eye’s batteries are dead or low.<strong>Rugby</strong> 100 LR-2.2.1en18 Troubleshooting
Care and TransportTransportWhen dispatching theinstrument, always use the completeoriginal Leica Geosystems packaging(case and cardboard box).When transporting the instrument inthe field, always make sure that you:• Either carry the instrument in itsoriginal transport case• Or carry the tripod with its legssplayed across your shoulder,keeping the attached instrumentupright.Never carry the instrument loose in aroad vehicle. It can be affected byshock and vibration. Always carry it inits case and secure it.When transporting the instrument byrail, air or ship, always use thecomplete original packaging (case andcardboard box), or its equivalent, toprotect it against shock and vibration.After transport, or after longperiods of storage, inspect the fieldadjustment parameters given in thisuser manual before using theinstrument.StorageTemperature Limits (-40° to70°C / -40° to 158°F) Respect thetemperature limits when storing theinstrument, particularly in summer ifthe instrument is inside the vehicle.Damp instruments must beunpacked. Dry the instrument, thecase and the accessories at not morethan 40°C / 108°F and clean them. Donot repack until everything iscompletely dry.Cleaning and DryingWindowsWindows• Never touch the glass with yourfingers.• Use only a clean, soft, lint-free clothfor cleaning. If necessary, moistenthe cloth with pure alcohol. Use noother liquids; these may attack thepolymer components.Care and Transport19 <strong>Rugby</strong> 100 LR-2.2.1en
Safety DirectionsThe following directions should enablethe person responsible for the laserunit, and the person who actually usesthe instrument, to anticipate and avoidoperational hazards. The personresponsible for the instrument mustensure that all users understand thesedirections and adhere to them.Intended Use of InstrumentsPermitted usesThe <strong>Rugby</strong> <strong>100LR</strong> is designed andsuitable for the following applications,within the limits of is intendedconditions of use:• The instrument casts a horizontallaser plane or a laser beam for thepurposes of alignment.• The unit can be set up on its ownbaseplate or on a tripod.• The laser beam can be detected bythe object being surveyed or bymeans of a laser detector.• The laser unit, combined withmachine control receivers, is alsosuitable for guiding constructionmachinery.• The unit can be powered byrechargeable NiMH (optional) orAlkaline batteries.Adverse uses• Use of the product withoutinstruction.• Use outside of the intended limits.• Disabling safety systems andremoval of hazard notices.• Opening the instrument using tools(screwdriver, etc.).• Modification or conversion of theinstrument.• Use after misappropriation.• Use with accessories from othermanufacturers without the priorexpress approval of LeicaGeosystems.• Inadequate safeguards at themeasuring station (e.g. whenmeasuring on roads).• Deliberate dazzling of third parties. WARNING:Adverse use can lead to injury,malfunction, and material damage. It isthe task of the person responsible forthe instrument to inform the user abouthazards and how to counteract them.The laser unit is not to be used until theuser has been instructed how to workwith it.Limits of UseEnvironment:Suitable for use in an atmosphereappropriate for permanent humanhabitation. Cannot be used in anaggressive or explosive environment.See chapter "Techni<strong>cal</strong> Data".<strong>Rugby</strong> 100 LR-2.2.1en20 Safety Directions
ResponsibilitiesResponsibility for the manufacturerof the original equipment LeicaGeosystems AG, Heerbrugg(hereinafter referred to as LeicaGeosystems):Leica Geosystems is responsible forsupplying the product, including theuser manual and original accessories,in a completely-safe condition.Responsibilities of the manufacturersof non-Leica Geosystemsaccessories:The manufacturers of non-LeicaGeosystems accessories for the laserunit are responsible for developing,implementing and communicatingsafety concepts for their products, andare also responsible for theeffectiveness of those safety conceptsin combination with the LeicaGeosystems product.Responsibilities of the person incharge of the instrument: WARNING:The person responsible for theinstrument must ensure that it is usedin accordance with the instructions.This person is also accountable for thetraining and the deployment ofpersonnel who use the instrument andfor the safety of the equipment in use.The person in charge of the instrumenthas the following duties:• To understand the safetyinstructions on the product and theinstructions in the user manual;• To be familiar with lo<strong>cal</strong> regulationsrelating to accident prevention;• To inform Leica Geosystemsimmediately if the equipmentbecomes unsafe.Hazards of UseMain hazards of use WARNING:The absence of instruction, orthe inadequate imparting ofinstruction, can lead to incorrect oradverse use, and can give rise toaccidents with far-reaching human,material, financial, and environmentalconsequences.Precautions: All users must follow thesafety directions given by themanufacturer and the directions of theperson responsible for the instrument. WARNING:The charger is not designed foruse under wet conditions. If the unitbecomes wet it may cause you toreceive an electri<strong>cal</strong> shock.Precautions: Use charger onlyindoors, in dry rooms and protect itfrom damp. If the charger is damp, donot use it. WARNING:The charger contains potentiallyhaxardous voltages. Opening thecharger may cause you to receive anelectri<strong>cal</strong> shock.Precautions: Do not open thecharger.Safety Directions21 <strong>Rugby</strong> 100 LR-2.2.1en
CAUTION:Watch out for erroneousmeasurements if the product isdefective or if it has been dropped orhas been misused or modified.Precautions: Periodi<strong>cal</strong>ly carry outtest measurements and perform thefield adjustments indicated in the usermanual, particularly after theinstrument has been subjected toabnormal use and before and afterimportant measurements. WARNING:By working during athunderstorm you are at risk fromlightning.Precautions: Do not carry out fieldwork during thunderstorms. DANGER:Because of the risk ofelectrocution, it is very dangerous touse staffs and telescopic s<strong>cal</strong>es in thevicinity of electri<strong>cal</strong> installations suchas power cables or electri<strong>cal</strong> railways.Precautions: Keep at a safe distancefrom electri<strong>cal</strong> installations. If it isessential to work in this environment,first contact the safety authoritiesresponsible for the electri<strong>cal</strong>installations and follow theirinstructions. WARNING:Inadequate securing of theworking site can lead to dangeroussituations, for example in traffic, onbuilding sites, and at industrialinstallations.Precautions: Always ensure that theworking site is adequately secured.Adhere to the regulations governingaccident prevention and road traffic. CAUTION:During the transport or disposalof charged batteries it is possible forinappropriate mechani<strong>cal</strong> influences toconstitute a fire hazard.Precautions: Remove the batteriesfrom their compartment before theyare transported. Disposal of batteriesonly if they are fully flat. CAUTION:If the accessories used with theinstrument are not properly securedand the equipment is subjected tomechani<strong>cal</strong> shock (e.g. blows, falling),the equipment may be damaged orpeople may sustain injury.Precautions: When setting-up theinstrument, make sure that theaccessories (e.g. tripod, tribrach) arecorrectly adapted, fitted, secured, andlocked in position. Avoid subjectingthe equipment to mechani<strong>cal</strong> shock.Never position the instrument on thetripod baseplate without securelytightening the central fixing screw. Ifthe screw is loosened, always removethe instrument immediately from thetripod.<strong>Rugby</strong> 100 LR-2.2.1en22 Safety Directions
WARNING:If the product is improperlydisposed of, the following can happen:• If polymer parts are burnt,poisonous gases are producedwhich may impair health.• If batteries are damaged or areheated strongly, they can explodeand cause poisoning, burning,corrosion or environmentalcontamination.• By disposing of the productirresponsibly you may enableunauthorized persons to use it incontravention of the regulations,exposing them-selves and thirdparties to the risk of severe injuryand rendering the en-vironmentliable to contamination.• Improper disposal of silicone oilmay cause environmentalcontamination.Precautions:The product must not bedisposed with householdwaste.Dispose of the product appropriately inaccordance with the national regulationsin force in your country.Always prevent access to the productby unauthorized personnel.Product specific treatment and wastemanagement information can bedownloaded from the LeicaGeosystems home page at http://www.leica-geosystems.com/treatmentor received from your LeicaGeosystems dealer.WARNING:Use only the approved chargerdesigned for this battery pack. Seemanufacturer’s reference below.Precautions: Reference GlobTek PartNr: TR9KC1000PTP-N, Model: GT-4121DA-09-1.5Safety Directions23 <strong>Rugby</strong> 100 LR-2.2.1en
Laser classification CAUTION:Only Leica Geosystemsauthorized workshops are entitled torepair these products.The rotating laser <strong>Rugby</strong> <strong>100LR</strong>produces an invisible laser beam thatemerges from the rotating head.The product is a Class 1 laser productin accordance with:• IEC 60825-1:1993 + A1:1997 +A2:2001 "Radiation safety of laserproducts"• EN 60825-1:1994 + A11:1996 +A2:2001 "Radiation safety of laserproducts"The product is a Class I laser productin accordance with:• FDA 21CFR Ch.I §1040: 2002 (USDepartment of Health and HumanService, Code of FederalRegulations)Class 1/I laser products are safe underreasonable foreseeable conditions ofoperation and are not harmful to theeyes provided that the products areused and maintained in accordancewith the instructions.Beam divergence:................ 0.2 mradMaximum radiantpower:............. 2.6 mW rotating modeMeasurement uncertainty: .......... ±5%Pulse duration..............Not applicableMax. radiant powerper pulse......................Not applicableLabelingLaserBeamClass 1 Laser Productaccording toIEC 60825-1:1993 +A1:1997 + A2:2001<strong>Rugby</strong> 100 LR-2.2.1en24 Safety Directions
ElectromagneticCompatibility (EMC)The term "electromagneticcompatibility" is taken to mean thecapability of the laser unit to functionsmoothly in an environment whereelectromagnetic radiation andelectrostatic discharges are present,and without causing electromagneticdisturbances to other equipment. WARNING:Electromagnetic radiation cancause disturbances in otherequipment.Although the laser units meet the strictregulations and standards which are inforce in this respect, LeicaGeosystems cannot completelyexclude the possibility that otherequipment may be disturbed. CAUTION:There is a risk that disturbancesmay be caused in other equipment ifthe laser unit is used in conjunctionwith accessories from othermanufacturers, e.g. walkie-talkies,mobile phones.Precautions: Use only the equipmentand accessories recommended byLeica Geosystems. When combinedwith the laser unit, they meet the strictrequirements stipulated by theguidelines and standards. CAUTION:Disturbances caused byelectromagnetic radiation can result inthe tolerance limits for measurementsbeing exceeded.Although the laser meets the strictregulations and standards which are inforce in this connection, LeicaGeosystems cannot completelyexclude the possibility that the laserunit may be disturbed by very intenseelectromagnetic radiation, e.g. nearradio transmitters, walkie-talkies,diesel generators, power cables.Check the plausibility of resultsobtained under these conditions.FCC Statement (applicable inthe U.S.) WARNING:This equipment has been testedand found to comply with the limits fora Class B digital device, pursuant topart 15 of the FCC rules.These limits are designed to providereasonable protection against harmfulinterference in a residentialinstallation.This equipment generates, uses andcan radiate frequency energy and, ifnot installed and used in accordancewith the instructions, may causeharmful interference to radiocommunications. However, there is noguarantee that interference will notoccur in a particular installation. If thisequipment does cause harmfulinterference to radio or televisionreception, which can be determined byturning the equipment off and on, theuser is encouraged to try to correct theinterference by one or more of thefollowing measures:• Increase the separation betweenthe equipment and the receiver.Safety Directions25 <strong>Rugby</strong> 100 LR-2.2.1en
• Consult the dealer or anexperienced radio/TV technician forhelp.• Reorient or relocate the receivingantenna.• Connect the equipment into anoutlet on a circuit different from thatto which the receiver is connected. WARNING:Changes or modifications notexpressly approved by LeicaGeosystems could void the user'sauthority to operate the equipment.This device complies with Part 15 ofthe FCC Rules. Operation is subject tothe following conditions: (1) Thisdevice may not cause harmfulinterference, and (2) this device mustaccept any interference received,including interference that maycause undesired operation.<strong>Rugby</strong> 100 LR-2.2.1en26 Safety Directions
Safety Directions27 <strong>Rugby</strong> 100 LR-2.2.1en
Leica Geosystems AG,Heerbrugg, Switzerland,has been certified as beingequipped with a qualitysystem which meets theInternational Standards ofQuality Management andQuality Systems (ISO standard9001) and EnvironmentalManagementSystems(ISO standard 14001).Total Quality Management -Our commitment to totalcustomer satisfaction.Ask your lo<strong>cal</strong> LeicaGeosystems agent for moreinformation about our TQMprogram.732641-2.2.1enPrinted in SwitzerlandCopyright Leica Geosystems AGHeerbrugg, Switzerland 2006(Original Text)Leica Geosystems AGCH-9435 Heerbrugg(Switzerland)Phone +41 71 727 31 31Fax +41 71 727 46 73www.leica-geosystems.com