October Magazine
Horror time ... if you love horror games, comics and cosplay, you'll love this months issue of Live Magazine!
Horror time ... if you love horror games, comics and cosplay, you'll love this months issue of Live Magazine!

You also want an ePaper? Increase the reach of your titles
YUMPU automatically turns print PDFs into web optimized ePapers that Google loves.
Reader tips<br />
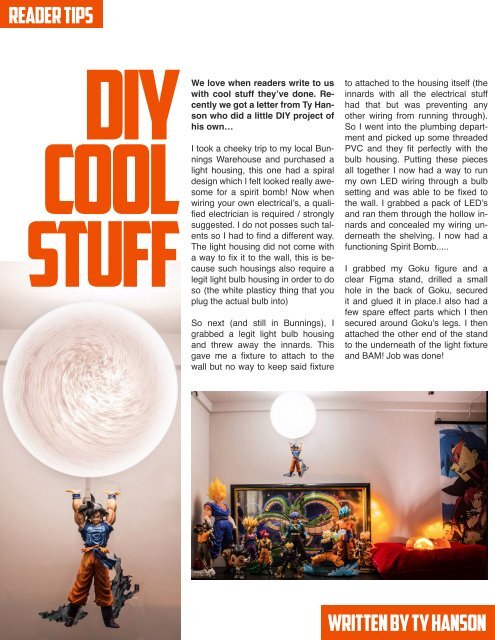
DIY<br />
COOL<br />
STUFF<br />
We love when readers write to us<br />
with cool stuff they’ve done. Recently<br />
we got a letter from Ty Hanson<br />
who did a little DIY project of<br />
his own…<br />
I took a cheeky trip to my local Bunnings<br />
Warehouse and purchased a<br />
light housing, this one had a spiral<br />
design which I felt looked really awesome<br />
for a spirit bomb! Now when<br />
wiring your own electrical’s, a qualified<br />
electrician is required / strongly<br />
suggested. I do not posses such talents<br />
so I had to find a different way.<br />
The light housing did not come with<br />
a way to fix it to the wall, this is because<br />
such housings also require a<br />
legit light bulb housing in order to do<br />
so (the white plasticy thing that you<br />
plug the actual bulb into)<br />
So next (and still in Bunnings), I<br />
grabbed a legit light bulb housing<br />
and threw away the innards. This<br />
gave me a fixture to attach to the<br />
wall but no way to keep said fixture<br />
to attached to the housing itself (the<br />
innards with all the electrical stuff<br />
had that but was preventing any<br />
other wiring from running through).<br />
So I went into the plumbing department<br />
and picked up some threaded<br />
PVC and they fit perfectly with the<br />
bulb housing. Putting these pieces<br />
all together I now had a way to run<br />
my own LED wiring through a bulb<br />
setting and was able to be fixed to<br />
the wall. I grabbed a pack of LED’s<br />
and ran them through the hollow innards<br />
and concealed my wiring underneath<br />
the shelving. I now had a<br />
functioning Spirit Bomb.....<br />
I grabbed my Goku figure and a<br />
clear Figma stand, drilled a small<br />
hole in the back of Goku, secured<br />
it and glued it in place.I also had a<br />
few spare effect parts which I then<br />
secured around Goku’s legs. I then<br />
attached the other end of the stand<br />
to the underneath of the light fixture<br />
and BAM! Job was done!<br />
WRITTEN BY ty hanson