Operating Manual LUXOR S 400
Operating Manual LUXOR S 400
Operating Manual LUXOR S 400

You also want an ePaper? Increase the reach of your titles
YUMPU automatically turns print PDFs into web optimized ePapers that Google loves.
<strong>LUXOR</strong> S <strong>400</strong><br />
Maintenance and repair 9<br />
Repair work<br />
� Remove the wide clips [7] and slide the silicone collars towards the T piece (regeneration air) [8].<br />
� Unscrew the eight screws on every switching valve [6] and remove the top switching valves.<br />
CAUTION!<br />
� Move the piston rod to center position.<br />
MATERIAL DAMAGE!<br />
Parts which fall into the drying agent cartridge can cause operational faults.<br />
� Make sure that no parts fall into the drying agent cartridge.<br />
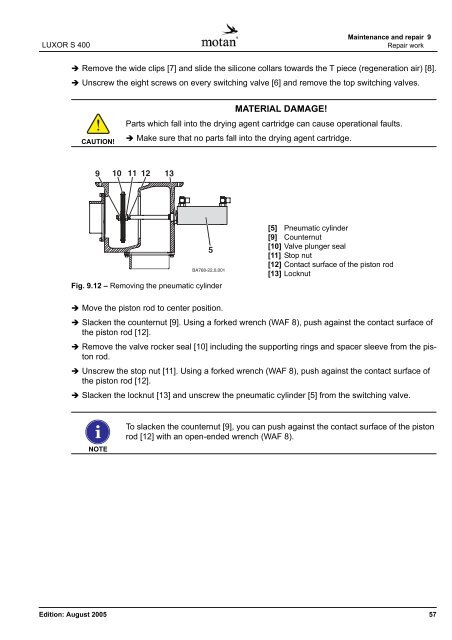
Fig. 9.12 – Removing the pneumatic cylinder<br />
[5] Pneumatic cylinder<br />
[9] Counternut<br />
[10] Valve plunger seal<br />
[11] Stop nut<br />
[12] Contact surface of the piston rod<br />
[13] Locknut<br />
� Slacken the counternut [9]. Using a forked wrench (WAF 8), push against the contact surface of<br />
the piston rod [12].<br />
� Remove the valve rocker seal [10] including the supporting rings and spacer sleeve from the piston<br />
rod.<br />
� Unscrew the stop nut [11]. Using a forked wrench (WAF 8), push against the contact surface of<br />
the piston rod [12].<br />
� Slacken the locknut [13] and unscrew the pneumatic cylinder [5] from the switching valve.<br />
NOTE<br />
To slacken the counternut [9], you can push against the contact surface of the piston<br />
rod [12] with an open-ended wrench (WAF 8).<br />
Edition: August 2005 57