Mittwoch, 18. Mai, 2016

You also want an ePaper? Increase the reach of your titles
YUMPU automatically turns print PDFs into web optimized ePapers that Google loves.
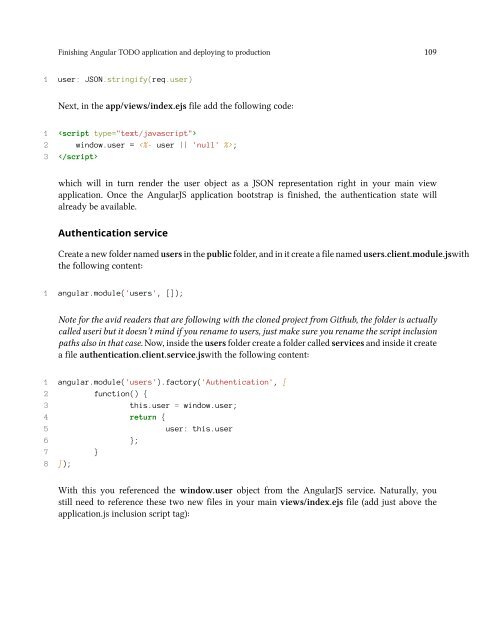
Finishing Angular TODO application and deploying to production 109<br />
1 user: JSON.stringify(req.user)<br />
Next, in the app/views/index.ejs file add the following code:<br />
1 <br />
2 window.user = ;<br />
3 <br />
which will in turn render the user object as a JSON representation right in your main view<br />
application. Once the AngularJS application bootstrap is finished, the authentication state will<br />
already be available.<br />
Authentication service<br />
Create a new folder named users in the public folder, and in it create a file named users.client.module.jswith<br />
the following content:<br />
1 angular.module('users', []);<br />
Note for the avid readers that are following with the cloned project from Github, the folder is actually<br />
called useri but it doesn’t mind if you rename to users, just make sure you rename the script inclusion<br />
paths also in that case. Now, inside the users folder create a folder called services and inside it create<br />
a file authentication.client.service.jswith the following content:<br />
1 angular.module('users').factory('Authentication', [<br />
2 function() {<br />
3 this.user = window.user;<br />
4 return {<br />
5 user: this.user<br />
6 };<br />
7 }<br />
8 ]);<br />
With this you referenced the window.user object from the AngularJS service. Naturally, you<br />
still need to reference these two new files in your main views/index.ejs file (add just above the<br />
application.js inclusion script tag):