

Web_Designer_UK__May_2018

You also want an ePaper? Increase the reach of your titles
YUMPU automatically turns print PDFs into web optimized ePapers that Google loves.
GET PRO DESIGN SKILLS<br />
DESIGNING LAYOUTS The Design phase of a project typically<br />
includes a number of processes<br />
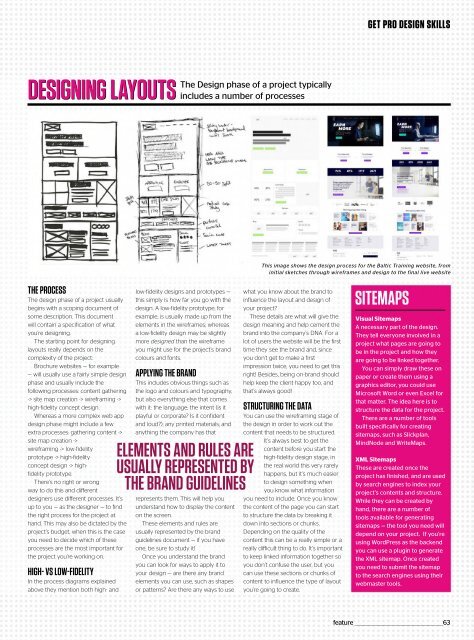
This image shows the design process for the Baltic Training website, from<br />
initial sketches through wireframes and design to the final live website<br />
THE PROCESS<br />
The design phase of a project usually<br />
begins with a scoping document of<br />
some description. This document<br />
will contain a specification of what<br />
you’re designing.<br />
The starting point for designing<br />
layouts really depends on the<br />
complexity of the project:<br />
Brochure websites — for example<br />
— will usually use a fairly simple design<br />
phase and usually include the<br />
following processes: content gathering<br />
-> site map creation -> wireframing -><br />
high-fidelity concept design.<br />
Whereas a more complex web app<br />
design phase might include a few<br />
extra processes: gathering content -><br />
site map creation -><br />
wireframing -> low-fidelity<br />
prototype -> high-fidelity<br />
concept design -> highfidelity<br />
prototype.<br />
There’s no right or wrong<br />
way to do this and different<br />
designers use different processes. It’s<br />
up to you — as the designer — to find<br />
the right process for the project at<br />
hand. This may also be dictated by the<br />
project’s budget, when this is the case<br />
you need to decide which of these<br />
processes are the most important for<br />
the project you’re working on.<br />
HIGH- VS LOW-FIDELITY<br />
In the process diagrams explained<br />
above they mention both high- and<br />
low-fidelity designs and prototypes —<br />
this simply is how far you go with the<br />
design. A low-fidelity prototype, for<br />
example, is usually made up from the<br />
elements in the wireframes; whereas<br />
a low-fidelity design may be slightly<br />
more designed than the wireframe<br />
you might use for the project’s brand<br />
colours and fonts.<br />
APPLYING THE BRAND<br />
This includes obvious things such as<br />
the logo and colours and typography,<br />
but also everything else that comes<br />
with it: the language; the intent (is it<br />
playfulorcorporate?Isitconfident<br />
and loud?); any printed materials; and<br />
anything the company has that<br />
ELEMENTS AND RULES ARE<br />
USUALLY REPRESENTED BY<br />
THE BRAND GUIDELINES<br />
represents them. This will help you<br />
understand how to display the content<br />
on the screen.<br />
These elements and rules are<br />
usually represented by the brand<br />
guidelines document — if you have<br />
one, be sure to study it!<br />
Once you understand the brand<br />
you can look for ways to apply it to<br />
your design — are there any brand<br />
elements you can use, such as shapes<br />
or patterns? Are there any ways to use<br />
what you know about the brand to<br />
influence the layout and design of<br />
your project?<br />
These details are what will give the<br />
design meaning and help cement the<br />
brand into the company’s DNA. For a<br />
lot of users the website will be the first<br />
time they see the brand and, since<br />
youdon’tgettomakeafirst<br />
impression twice, you need to get this<br />
right! Besides, being on-brand should<br />
help keep the client happy too, and<br />
that’s always good!<br />
STRUCTURING THE DATA<br />
You can use the wireframing stage of<br />
the design in order to work out the<br />
content that needs to be structured.<br />
It’s always best to get the<br />
content before you start the<br />
high-fidelity design stage, in<br />
the real world this very rarely<br />
happens, but it’s much easier<br />
to design something when<br />
you know what information<br />
you need to include. Once you know<br />
the content of the page you can start<br />
to structure the data by breaking it<br />
down into sections or chunks.<br />
Depending on the quality of the<br />
content this can be a really simple or a<br />
really difficult thing to do. It’s important<br />
to keep linked information together so<br />
you don’t confuse the user, but you<br />
can use these sections or chunks of<br />
content to influence the type of layout<br />
you’re going to create.<br />
SITEMAPS<br />
Visual Sitemaps<br />
Anecessarypartofthedesign.<br />
They tell everyone involved in a<br />
projectwhatpagesaregoingto<br />
be in the project and how they<br />
are going to be linked together.<br />
You can simply draw these on<br />
paperorcreatethemusinga<br />
graphics editor, you could use<br />
MicrosoftWordorevenExcelfor<br />
that matter. The idea here is to<br />
structurethedatafortheproject.<br />
There are a number of tools<br />
builtspecificallyforcreating<br />
sitemaps, such as Slickplan,<br />
MindNode and WriteMaps.<br />
XML Sitemaps<br />
Thesearecreatedoncethe<br />
projecthasfinished,andareused<br />
by search engines to index your<br />
project’s contents and structure.<br />
Whiletheycanbecreatedby<br />
hand, there are a number of<br />
tools available for generating<br />
sitemaps — the tool you need will<br />
depend on your project. If you’re<br />
using WordPress as the backend<br />
you can use a plugin to generate<br />
the XML sitemap. Once created<br />
you need to submit the sitemap<br />
to the search engines using their<br />
webmaster tools.<br />
feature _________________________________________________63