

QUILTsocial Issue 14
While exploring and playing with the Brother Luminaire XP1 and the Husqvarna Viking Designer EPIC sewing machines, we're after what is original in quilting ideas. In this issue we show you how to piece fabric using decorative stitches instead of the typical quarter inch seam. We use traditional quilt blocks to make a modern quilt, show you how to use the flip and stitch technique of quilt making, the golden 5 steps to add a flange to a binding to give the quilt edge some pop of color. Many free patterns and inspiring new quilting ideas!sew
While exploring and playing with the Brother Luminaire XP1 and the Husqvarna Viking Designer EPIC sewing machines, we're after what is original in quilting ideas. In this issue we show you how to piece fabric using decorative stitches instead of the typical quarter inch seam. We use traditional quilt blocks to make a modern quilt, show you how to use the flip and stitch technique of quilt making, the golden 5 steps to add a flange to a binding to give the quilt edge some pop of color. Many free patterns and inspiring new quilting ideas!sew

Create successful ePaper yourself
Turn your PDF publications into a flip-book with our unique Google optimized e-Paper software.
Step 2 - Join the strips<br />
Now that all the strips are cut, it’s time to<br />
join them together. You need to join all<br />
the flange strips together to create one<br />
long strip. I like to use a diagonal seam<br />
as that reduces bulk in the binding.<br />
I don’t bother to cut off the selvages<br />
before I join the strips, and you can see<br />
that I’ve overlapped the ends. I have two<br />
reasons for that overlap. When I trim the<br />
seam, the selvages will be trimmed off,<br />
but more importantly, those overlaps<br />
allow me to more easily see where to<br />
stop and start my diagonal seam.<br />
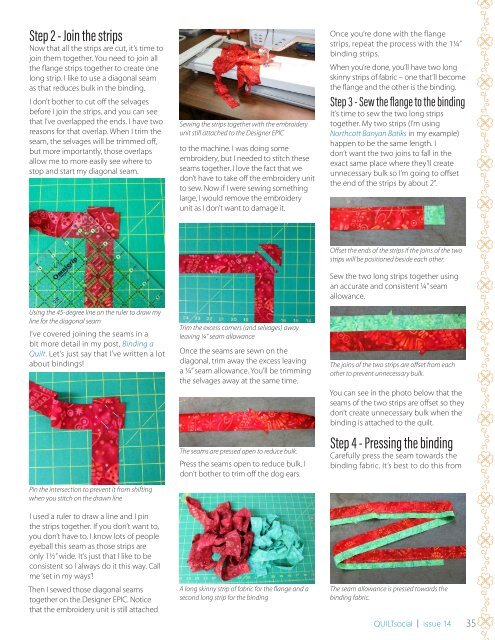
Sewing the strips together with the embroidery<br />
unit still attached to the Designer EPIC<br />
to the machine. I was doing some<br />
embroidery, but I needed to stitch these<br />
seams together. I love the fact that we<br />
don’t have to take off the embroidery unit<br />
to sew. Now if I were sewing something<br />
large, I would remove the embroidery<br />
unit as I don’t want to damage it.<br />
Once you’re done with the flange<br />
strips, repeat the process with the 1¼”<br />
binding strips.<br />
When you’re done, you’ll have two long<br />
skinny strips of fabric – one that’ll become<br />
the flange and the other is the binding.<br />
Step 3 - Sew the flange to the binding<br />
It’s time to sew the two long strips<br />
together. My two strips (I’m using<br />
Northcott Banyan Batiks in my example)<br />
happen to be the same length. I<br />
don’t want the two joins to fall in the<br />
exact same place where they’ll create<br />
unnecessary bulk so I’m going to offset<br />
the end of the strips by about 2”.<br />
Using the 45-degree line on the ruler to draw my<br />
line for the diagonal seam<br />
I’ve covered joining the seams in a<br />
bit more detail in my post, Binding a<br />
Quilt. Let’s just say that I’ve written a lot<br />
about bindings!<br />
Pin the intersection to prevent it from shifting<br />
when you stitch on the drawn line<br />
Trim the excess corners (and selvages) away<br />
leaving ¼” seam allowance<br />
Once the seams are sewn on the<br />
diagonal, trim away the excess leaving<br />
a ¼” seam allowance. You’ll be trimming<br />
the selvages away at the same time.<br />
The seams are pressed open to reduce bulk.<br />
Press the seams open to reduce bulk. I<br />
don’t bother to trim off the dog ears.<br />
Offset the ends of the strips if the joins of the two<br />
strips will be positioned beside each other.<br />
Sew the two long strips together using<br />
an accurate and consistent ¼” seam<br />
allowance.<br />
The joins of the two strips are offset from each<br />
other to prevent unnecessary bulk.<br />
You can see in the photo below that the<br />
seams of the two strips are offset so they<br />
don’t create unnecessary bulk when the<br />
binding is attached to the quilt.<br />
Step 4 - Pressing the binding<br />
Carefully press the seam towards the<br />
binding fabric. It’s best to do this from<br />
I used a ruler to draw a line and I pin<br />
the strips together. If you don’t want to,<br />
you don’t have to. I know lots of people<br />
eyeball this seam as those strips are<br />
only 1½” wide. It’s just that I like to be<br />
consistent so I always do it this way. Call<br />
me ‘set in my ways’!<br />
Then I sewed those diagonal seams<br />
together on the Designer EPIC. Notice<br />
that the embroidery unit is still attached<br />
A long skinny strip of fabric for the flange and a<br />
second long strip for the binding<br />
The seam allowance is pressed towards the<br />
binding fabric.<br />
<strong>QUILTsocial</strong> | issue <strong>14</strong><br />
35


