

QUILTsocial Issue 14
While exploring and playing with the Brother Luminaire XP1 and the Husqvarna Viking Designer EPIC sewing machines, we're after what is original in quilting ideas. In this issue we show you how to piece fabric using decorative stitches instead of the typical quarter inch seam. We use traditional quilt blocks to make a modern quilt, show you how to use the flip and stitch technique of quilt making, the golden 5 steps to add a flange to a binding to give the quilt edge some pop of color. Many free patterns and inspiring new quilting ideas!sew
While exploring and playing with the Brother Luminaire XP1 and the Husqvarna Viking Designer EPIC sewing machines, we're after what is original in quilting ideas. In this issue we show you how to piece fabric using decorative stitches instead of the typical quarter inch seam. We use traditional quilt blocks to make a modern quilt, show you how to use the flip and stitch technique of quilt making, the golden 5 steps to add a flange to a binding to give the quilt edge some pop of color. Many free patterns and inspiring new quilting ideas!sew

Create successful ePaper yourself
Turn your PDF publications into a flip-book with our unique Google optimized e-Paper software.
It doesn’t get any easier than that.<br />
All these information sources do<br />
NOT replace a good class from your<br />
Husqvarna Viking dealer. The class will<br />
give you a good overview of everything<br />
that’s possible, but it will be difficult to<br />
remember it all.<br />
These amazing reference tools will help<br />
you when there’s no one to guide you<br />
at home.<br />
The key to remember is to search<br />
through or read through the information<br />
in bits. Sit at the sewing machine. Touch<br />
the buttons, see what happens when<br />
you push all the buttons. You can’t really<br />
hurt anything and all you have to gain is<br />
knowledge.<br />
I’ve barely touched the surface of the<br />
options available on the Husqvarna<br />
Viking Designer EPIC. There’s truly a<br />
whole lot more to explore and I hope to<br />
touch on more options.<br />
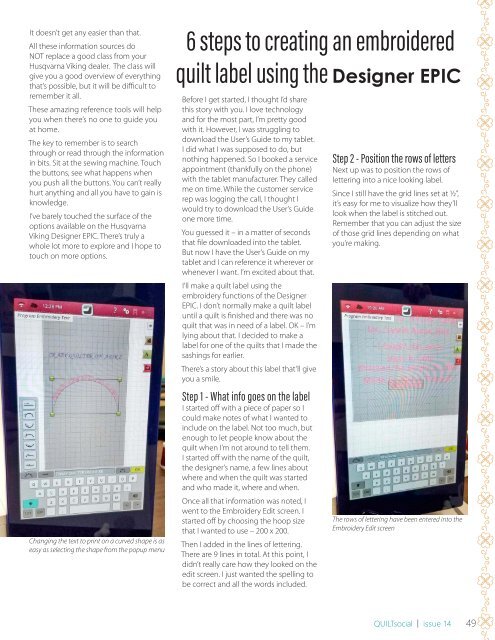
Changing the text to print on a curved shape is as<br />
easy as selecting the shape from the popup menu<br />
6 steps to creating an embroidered<br />
quilt label using the Designer EPIC<br />
Before I get started, I thought I’d share<br />
this story with you. I love technology<br />
and for the most part, I’m pretty good<br />
with it. However, I was struggling to<br />
download the User’s Guide to my tablet.<br />
I did what I was supposed to do, but<br />
nothing happened. So I booked a service<br />
appointment (thankfully on the phone)<br />
with the tablet manufacturer. They called<br />
me on time. While the customer service<br />
rep was logging the call, I thought I<br />
would try to download the User’s Guide<br />
one more time.<br />
You guessed it – in a matter of seconds<br />
that file downloaded into the tablet.<br />
But now I have the User’s Guide on my<br />
tablet and I can reference it wherever or<br />
whenever I want. I’m excited about that.<br />
I’ll make a quilt label using the<br />
embroidery functions of the Designer<br />
EPIC. I don’t normally make a quilt label<br />
until a quilt is finished and there was no<br />
quilt that was in need of a label. OK – I’m<br />
lying about that. I decided to make a<br />
label for one of the quilts that I made the<br />
sashings for earlier.<br />
There’s a story about this label that’ll give<br />
you a smile.<br />
Step 1 - What info goes on the label<br />
I started off with a piece of paper so I<br />
could make notes of what I wanted to<br />
include on the label. Not too much, but<br />
enough to let people know about the<br />
quilt when I’m not around to tell them.<br />
I started off with the name of the quilt,<br />
the designer’s name, a few lines about<br />
where and when the quilt was started<br />
and who made it, where and when.<br />
Once all that information was noted, I<br />
went to the Embroidery Edit screen. I<br />
started off by choosing the hoop size<br />
that I wanted to use – 200 x 200.<br />
Then I added in the lines of lettering.<br />
There are 9 lines in total. At this point, I<br />
didn’t really care how they looked on the<br />
edit screen. I just wanted the spelling to<br />
be correct and all the words included.<br />
Step 2 - Position the rows of letters<br />
Next up was to position the rows of<br />
lettering into a nice looking label.<br />
Since I still have the grid lines set at ½”,<br />
it’s easy for me to visualize how they’ll<br />
look when the label is stitched out.<br />
Remember that you can adjust the size<br />
of those grid lines depending on what<br />
you’re making.<br />
The rows of lettering have been entered into the<br />
Embroidery Edit screen<br />
<strong>QUILTsocial</strong> | issue <strong>14</strong><br />
49


