

QUILTsocial Issue 14
While exploring and playing with the Brother Luminaire XP1 and the Husqvarna Viking Designer EPIC sewing machines, we're after what is original in quilting ideas. In this issue we show you how to piece fabric using decorative stitches instead of the typical quarter inch seam. We use traditional quilt blocks to make a modern quilt, show you how to use the flip and stitch technique of quilt making, the golden 5 steps to add a flange to a binding to give the quilt edge some pop of color. Many free patterns and inspiring new quilting ideas!sew
While exploring and playing with the Brother Luminaire XP1 and the Husqvarna Viking Designer EPIC sewing machines, we're after what is original in quilting ideas. In this issue we show you how to piece fabric using decorative stitches instead of the typical quarter inch seam. We use traditional quilt blocks to make a modern quilt, show you how to use the flip and stitch technique of quilt making, the golden 5 steps to add a flange to a binding to give the quilt edge some pop of color. Many free patterns and inspiring new quilting ideas!sew

You also want an ePaper? Increase the reach of your titles
YUMPU automatically turns print PDFs into web optimized ePapers that Google loves.
the FRONT of the binding to prevent<br />
tucks from occurring along the seam.<br />
Make sure you don’t distort the<br />
binding – in other words, try to keep<br />
the seam straight as you press the<br />
length of the binding.<br />
Then you’ll press the binding in half with<br />
wrong sides together. Keep those long<br />
raw edges even. See how that flange<br />
just peaks over the edge of the binding?<br />
My flange measures about 1⁄8” but as<br />
Fold the joined binding/flange strips in half to reveal<br />
the narrow flange on the right side of the binding.<br />
I mentioned, if you want that flange<br />
a wee bit narrower, then reduce the<br />
difference between the two strip widths<br />
to perhaps 3⁄16”.<br />
The beginning and ending ends of the completed<br />
binding strip are offset to prevent the joins from<br />
being side by side.<br />
Do some experimenting and see what<br />
you come up with.<br />
In the photo below, you can see how<br />
both ends of my binding were offset to<br />
prevent the diagonal seams of the joins<br />
from sitting beside each other.<br />
Wind the binding strip as shown at the<br />
start of this feature.<br />
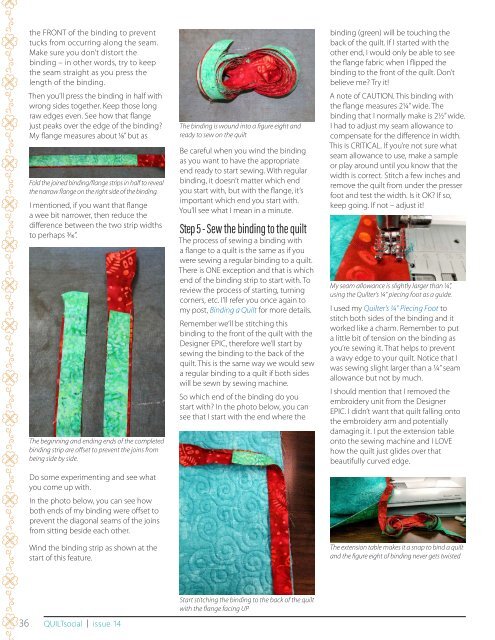
The binding is wound into a figure eight and<br />
ready to sew on the quilt<br />
Be careful when you wind the binding<br />
as you want to have the appropriate<br />
end ready to start sewing. With regular<br />
binding, it doesn’t matter which end<br />
you start with, but with the flange, it’s<br />
important which end you start with.<br />
You’ll see what I mean in a minute.<br />
Step 5 - Sew the binding to the quilt<br />
The process of sewing a binding with<br />
a flange to a quilt is the same as if you<br />
were sewing a regular binding to a quilt.<br />
There is ONE exception and that is which<br />
end of the binding strip to start with. To<br />
review the process of starting, turning<br />
corners, etc. I’ll refer you once again to<br />
my post, Binding a Quilt for more details.<br />
Remember we’ll be stitching this<br />
binding to the front of the quilt with the<br />
Designer EPIC, therefore we’ll start by<br />
sewing the binding to the back of the<br />
quilt. This is the same way we would sew<br />
a regular binding to a quilt if both sides<br />
will be sewn by sewing machine.<br />
So which end of the binding do you<br />
start with? In the photo below, you can<br />
see that I start with the end where the<br />
binding (green) will be touching the<br />
back of the quilt. If I started with the<br />
other end, I would only be able to see<br />
the flange fabric when I flipped the<br />
binding to the front of the quilt. Don’t<br />
believe me? Try it!<br />
A note of CAUTION. This binding with<br />
the flange measures 2¼” wide. The<br />
binding that I normally make is 2½” wide.<br />
I had to adjust my seam allowance to<br />
compensate for the difference in width.<br />
This is CRITICAL. If you’re not sure what<br />
seam allowance to use, make a sample<br />
or play around until you know that the<br />
width is correct. Stitch a few inches and<br />
remove the quilt from under the presser<br />
foot and test the width. Is it OK? If so,<br />
keep going. If not – adjust it!<br />
My seam allowance is slightly larger than ¼”,<br />
using the Quilter’s ¼” piecing foot as a guide.<br />
I used my Quilter’s ¼” Piecing Foot to<br />
stitch both sides of the binding and it<br />
worked like a charm. Remember to put<br />
a little bit of tension on the binding as<br />
you’re sewing it. That helps to prevent<br />
a wavy edge to your quilt. Notice that I<br />
was sewing slight larger than a ¼” seam<br />
allowance but not by much.<br />
I should mention that I removed the<br />
embroidery unit from the Designer<br />
EPIC. I didn’t want that quilt falling onto<br />
the embroidery arm and potentially<br />
damaging it. I put the extension table<br />
onto the sewing machine and I LOVE<br />
how the quilt just glides over that<br />
beautifully curved edge.<br />
The extension table makes it a snap to bind a quilt<br />
and the figure eight of binding never gets twisted<br />
36 <strong>QUILTsocial</strong> | issue <strong>14</strong><br />
Start stitching the binding to the back of the quilt<br />
with the flange facing UP


