

QUILTsocial Issue 14
While exploring and playing with the Brother Luminaire XP1 and the Husqvarna Viking Designer EPIC sewing machines, we're after what is original in quilting ideas. In this issue we show you how to piece fabric using decorative stitches instead of the typical quarter inch seam. We use traditional quilt blocks to make a modern quilt, show you how to use the flip and stitch technique of quilt making, the golden 5 steps to add a flange to a binding to give the quilt edge some pop of color. Many free patterns and inspiring new quilting ideas!sew
While exploring and playing with the Brother Luminaire XP1 and the Husqvarna Viking Designer EPIC sewing machines, we're after what is original in quilting ideas. In this issue we show you how to piece fabric using decorative stitches instead of the typical quarter inch seam. We use traditional quilt blocks to make a modern quilt, show you how to use the flip and stitch technique of quilt making, the golden 5 steps to add a flange to a binding to give the quilt edge some pop of color. Many free patterns and inspiring new quilting ideas!sew

You also want an ePaper? Increase the reach of your titles
YUMPU automatically turns print PDFs into web optimized ePapers that Google loves.
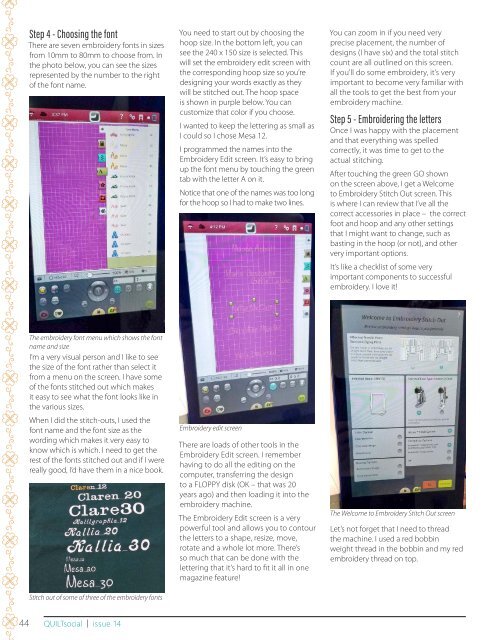
Step 4 - Choosing the font<br />
There are seven embroidery fonts in sizes<br />
from 10mm to 80mm to choose from. In<br />
the photo below, you can see the sizes<br />
represented by the number to the right<br />
of the font name.<br />
You need to start out by choosing the<br />
hoop size. In the bottom left, you can<br />
see the 240 x 150 size is selected. This<br />
will set the embroidery edit screen with<br />
the corresponding hoop size so you’re<br />
designing your words exactly as they<br />
will be stitched out. The hoop space<br />
is shown in purple below. You can<br />
customize that color if you choose.<br />
I wanted to keep the lettering as small as<br />
I could so I chose Mesa 12.<br />
I programmed the names into the<br />
Embroidery Edit screen. It’s easy to bring<br />
up the font menu by touching the green<br />
tab with the letter A on it.<br />
Notice that one of the names was too long<br />
for the hoop so I had to make two lines.<br />
You can zoom in if you need very<br />
precise placement, the number of<br />
designs (I have six) and the total stitch<br />
count are all outlined on this screen.<br />
If you’ll do some embroidery, it’s very<br />
important to become very familiar with<br />
all the tools to get the best from your<br />
embroidery machine.<br />
Step 5 - Embroidering the letters<br />
Once I was happy with the placement<br />
and that everything was spelled<br />
correctly, it was time to get to the<br />
actual stitching.<br />
After touching the green GO shown<br />
on the screen above, I get a Welcome<br />
to Embroidery Stitch Out screen. This<br />
is where I can review that I’ve all the<br />
correct accessories in place – the correct<br />
foot and hoop and any other settings<br />
that I might want to change, such as<br />
basting in the hoop (or not), and other<br />
very important options.<br />
It’s like a checklist of some very<br />
important components to successful<br />
embroidery. I love it!<br />
The embroidery font menu which shows the font<br />
name and size<br />
I’m a very visual person and I like to see<br />
the size of the font rather than select it<br />
from a menu on the screen. I have some<br />
of the fonts stitched out which makes<br />
it easy to see what the font looks like in<br />
the various sizes.<br />
When I did the stitch-outs, I used the<br />
font name and the font size as the<br />
wording which makes it very easy to<br />
know which is which. I need to get the<br />
rest of the fonts stitched out and if I were<br />
really good, I’d have them in a nice book.<br />
Stitch out of some of three of the embroidery fonts<br />
Embroidery edit screen<br />
There are loads of other tools in the<br />
Embroidery Edit screen. I remember<br />
having to do all the editing on the<br />
computer, transferring the design<br />
to a FLOPPY disk (OK – that was 20<br />
years ago) and then loading it into the<br />
embroidery machine.<br />
The Embroidery Edit screen is a very<br />
powerful tool and allows you to contour<br />
the letters to a shape, resize, move,<br />
rotate and a whole lot more. There’s<br />
so much that can be done with the<br />
lettering that it’s hard to fit it all in one<br />
magazine feature!<br />
The Welcome to Embroidery Stitch Out screen<br />
Let’s not forget that I need to thread<br />
the machine. I used a red bobbin<br />
weight thread in the bobbin and my red<br />
embroidery thread on top.<br />
44 <strong>QUILTsocial</strong> | issue <strong>14</strong>


