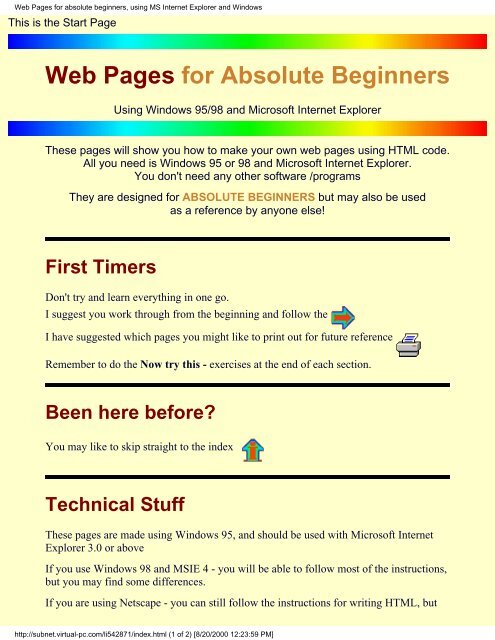
Web Pages for absolute beginners, using MS Internet Explorer and ...
Web Pages for absolute beginners, using MS Internet Explorer and ...
Web Pages for absolute beginners, using MS Internet Explorer and ...

Create successful ePaper yourself
Turn your PDF publications into a flip-book with our unique Google optimized e-Paper software.
<strong>Web</strong> <strong>Pages</strong> <strong>for</strong> <strong>absolute</strong> <strong>beginners</strong>, <strong>using</strong> <strong>MS</strong> <strong>Internet</strong> <strong>Explorer</strong> <strong>and</strong> Windows<br />
This is the Start Page<br />
<strong>Web</strong> <strong>Pages</strong> <strong>for</strong> Absolute Beginners<br />
Using Windows 95/98 <strong>and</strong> Microsoft <strong>Internet</strong> <strong>Explorer</strong><br />
These pages will show you how to make your own web pages <strong>using</strong> HTML code.<br />
All you need is Windows 95 or 98 <strong>and</strong> Microsoft <strong>Internet</strong> <strong>Explorer</strong>.<br />
You don't need any other software /programs<br />
They are designed <strong>for</strong> ABSOLUTE BEGINNERS but may also be used<br />
as a reference by anyone else!<br />
First Timers<br />
Don't try <strong>and</strong> learn everything in one go.<br />
I suggest you work through from the beginning <strong>and</strong> follow the<br />
I have suggested which pages you might like to print out <strong>for</strong> future reference<br />
Remember to do the Now try this - exercises at the end of each section.<br />
Been here be<strong>for</strong>e?<br />
You may like to skip straight to the index<br />
Technical Stuff<br />
These pages are made <strong>using</strong> Windows 95, <strong>and</strong> should be used with Microsoft <strong>Internet</strong><br />
<strong>Explorer</strong> 3.0 or above<br />
If you use Windows 98 <strong>and</strong> <strong>MS</strong>IE 4 - you will be able to follow most of the instructions,<br />
but you may find some differences.<br />
If you are <strong>using</strong> Netscape - you can still follow the instructions <strong>for</strong> writing HTML, but<br />
http://subnet.virtual-pc.com/li542871/index.html (1 of 2) [8/20/2000 12:23:59 PM]
<strong>Web</strong> <strong>Pages</strong> <strong>for</strong> <strong>absolute</strong> <strong>beginners</strong>, <strong>using</strong> <strong>MS</strong> <strong>Internet</strong> <strong>Explorer</strong> <strong>and</strong> Windows<br />
you will not be able to edit code <strong>using</strong> your browser's View/Document Source facility.<br />
You should open Notepad <strong>and</strong> use Notepad to do your editing.<br />
I use English spelling, which may look odd if you are from the United States.<br />
Since I first wrote this tutorial there have been many developments in <strong>Web</strong> design -<br />
including Frames <strong>and</strong> Style Sheets. You may like to go on <strong>and</strong> master these<br />
developments, but I strongly advise you to learn the art of writing in HTML first.<br />
INDEX NEXT PAGE<br />
These pages were designed <strong>and</strong> written by Ruth Livingstone. Sept 1996 <strong>and</strong> revised January 2000<br />
They may be printed out <strong>for</strong> personal use, but should not be copied <strong>and</strong> redistributed without my permission<br />
All mistakes are my own.<br />
Brick bats <strong>and</strong> bouquets to Ruth-Livingstone@ella.co.uk<br />
http://subnet.virtual-pc.com/li542871/index.html (2 of 2) [8/20/2000 12:23:59 PM]
Introduction to <strong>Web</strong> <strong>Pages</strong> <strong>for</strong> <strong>absolute</strong> <strong>beginners</strong><br />
This is the Introduction Page<br />
Introduction to <strong>Web</strong> <strong>Pages</strong><br />
<strong>for</strong> Absolute Beginners<br />
Using Windows 95 <strong>and</strong> Microsoft <strong>Internet</strong> <strong>Explorer</strong> or similar browser<br />
Why should I learn to make web pages ?<br />
<strong>Web</strong> pages look wonderful.<br />
They can be bright <strong>and</strong> colourful<br />
They can display photos <strong>and</strong> moving pictures.<br />
They can play music, <strong>and</strong> make sounds.<br />
You can use web pages on your own computer<br />
- to display art work <strong>and</strong> photos<br />
- to make your documents more interesting.<br />
You can send web pages via E mail to your friends........<br />
(Your friends will need a web browser<br />
like <strong>Explorer</strong> or Netscape to view them)<br />
AND, of course, you can put web pages on the internet, <strong>for</strong> everyone<br />
to see.<br />
OK, lets begin.<br />
These pages will show you how to make web pages <strong>using</strong> Microsoft <strong>Internet</strong> <strong>Explorer</strong><br />
<strong>and</strong> Windows 95. You don't need any other software.<br />
http://subnet.virtual-pc.com/li542871/intro.html (1 of 2) [8/20/2000 12:24:03 PM]
Introduction to <strong>Web</strong> <strong>Pages</strong> <strong>for</strong> <strong>absolute</strong> <strong>beginners</strong><br />
<strong>Web</strong> pages are written <strong>using</strong> HyperText Markup Language (HTML).<br />
HTML code is easy to write.<br />
You use ordinary text, with a few special code words enclosed in < tags ><br />
You can write HTML code <strong>using</strong> a simple text editor, Notepad, which comes free with<br />
Windows 95.<br />
To view <strong>and</strong> edit your work, use Microsoft <strong>Internet</strong> <strong>Explorer</strong>.<br />
If this sounds complicated, don't worry! Just read these pages.<br />
BACK INDEX NEXT<br />
These pages were designed <strong>and</strong> written by Ruth Livingstone. Sept 1996<br />
They may be printed out <strong>for</strong> personal use, but should not be copied <strong>and</strong> redistributed without my permission<br />
All mistakes are my own.<br />
Brick bats <strong>and</strong> bouquets to Ruth-Livingstone@ella.co.uk<br />
http://subnet.virtual-pc.com/li542871/intro.html (2 of 2) [8/20/2000 12:24:03 PM]
Photo display<br />
You can use web pages on your home<br />
computer<br />
to display PHOTOS<br />
Photos displayed as a web page<br />
Look so much better than this!<br />
http://subnet.virtual-pc.com/li542871/photos.htm (1 of 2) [8/20/2000 12:24:05 PM]
Photo display<br />
http://subnet.virtual-pc.com/li542871/photos.htm (2 of 2) [8/20/2000 12:24:05 PM]
Documents<br />
You can use web pages on your home<br />
computer<br />
to display DOCUMENTS<br />
This is a document about a midi composer, written<br />
in Notepad<br />
http://subnet.virtual-pc.com/li542871/document.htm (1 of 2) [8/20/2000 12:24:08 PM]
Documents<br />
Below is the same in<strong>for</strong>mation displayed as a web<br />
page.<br />
It has had links added so that it is possible to listen to music,<br />
jump to other web pages<br />
<strong>and</strong> even send the author an E mail<br />
Of course, the links don't work in this example, which is only an IMAGE of the original page!<br />
http://subnet.virtual-pc.com/li542871/document.htm (2 of 2) [8/20/2000 12:24:08 PM]
Index page, <strong>for</strong> Absolute Beginners<br />
This is the Index page<br />
Index to <strong>Web</strong> <strong>Pages</strong><br />
<strong>for</strong> Absolute Beginners<br />
Using Windows 95 <strong>and</strong> Microsoft <strong>Internet</strong> <strong>Explorer</strong><br />
The start page explains how to use these pages.<br />
The introduction reminds you why you want to make web pages!<br />
Make a simple web page<br />
1. A very simple web page<br />
2.<br />
3.<br />
4.<br />
Arranging the text<br />
Making lists<br />
Use horizontal rules<br />
Add links to your pages<br />
1. Link your pages together<br />
2.<br />
3.<br />
4.<br />
Link to other folders <strong>and</strong> files<br />
Provide an E mail link<br />
Make links to other peoples<br />
pages<br />
Showing Off<br />
1. Adding sound to your pages<br />
2.<br />
Scrolling Marquees <strong>and</strong> blinking text<br />
http://subnet.virtual-pc.com/li542871/theindex.html (1 of 2) [8/20/2000 12:24:12 PM]<br />
Use colours <strong>and</strong> pictures<br />
1. Using coloured backgrounds<br />
2.<br />
3.<br />
4.<br />
Using coloured text<br />
Adding pictures to your pages<br />
Using images in the background<br />
Putting your web pages on the internet<br />
1. Basic requirements <strong>for</strong> getting your<br />
pages on the web<br />
2.<br />
3.<br />
Tips <strong>and</strong> hints<br />
Other HTML help sites on the internet<br />
Using Tables<br />
1. Making Tables Part 1<br />
2.<br />
3.<br />
More about Tables Part 2<br />
Making Tables look better Part 3
Index page, <strong>for</strong> Absolute Beginners<br />
I welcome any comment or questions. If you have a question you would<br />
like me to respond to, please put "HTML question" in the subject line.<br />
Looking <strong>for</strong> a <strong>Web</strong> design service ? - visit Ella <strong>Web</strong> Design <strong>for</strong> in<strong>for</strong>mation about our<br />
current rates.<br />
BACK NEXT<br />
These pages were designed <strong>and</strong> written by Ruth Livingstone. Sept 1996<br />
They may be printed out <strong>for</strong> personal use, but should not be copied <strong>and</strong> redistributed without my permission<br />
All mistakes are my own.<br />
Brick bats <strong>and</strong> bouquets to Ruth-Livingstone@ella.co.uk<br />
http://subnet.virtual-pc.com/li542871/theindex.html (2 of 2) [8/20/2000 12:24:12 PM]
A very simple web page <strong>for</strong> <strong>absolute</strong> <strong>beginners</strong><br />
START...INDEX...NEXT<br />
Making a VERY Simple <strong>Web</strong> Page<br />
<strong>for</strong> Absolute Beginners<br />
First steps<br />
1.<br />
2.<br />
3.<br />
4.<br />
5.<br />
Using Windows 95 <strong>and</strong> Microsoft <strong>Internet</strong> <strong>Explorer</strong><br />
Anyone with Windows 95 can make <strong>Web</strong> pages<br />
You don't need any fancy software or editors<br />
Print out this screen, so you can follow these instructions.<br />
Make a new folder called HTMLwork somewhere on your hard drive<br />
Open a new Notepad document<br />
TIP - a quick way to start a new Notepad document<br />
Position your mouse pointer on a clear space on your desktop<br />
Right click, <strong>and</strong> choose New <strong>and</strong> then Text Document.<br />
Type in the following exactly as written<br />
< HTML ><br />
< HEAD > I Type My Title Here < /HEAD ><br />
< BODY ><br />
I can type whatever I like here, <strong>and</strong> it will be displayed on my<br />
web page.<br />
< /BODY ><br />
<br />
To save this Notepad document as a HTML document -<br />
Click on 'File' <strong>and</strong> 'Save As'<br />
Type in the new name mypage.htm .<br />
Make sure in 'Save as Type' you have "text documents" selected.<br />
And save it in your new HTMLwork folder<br />
Close the Notepad document<br />
http://subnet.virtual-pc.com/li542871/simple.htm (1 of 3) [8/20/2000 12:24:12 PM]
A very simple web page <strong>for</strong> <strong>absolute</strong> <strong>beginners</strong><br />
6. Find mypage.htm in your computer, <strong>and</strong> double click to open it.<br />
7. Admire your new web page. It should look like this<br />
Very boring isn't it? Don't worry, you'll soon be creating interesting pages.<br />
8. Now click on View <strong>and</strong> Source <strong>and</strong> you will see your HTML code<br />
9.<br />
TIP - you can click View <strong>and</strong> Source to see the HTML code<br />
of any web page you are viewing on the internet.<br />
You can change your page.<br />
Click View <strong>and</strong> Source to open Notepad<br />
Type in your changes<br />
Then click File <strong>and</strong> Save be<strong>for</strong>e closing Notepad<br />
Click Refresh on your browser to see the changes you have just<br />
made<br />
Ooops - It didn't work!<br />
●<br />
●<br />
●<br />
●<br />
Check your spelling<br />
Check you used the "tags" < <strong>and</strong> > EXACTLY where I told you to.<br />
Check you saved your document as .htm <strong>and</strong> not .txt or .doc<br />
Try again<br />
THINGS TO REMEMBER<br />
● Your document must begin with the "tags"< HTML > <strong>and</strong> end with < /HTML ><br />
● Next comes < HEAD > which contains the < TITLE ><br />
● Don't <strong>for</strong>get < /TITLE > at the end of the title <strong>and</strong> then< /HEAD ><br />
● Next comes the < BODY > after which appears all the stuff you want to show on<br />
your pages.<br />
● Don't <strong>for</strong>get < /BODY > <strong>and</strong> finally < /HTML > at the end<br />
● Save your HTML document with .htm or .html at the end (doesn't matter which)<br />
TIPS<br />
It is a good idea to write your HTML tags in CAPITAL letters.<br />
This makes your coding easier to read <strong>and</strong> edit.<br />
If you have problems - the first thing to do is check your spelling<br />
http://subnet.virtual-pc.com/li542871/simple.htm (2 of 3) [8/20/2000 12:24:12 PM]
A very simple web page <strong>for</strong> <strong>absolute</strong> <strong>beginners</strong><br />
Now try this -<br />
1.<br />
2.<br />
3.<br />
Open your new web page, click View <strong>and</strong> Source. Now add a few sentences about<br />
yourself.<br />
Save your document, <strong>and</strong> Refresh your page to view your changes.<br />
Make a new page, following the instructions above. For your title type My friend .<br />
After the BODY tag, write a short sentence about a friend of yours.<br />
Save your new document as friend.htm in your HTMLwork folder.<br />
Now - lets make your page more interesting<br />
START INDEX NEXT<br />
These pages were designed <strong>and</strong> written by Ruth Livingstone. Sept 1996<br />
They may be printed out <strong>for</strong> personal use, but should not be copied <strong>and</strong> redistributed without my permission<br />
All mistakes are my own.<br />
Brick bats <strong>and</strong> bouquets to Ruth-Livingstone@ella.co.uk<br />
http://subnet.virtual-pc.com/li542871/simple.htm (3 of 3) [8/20/2000 12:24:12 PM]
Arranging text on the page<br />
BACK...INDEX...NEXT<br />
Arranging TEXT on your web page<br />
<strong>for</strong> Absolute Beginners<br />
Using Windows 95 <strong>and</strong> Microsoft <strong>Internet</strong> <strong>Explorer</strong><br />
TECHNICAL NOTE<br />
This page will show you how to<br />
1.<br />
2.<br />
3.<br />
4.<br />
arrange text on the page<br />
make headings<br />
change the size of text<br />
change the font of text<br />
You may wish to print out this page <strong>for</strong> future reference<br />
When you type text <strong>using</strong> Notepad, you expect certain things to happen automatically.<br />
● to start a new line you press the [return] key<br />
● to leave a blank line you press the [return] key twice<br />
● to leave more than one space between words you press the [space bar] several times<br />
BE WARNED none of these things will happen in your .htm document.<br />
1. Arranging text on the page<br />
●<br />
●<br />
●<br />
●<br />
To start a new line - type < BR ><br />
remember BR <strong>for</strong> BReak<br />
To start a new line <strong>and</strong> leave a blank line - type < P ><br />
remember P <strong>for</strong> Paragraph<br />
To centre a line on the page - type<br />
< CENTER > type line here < /CENTER ><br />
To indent a whole paragraph type<br />
http://subnet.virtual-pc.com/li542871/text.htm (1 of 3) [8/20/2000 12:24:14 PM]
Arranging text on the page<br />
< BLOCKQUOTE > type your paragraph here < /BLOCKQUOTE ><br />
Have a look here <strong>for</strong> examples.<br />
2. Making Headings<br />
By <strong>using</strong> headings, you can type text that will st<strong>and</strong> out.<br />
● Type < H1 > type your largest heading here < /H1 ><br />
● Type < H2 > type your medium size heading here< /H2 ><br />
● Type < H3 > type your smallest heading here < /H3 ><br />
You can continue down to H6, but only H1, H2, <strong>and</strong> H3 are a useful size<br />
Here are what these headings look like<br />
3. Changing the type <strong>and</strong> size of text<br />
●<br />
●<br />
●<br />
●<br />
●<br />
Use < B > <strong>for</strong> bold text< /B ><br />
Use < I > <strong>for</strong> italic text < /I ><br />
Use < U > <strong>for</strong> underlined text < /U ><br />
Use < TT > <strong>for</strong> evenly spaced Typewriter Text< /TT ><br />
Use < FONT SIZE=n > to get different text sizes < /FONT ><br />
n can be any number between 1 <strong>and</strong> 7 . Normal font size is 3. This font size is 1.<br />
4. Changing the text font<br />
This only works <strong>for</strong> people viewing your pages with <strong>Internet</strong> <strong>Explorer</strong> or Netscape<br />
Navigator 3<br />
You can change the text font by typing<br />
<strong>for</strong> "Times New Roman" text < /FONT ><br />
<strong>for</strong> "Courier" text < /FONT ><br />
<strong>for</strong> "Comic Sans <strong>MS</strong>" text < /FONT ><br />
You can specify any font you like, but you will only see a font if it is<br />
already installed on your computer.<br />
Your viewer will only be able to see the font if he or she has the same font<br />
installed on their computer. If their computer doesn't recognise your font, it<br />
may try <strong>and</strong> guess a font to use, with unpredictable results.<br />
http://subnet.virtual-pc.com/li542871/text.htm (2 of 3) [8/20/2000 12:24:14 PM]
Arranging text on the page<br />
Most people have "arial", "times new roman" <strong>and</strong> "courier".<br />
You can also specify a choice of fonts<br />
eg. <br />
if the first font is not installed, the second font will be used<br />
Now try this -<br />
1.<br />
2.<br />
3.<br />
4.<br />
Create a new page called 'Poetry'. Write (or copy) a poem on your page, <strong>using</strong> <<br />
BR > to separate lines, <strong>and</strong> < P > to seperate verses. Save your page as poem.htm<br />
Use < H1 > to create a heading <strong>for</strong> your poem<br />
Experiment with different fonts to suit the mood of the poem. Go wild!<br />
Take a short magazine article, <strong>and</strong> try <strong>and</strong> reproduce it as a web page. Choose an<br />
article with different sized headings <strong>and</strong> different types of text. You may not be<br />
able to make your page look exactly like the original article.<br />
BACK INDEX NEXT<br />
These pages were designed <strong>and</strong> written by Ruth Livingstone. Sept 1996<br />
They may be printed out <strong>for</strong> personal use, but should not be copied <strong>and</strong> redistributed without my permission<br />
All mistakes are my own.<br />
Brick bats <strong>and</strong> bouquets to Ruth-Livingstone@ella.co.uk<br />
http://subnet.virtual-pc.com/li542871/text.htm (3 of 3) [8/20/2000 12:24:14 PM]
I Type My Title Here<br />
I can type whatever I like here, <strong>and</strong> it will be displayed on my web page<br />
http://subnet.virtual-pc.com/li542871/this.htm [8/20/2000 12:24:14 PM]
Making Lists <strong>for</strong> Absolute Beginners<br />
BACK...INDEX...NEXT<br />
Making LISTS<br />
<strong>for</strong> Absolute Beginners<br />
Using Windows 95 <strong>and</strong> Microsoft <strong>Internet</strong> <strong>Explorer</strong><br />
This page will show you how to<br />
1.<br />
2.<br />
3.<br />
Make a bullet list<br />
Make a numbered list<br />
Make a list of definitions<br />
You may wish to print out this page <strong>for</strong> future reference<br />
1. Making a bullet list<br />
● To start a bullet list - type<br />
< UL ><br />
remember UL <strong>for</strong> Unnumbered List<br />
● For the first item in the list - type<br />
< LI > then type in the first item in your list<br />
remember LI <strong>for</strong> LIst<br />
● To second item on the list - type<br />
< LI > then type in the second item in your list<br />
● You can add as many < LI > as you wish<br />
● At the end of your list type < /UL ><br />
An example of how to set this out<br />
< UL ><br />
< LI >first item in your list<br />
< LI >second item in your list<br />
< LI >third item in your list<br />
< /UL ><br />
http://subnet.virtual-pc.com/li542871/lists.htm (1 of 3) [8/20/2000 12:24:16 PM]
Making Lists <strong>for</strong> Absolute Beginners<br />
2. Making a numbered list<br />
1.<br />
2.<br />
3.<br />
4.<br />
5.<br />
6.<br />
To start a numbered list - type<br />
< OL ><br />
remember OL <strong>for</strong> Ordered List<br />
For the first item in the list - type<br />
< LI > then type in the first item on your list<br />
remember LI <strong>for</strong> LIst<br />
For the second item on the list - type<br />
< LI > then type in the second item on your list<br />
You can add as many < LI > as you wish<br />
If you add or remove lines, they will automatically be given the right number<br />
At the end of your list type < /OL ><br />
An example of how to set this out<br />
< OL ><br />
< LI >first item in your list<br />
< LI >second item in your list<br />
< LI >third item in your list<br />
< /OL ><br />
3. Making a list of definitions<br />
❍<br />
❍<br />
❍<br />
❍<br />
❍<br />
❍<br />
❍<br />
To start a definition list - type<br />
< DL ><br />
remember DL <strong>for</strong> Definition List<br />
For the first term in the list - type<br />
< DT > then type in the first item in your list<br />
remember DT <strong>for</strong> Definition Term<br />
Then type -<br />
< DD > then type in the text to appear under the first item in your list<br />
remember DD <strong>for</strong> Definition Detail<br />
For the second item on the list - type<br />
< DT > then type in the second item in your list<br />
Then type -<br />
< DD > then type in the text to appear under the second item in your list<br />
You can add as many < DT > followed by < DD >as you wish<br />
At the end of your list type < /DL ><br />
http://subnet.virtual-pc.com/li542871/lists.htm (2 of 3) [8/20/2000 12:24:16 PM]
Making Lists <strong>for</strong> Absolute Beginners<br />
An example of how to set this out<br />
< DL ><br />
< DT >first item in your list<br />
< DD > text to display under first item in your list<br />
< DT >second item in your list<br />
< DD > text to display under second item in your list<br />
< DT >third item in your list<br />
< DD > text to display under third item in your list<br />
< /DL ><br />
Now try this -<br />
1. Have a look here <strong>for</strong> examples of lists<br />
2. Open mypage.htm <strong>and</strong> make a numbered list of your 5 favourite pasttimes.<br />
3. Make a bullet list of your 5 most annoying habits<br />
4. Make a bullet list of the the days of the week.<br />
Then, under each day, make a numbered list of jobs to do.<br />
5. Make a definition list<br />
List your favourite songs, <strong>and</strong> give a brief description of each one.<br />
6. Use headings <strong>for</strong> each list.<br />
BACK INDEX NEXT<br />
These pages were designed <strong>and</strong> written by Ruth Livingstone. Sept 1996<br />
They may be printed out <strong>for</strong> personal use, but should not be copied <strong>and</strong> redistributed without my permission<br />
All mistakes are my own.<br />
Brick bats <strong>and</strong> bouquets to Ruth-Livingstone@ella.co.uk<br />
http://subnet.virtual-pc.com/li542871/lists.htm (3 of 3) [8/20/2000 12:24:16 PM]
Arranging text examples<br />
You can click VIEW <strong>and</strong> SOURCE to see the html coding <strong>for</strong> this page.<br />
If you write a long sequence of words without specifying any breaks or paragraphs, the words will appear<br />
as one long paragraph. There will always be one space between each word, even if you leave lots of<br />
spaces when you type. And if you press the RETURN key these breaks will not show up. This makes<br />
your text rather boring <strong>and</strong> difficult to read, so don't <strong>for</strong>get to use lots of BReaks <strong>and</strong> Paragraphs.<br />
There was a young man from Stanages<br />
Who didn't use BReaks on his pages<br />
Some say he was lazy<br />
Some say he was crazy<br />
But his pages went on <strong>for</strong> ages!<br />
Centering text on a pages can be very effective.<br />
Don't <strong>for</strong>get to use BReak when you want a new line<br />
to begin.<br />
AND don't <strong>for</strong>get to spell centre the American way.<br />
"CENTER"<br />
Or you can use BLOCKQUOTE to make a whole section indented.<br />
A Tao saying<br />
He who knows men is clever;<br />
He who knows himself has insight.<br />
He who conquers men has <strong>for</strong>ce;<br />
He who conquers himself is truly strong<br />
He who knows when he has got enough is rich.<br />
Do some experimenting with your page. Try typing out a short poem.<br />
http://subnet.virtual-pc.com/li542871/arrange.htm [8/20/2000 12:24:16 PM]
Headings<br />
This text is the largest heading size = H1<br />
You usually put this heading at the beginning of your page <strong>and</strong> put your first paragraph here.<br />
You will see how the heading takes up a line on its own<br />
with plenty of space above <strong>and</strong> below it to make it st<strong>and</strong> out.<br />
This text is the second heading size = H2<br />
This text is the third heading size = H3<br />
This text is the fourth heading size = H4<br />
This text is the fifth heading size = H5<br />
This text is the sixth heading size = H6<br />
Don't <strong>for</strong>get, you can see the HTML code <strong>for</strong> this page by clicking View <strong>and</strong> Source<br />
http://subnet.virtual-pc.com/li542871/headings.htm [8/20/2000 12:24:17 PM]
Using Horizontal Rules <strong>for</strong> <strong>absolute</strong> <strong>beginners</strong><br />
BACK...INDEX...NEXT<br />
Using Horizontal RULES<br />
<strong>for</strong> Absolute Beginners<br />
Using Windows 95 <strong>and</strong> Microsoft <strong>Internet</strong> <strong>Explorer</strong><br />
1.<br />
2.<br />
This page will show you<br />
How to make a simple rule<br />
How to alter the size <strong>and</strong> appearance of rules<br />
You may wish to print out this page <strong>for</strong> future reference<br />
1. Making a simple rule<br />
This is the easiest thing you have learnt so far.<br />
Type < HR > (remember HR <strong>for</strong> Horizontal Rule)<br />
And you will produce a horizontal rule , just like the one below<br />
2. Altering the size <strong>and</strong> appearance of<br />
horizontal rules<br />
You can have a lot of fun with horizontal rules.<br />
To alter the width of the rule<br />
< HR WIDTH=50% > will give you a rule which only stretches half way across the page<br />
< HR WIDTH=33% > will give you a rule which stretches one third of the way across<br />
the page<br />
< HR WIDTH=100 > will give you a rule which always stretches 100 pixels across any<br />
sized page<br />
http://subnet.virtual-pc.com/li542871/rules.htm (1 of 3) [8/20/2000 12:24:17 PM]
Using Horizontal Rules <strong>for</strong> <strong>absolute</strong> <strong>beginners</strong><br />
To alter the height of the rule<br />
< HR size=5 > will give you a rule 5 pixels high<br />
< HR size=10 > will give you a rule 10 pixels high<br />
To alter the appearance of the rule<br />
< HR size=8 width=40% > will give you a rule with the normal 3D or "cutout"<br />
appearance<br />
< HR size=8 width=40% NOSHADE > will give you a dark rule<br />
To alter the position of the rule<br />
< HR align=left width=50% > will give you a rule aligned to the left of the page<br />
< HR align=right width=50% > will give you a rule aligned to the right of the page<br />
Now try this -<br />
1.<br />
2.<br />
Look at this page <strong>for</strong> inspiration.<br />
Make a page of patterns, <strong>using</strong> horizontal rules<br />
Try making a ladder pattern.<br />
Try making a circular shape, <strong>using</strong> rules.<br />
Things you have learnt so far<br />
You have learnt how to create a new web page, <strong>using</strong> Notepad.<br />
You know how to save your new page as .htm or .html<br />
You can view your page <strong>using</strong> Microsoft <strong>Internet</strong> <strong>Explorer</strong>.<br />
You know how to use View <strong>and</strong> Source to see the HTML coding behind a page.<br />
You can edit your page, save the changes, <strong>and</strong> use Refresh to view the changes.<br />
You can write lines <strong>and</strong> paragraphs <strong>using</strong> different fonts <strong>and</strong> headings.<br />
You know how to center your text, <strong>and</strong> indent sections <strong>using</strong> blockquote.<br />
You know how to make useful lists.<br />
You can add horizontal rules to your pages to break up text.<br />
Well done!<br />
http://subnet.virtual-pc.com/li542871/rules.htm (2 of 3) [8/20/2000 12:24:17 PM]
Using Horizontal Rules <strong>for</strong> <strong>absolute</strong> <strong>beginners</strong><br />
Now, let's work on making your pages more attractive.<br />
How about adding some COLOUR ....<br />
BACK INDEX NEXT<br />
These pages were designed <strong>and</strong> written by Ruth Livingstone. Sept 1996<br />
They may be printed out <strong>for</strong> personal use, but should not be copied <strong>and</strong> redistributed without my permission<br />
All mistakes are my own.<br />
Brick bats <strong>and</strong> bouquets to Ruth-Livingstone@ella.co.uk<br />
http://subnet.virtual-pc.com/li542871/rules.htm (3 of 3) [8/20/2000 12:24:17 PM]
Examples of lists<br />
Examples of Lists<br />
Remember you can click VIEW<strong>and</strong> SOURCE to see the html coding <strong>for</strong> this page.<br />
This is an example of a bullet list<br />
The official name <strong>for</strong> this is an "Unordered list"<br />
A list of things I don't like<br />
● spiders<br />
● snakes<br />
● growling dogs<br />
● rude people<br />
● beetroot<br />
This is an example of a numbered list<br />
The official name <strong>for</strong> this is a "Ordered list"<br />
To make a web page you need to have these things,<br />
1. The HTML tag<br />
2. The HEAD tag<br />
3. The TITLE tag<br />
4. The title of your page typed here<br />
5. The /TITLE tag<br />
6. The /HEAD tag<br />
7. The BODY tag<br />
8. Then body of your page typed here<br />
9. The /BODY tag<br />
10. The /HTML tag<br />
If you miss something out, or get the order wrong, your page may not work!<br />
This is an example of a definition list<br />
This allows you to have a list of topics, each followed by an indented paragraph.<br />
A list of childhood illnesses<br />
http://subnet.virtual-pc.com/li542871/eglists.htm (1 of 3) [8/20/2000 12:24:18 PM]
Examples of lists<br />
Whooping Cough<br />
A nasty illness, which can start like a cold, but then a harsh dry cough develops. Coughing fits can<br />
last a long time, <strong>and</strong> are followed by a "whooping" sound as the child breathes in. This can last <strong>for</strong><br />
weeks, <strong>and</strong> the child may be seriously ill. Sometimes brain damage can occur. You can prevent the<br />
spread of this dangerous illness by making sure your child is immunised.<br />
Mumps<br />
This begins with painful swollen gl<strong>and</strong>s in front of the ears. It can vary from a mild attack, hardly<br />
noticed, to a very severe illness. Eating <strong>and</strong> drinking is painful. In older children <strong>and</strong> adults other<br />
gl<strong>and</strong>s may also become affected, particularly the gonads <strong>and</strong> the pancreas gl<strong>and</strong>.<br />
Measles<br />
This starts like a cold, but then a dull blotchy rash develops, which spreads to the face, body <strong>and</strong><br />
limbs. Eyes may become sore. This can be a serious illness, <strong>and</strong> is best avoided by immunisation.<br />
Rubella<br />
The other name <strong>for</strong> this is German Measles. It appears like a very mild <strong>for</strong>m of measles, but the<br />
rash is paler, <strong>and</strong> the child is not very ill. The danger with rubella, is that if a pregnant lady<br />
becomes infected, it may damage the growing baby. Blindness <strong>and</strong> brain damage may be the<br />
result.<br />
Parent attention deprivation syndrome<br />
This increasingly common illness is the result of parents spending too much time attached to their<br />
personal computers. The <strong>Internet</strong> has a lot to answer <strong>for</strong>.<br />
Treatment consists of detaching the parent from their keyboard, either by brute <strong>for</strong>ce or by pulling<br />
out the electric plug. An alternative treatment is to buy every child their own computer with<br />
modem <strong>and</strong> internet connection. This will enable the child to communicate with their parents by<br />
Email.<br />
You can also have "nested" lists<br />
Here is a unordered list, with numbered lists "nested" within it.<br />
My favourite creatures<br />
● Mammals<br />
1. Dogs<br />
2. Dolphins<br />
3. Cats<br />
4. Elephants<br />
● Fish<br />
1. Goldfish<br />
2. Angel fish<br />
3. Piranhas<br />
4. Halibut (nicely grilled of course)<br />
http://subnet.virtual-pc.com/li542871/eglists.htm (2 of 3) [8/20/2000 12:24:18 PM]
Examples of lists<br />
Lists are very useful way of displaying in<strong>for</strong>mation on your web page.<br />
You should experiment with different kinds of lists<br />
http://subnet.virtual-pc.com/li542871/eglists.htm (3 of 3) [8/20/2000 12:24:18 PM]
Plain colour backgrounds<br />
BACK... INDEX ...NEXT<br />
Using backgound<br />
C O L O U R S<br />
<strong>for</strong> Absolute Beginners<br />
Using Windows 95 <strong>and</strong> Microsoft <strong>Internet</strong> <strong>Explorer</strong><br />
1.<br />
2.<br />
This page will show you how to use -<br />
Background colours with the 16 named colours<br />
Background colours which you mix yourself<br />
You may wish to print out this page <strong>for</strong> future reference<br />
1. The 16 named colours<br />
red blue green yellow<br />
maroon navy purple olive<br />
teal fuchsia aqua lime<br />
silver gray black white<br />
The HTML code to insert in the BODY tag of your document is<br />
<br />
eg. or <br />
Click on the links below to see these colours in action.<br />
Red Blue Green Yellow<br />
Maroon Navy Purple Olive<br />
Teal Fuchsia Aqua Lime<br />
http://subnet.virtual-pc.com/li542871/bgcolor.htm (1 of 3) [8/20/2000 12:24:21 PM]
Plain colour backgrounds<br />
Silver Gray Black White<br />
WARNING - Not everyone can see these named colours.<br />
2. Colours which you mix yourself<br />
You can mix any color you want by <strong>using</strong> RGB codes.<br />
The HTML code is written as <br />
XXXXXX can be any combination of numbers from 0 to 9 or letters from A to F<br />
The first two digits define the amount of red light in the colour<br />
The middle two digits define the amount of green light in the colour<br />
The last two digits define the amount of blue light in the colour<br />
00=none FF=maximum<br />
● FFFFFF=white<br />
● 000000=black<br />
● FF0000=red<br />
● 00FF00=green<br />
● 0000FF=blue<br />
● FFFF00=yellow<br />
If this seems a bit odd, remember you are mixing LIGHT, not paint!<br />
Try experimenting with your own combinations. Here are some to try.<br />
The pale yellow of this page is #FFFFCC<br />
rich gold colour <br />
soft pink <br />
a yummy brown <br />
a wonderful blue/green <br />
elegant grey <br />
http://subnet.virtual-pc.com/li542871/bgcolor.htm (2 of 3) [8/20/2000 12:24:21 PM]
Plain colour backgrounds<br />
Style tips<br />
Bright colours can make a dramatic backgound <strong>for</strong> graphics.<br />
BUT if your page contains text, choose gentle colours<br />
Look how hard it is to read text on a bright fuchsia backgound!<br />
It is easier to read on a soft pink background<br />
Remember, other people's computers may show different colours to yours!<br />
Some people have true colour, some have 256 colours, some have only 8<br />
colours.<br />
Some people use browsers which don't show up background colours.<br />
If you use white text on a black background, it may show up fine on most<br />
browsers.<br />
However, viewers with browsers that do not recognise text <strong>and</strong> background<br />
colours will see nothing at all!<br />
Trouble shooting<br />
●<br />
Have you checked your spelling?<br />
Watch out <strong>for</strong> 'GRAY' (not grey)<br />
Use the american spelling 'BGCOLOR'.<br />
Now try this -<br />
1.<br />
2.<br />
3.<br />
4.<br />
Open one of your pages, <strong>and</strong> change the background color to blue<br />
Now try creating your own pale shade of blue.<br />
Try <strong>and</strong> make a pale green.<br />
How about making orange? Experiment <strong>and</strong> see what happens ...<br />
BACK INDEX NEXT<br />
These pages were designed <strong>and</strong> written by Ruth Livingstone. Sept 1996<br />
They may be printed out <strong>for</strong> personal use, but should not be copied <strong>and</strong> redistributed without my permission<br />
All mistakes are my own.<br />
Brick bats <strong>and</strong> bouquets to Ruth-Livingstone@ella.co.uk<br />
http://subnet.virtual-pc.com/li542871/bgcolor.htm (3 of 3) [8/20/2000 12:24:21 PM]
Examples of <strong>using</strong> Horizontal Rules<br />
Examples of <strong>using</strong> horizontal rules<br />
http://subnet.virtual-pc.com/li542871/hrexam.htm [8/20/2000 12:24:22 PM]
Coloured TEXT <strong>for</strong> Absolute Beginners<br />
BACK... INDEX ...NEXT<br />
Using C O L O U R E D text<br />
Using Windows 95 <strong>and</strong> Microsoft <strong>Internet</strong> <strong>Explorer</strong><br />
●<br />
●<br />
●<br />
TECHNICAL NOTE<br />
This page will show you how to use -<br />
1. Coloured text with the 16 named colours<br />
2. Text colours which you mix yourself<br />
3. Defining text <strong>and</strong> link colours at the start of your page<br />
You may wish to print out this page <strong>for</strong> future reference<br />
By default, your text will normally be black <strong>and</strong> your links blue<br />
However, the person viewing your page may have set their browser to see text <strong>and</strong> links in<br />
colours of their own choice<br />
By putting colour in<strong>for</strong>mation in your pages, you can "<strong>for</strong>ce" the viewer to see text in the<br />
colours YOU choose.<br />
1. The 16 named colours<br />
red<br />
blue<br />
green<br />
yellow<br />
maroon<br />
navy<br />
purple<br />
teal<br />
olive<br />
fuchsia<br />
aqua<br />
lime<br />
http://subnet.virtual-pc.com/li542871/coltext.htm (1 of 4) [8/20/2000 12:24:23 PM]<br />
silver<br />
gray<br />
black<br />
white
Coloured TEXT <strong>for</strong> Absolute Beginners<br />
The HTML code to insert in the BODY of your document is<br />
<br />
eg. or < FONT COLOR=red ><br />
You will not see coloured text in Notepad, but it will appear when you view your page.<br />
< FONT COLOR=red > This will appear as red text - until I close with this tag < /FONT ><br />
< FONT COLOR=green > This will appear as green text - until I close with this tag < /FONT ><br />
< FONT COLOR=navy > This will appear as navy blue text - until I close with this tag < /FONT<br />
><br />
Remember, some viewers will not be able to see text coloured in this way.<br />
2. Colours which you mix yourself<br />
You can mix any color you want by <strong>using</strong> RGB codes.<br />
The HTML code is written as < FONT COLOR="#XXXXXX"><br />
XXXXXX can be any combination of numbers from 0 to 9 or letters from A to F<br />
The first two digits define the amount of red light in the colour<br />
The middle two digits define the amount of green light in the colour<br />
The last two digits define the amount of blue light in the colour<br />
00=none FF=maximum<br />
● FFFFFF=white<br />
● 000000=black<br />
● FF0000=red<br />
● 00FF00=green<br />
● 0000FF=blue<br />
● FFFF00=yellow<br />
This is exactly the same method as you can use <strong>for</strong> mixing your own background colours<br />
< FONT COLOR="#D9D919" > rich gold colour < /FONT ><br />
< FONT COLOR="#FFBBDD" > soft pink colour < /FONT ><br />
< FONT COLOR="#A66A6A" > a yummy brown < /FONT ><br />
< FONT COLOR="#22BBAA" > wonderful blue/green colour < /FONT ><br />
3. Defining text <strong>and</strong> link colours at the start<br />
of your page<br />
http://subnet.virtual-pc.com/li542871/coltext.htm (2 of 4) [8/20/2000 12:24:23 PM]
Coloured TEXT <strong>for</strong> Absolute Beginners<br />
You can choose the colours you would like to appear on your page <strong>for</strong><br />
● ordinary text<br />
● text in links<br />
● text in links which have been visited already<br />
This in<strong>for</strong>mation comes just after BODY in the < BODY > tag.<br />
You can use named colours or RBG codes<br />
To define the colour of ordinary text<br />
< BODY TEXT=name or code ><br />
To define the colour of text used in links<br />
< BODY LINK=name or code ><br />
To define the colour of text in visited links<br />
< BODY VLINK=name or code ><br />
remember VLINK <strong>for</strong> Visited LINK<br />
For example, to make a document with olive coloured text, purple links, <strong>and</strong> red visited<br />
links<br />
< BODY TEXT=olive LINK=purple VLINK=red ><br />
look at this page to see these colours<br />
You haven't learnt how to add links to your page yet, but you will soon.<br />
Style tips<br />
Coloured text can make a page dramatic <strong>and</strong> attractive<br />
BUT make sure your coloured text is legible, choose a suitable background<br />
In general, choose light text against a dark background, <strong>and</strong> dark text against a light<br />
background<br />
Now try this<br />
1. Change one of your pages, to white text on a black background<br />
2. Now change the colour of the headings - try yellow.<br />
3. Make a page with a bright background (try lime).<br />
Experiment with different coloured text on this page.<br />
http://subnet.virtual-pc.com/li542871/coltext.htm (3 of 4) [8/20/2000 12:24:23 PM]
Coloured TEXT <strong>for</strong> Absolute Beginners<br />
Enough of boring old text<br />
Lets add some PICTURES<br />
BACK INDEX NEXT<br />
These pages were designed <strong>and</strong> written by Ruth Livingstone. Sept 1996<br />
They may be printed out <strong>for</strong> personal use, but should not be copied <strong>and</strong> redistributed without my permission<br />
All mistakes are my own.<br />
Brick bats <strong>and</strong> bouquets to Ruth-Livingstone@ella.co.uk<br />
http://subnet.virtual-pc.com/li542871/coltext.htm (4 of 4) [8/20/2000 12:24:23 PM]
Red background<br />
This is a red background<br />
http://subnet.virtual-pc.com/li542871/red.htm [8/20/2000 12:24:24 PM]<br />
You can create a red background<br />
by <strong>using</strong> the code<br />
< BODY BGCOLOR=red >
Blue background<br />
This is a blue background<br />
http://subnet.virtual-pc.com/li542871/blue.htm [8/20/2000 12:24:24 PM]<br />
You can create a blue background<br />
by <strong>using</strong> the code<br />
< BODY BGCOLOR=blue >
Green background<br />
This is a green background<br />
You can create a green background<br />
by <strong>using</strong> the code<br />
< BODY BGCOLOR=green ><br />
http://subnet.virtual-pc.com/li542871/green.htm [8/20/2000 12:24:25 PM]
yellow background<br />
This is a yellow background<br />
You can create a yellow background<br />
by <strong>using</strong> the code<br />
< BODY BGCOLOR=yellow ><br />
http://subnet.virtual-pc.com/li542871/yellow.htm [8/20/2000 12:24:25 PM]
Maroon background<br />
This is a maroon background<br />
You can create a maroon background<br />
by <strong>using</strong> the code<br />
< BODY BGCOLOR=maroon ><br />
http://subnet.virtual-pc.com/li542871/maroon.htm [8/20/2000 12:24:26 PM]
Navy background<br />
This is a navy background<br />
http://subnet.virtual-pc.com/li542871/navy.htm [8/20/2000 12:24:27 PM]<br />
You can create a navy blue background<br />
by <strong>using</strong> the code<br />
< BODY BGCOLOR=navy >
Purple background<br />
This is a purple background<br />
You can create a purple background<br />
by <strong>using</strong> the code<br />
< BODY BGCOLOR=purple ><br />
http://subnet.virtual-pc.com/li542871/purple.htm [8/20/2000 12:24:27 PM]
Olive background<br />
This is a olive background<br />
http://subnet.virtual-pc.com/li542871/olive.htm [8/20/2000 12:24:28 PM]<br />
You can create a olive background<br />
by <strong>using</strong> the code<br />
< BODY BGCOLOR=olive >
Teal background<br />
This is a teal background<br />
http://subnet.virtual-pc.com/li542871/teal.htm [8/20/2000 12:24:28 PM]<br />
You can create a teal background<br />
by <strong>using</strong> the code<br />
< BODY BGCOLOR=teal >
Fuchsia background<br />
This is a fuchsia background<br />
You can create a fuchsia background<br />
by <strong>using</strong> the code<br />
< BODY BGCOLOR=fuchsia ><br />
http://subnet.virtual-pc.com/li542871/fuchsia.htm [8/20/2000 12:24:29 PM]
Aqua background<br />
This is a aqua background<br />
http://subnet.virtual-pc.com/li542871/aqua.htm [8/20/2000 12:24:29 PM]<br />
You can create an aqua background<br />
by <strong>using</strong> the code<br />
< BODY BGCOLOR=aqua >
Lime background<br />
This is a lime background<br />
http://subnet.virtual-pc.com/li542871/lime.htm [8/20/2000 12:24:30 PM]<br />
You can create a lime green background<br />
by <strong>using</strong> the code<br />
< BODY BGCOLOR=lime >
Silver background<br />
This is a silver background<br />
You can create a silver background<br />
by <strong>using</strong> the code<br />
< BODY BGCOLOR=silver ><br />
http://subnet.virtual-pc.com/li542871/silver.htm [8/20/2000 12:24:30 PM]
Gray background<br />
This is a gray background<br />
http://subnet.virtual-pc.com/li542871/gray.htm [8/20/2000 12:24:31 PM]<br />
You can create a gray background<br />
by <strong>using</strong> the code<br />
< BODY BGCOLOR=gray >
Black background<br />
This is a black background<br />
You can create a black background<br />
by <strong>using</strong> the code<br />
< BODY BGCOLOR=black ><br />
http://subnet.virtual-pc.com/li542871/black.htm [8/20/2000 12:24:32 PM]
Maroon background<br />
This is a white background<br />
You can create a white background<br />
by <strong>using</strong> the code<br />
< BODY BGCOLOR=white ><br />
http://subnet.virtual-pc.com/li542871/white.htm [8/20/2000 12:24:32 PM]
D9D919<br />
This is a rich gold background<br />
You can create this gold background<br />
by <strong>using</strong> the code<br />
< BGCOLOR="#D9D919" ><br />
http://subnet.virtual-pc.com/li542871/D9D919.htm [8/20/2000 12:24:33 PM]
Soft pink background<br />
This is a soft pink background<br />
You can create this pink background<br />
by <strong>using</strong> the code<br />
< BGCOLOR="#FFBBDD" ><br />
http://subnet.virtual-pc.com/li542871/FFBBDD.htm [8/20/2000 12:24:33 PM]
yummy brown<br />
This is a yummy brown background<br />
You can create this brown background<br />
by <strong>using</strong> the code<br />
< BGCOLOR="#A66A6A" ><br />
http://subnet.virtual-pc.com/li542871/A66A6A.htm [8/20/2000 12:24:34 PM]
wonderful blue/green colour<br />
This is a wonderful blue/green<br />
background<br />
You can create this blue/green background<br />
by <strong>using</strong> the code<br />
< BGCOLOR="#22BBAA" ><br />
http://subnet.virtual-pc.com/li542871/22BBAA.htm [8/20/2000 12:24:34 PM]
Elegant grey background<br />
This is an elegant grey background<br />
You can create this grey background<br />
by adding the code<br />
< BGCOLOR="#D0D0D0" ><br />
http://subnet.virtual-pc.com/li542871/D0D0D0.htm [8/20/2000 12:24:35 PM]
Adding Pictures to your <strong>Web</strong> Page<br />
TECHNICAL NOTE<br />
BACK... INDEX ...NEXT<br />
Adding P I C T U R E S<br />
to Your <strong>Pages</strong><br />
Using Windows 95 <strong>and</strong> Microsoft <strong>Internet</strong> <strong>Explorer</strong><br />
1.<br />
2.<br />
3.<br />
4.<br />
This page will show you how to -<br />
Find a picture <strong>for</strong> your page<br />
Add the picture to your page<br />
Position the picture<br />
Change the size of the picture<br />
You may wish to print out this page <strong>for</strong> future reference<br />
Pictures are called "graphics" or "images" by computer users.<br />
"Icons" are small images, which are often used as links in web pages.<br />
There are two types of images which are commonly used on web pages<br />
1. GIF, ending with .gif<br />
Usually drawings, cartoons <strong>and</strong> diagrams<br />
2. JPEG, ending with .jpg or .jpeg<br />
Usually photos or complex computer art<br />
1. Finding pictures to use<br />
I suggest you do what most people do, <strong>and</strong> pinch them from other web pages.<br />
To pinch an image, place your mouse cursor over the image, <strong>and</strong> right click.<br />
A menu will appear, choose Save Picture as .<br />
Choose where you want to save the picture on your disk.<br />
http://subnet.virtual-pc.com/li542871/graphics.htm (1 of 4) [8/20/2000 12:24:38 PM]
Adding Pictures to your <strong>Web</strong> Page<br />
Then click the Save button<br />
Try this out with the picture of the printer on this page.<br />
Now, be warned, stealing other people's work is against copyright laws.<br />
But, the good news is, there are many FREE images, which you are allowed to use<br />
Microsoft has a gallery of free images <strong>for</strong> you to use on your web pages.<br />
You can go there by clicking here to go to Microsoft's <strong>Web</strong> Gallery<br />
2. Adding pictures to your page<br />
1.<br />
2.<br />
3.<br />
4.<br />
5.<br />
6.<br />
7.<br />
8.<br />
9.<br />
Find your file of the printer image which you have just pinched.<br />
MOVE or COPY this file into your HTMLwork folder<br />
Now, open one of your pages, click view <strong>and</strong> source to begin editing<br />
Make sure your image appears on a new line, by <strong>using</strong> or <br />
The code you need to use is<br />
< IMG SRC="name.ext" ><br />
To remember this, think of IMaGe SouRCe.<br />
You should type < IMG SRC="printer1.gif" ><br />
Immediately after the image, type "This is a picture of a printer".<br />
Save your work, <strong>and</strong> refresh your page to view the results.<br />
It should appear looking like this<br />
OOPS! It didn't work<br />
●<br />
●<br />
●<br />
●<br />
●<br />
Check you have moved printer1.gif to the same folder as your page<br />
Have you spelt everything correctly, including .gif on the end ?<br />
Check <strong>for</strong> capital letters. Your image name <strong>and</strong> link must match exactly.<br />
Have you remembered the inverted commas around the name of the picture ?<br />
Now TRY AGAIN<br />
3. Positioning pictures on your pages<br />
Notice that your picture will appear close to the left margin.<br />
Any text following your picture will be aligned to the bottom of the picture.<br />
You can change this by adding any of the following codes.<br />
http://subnet.virtual-pc.com/li542871/graphics.htm (2 of 4) [8/20/2000 12:24:38 PM]
Adding Pictures to your <strong>Web</strong> Page<br />
●<br />
●<br />
●<br />
●<br />
●<br />
●<br />
To align the text to the top of the picture<br />
Use the code < IMG SRC="name.ext" align=top ><br />
To align the text to the middle of the picture<br />
Use the code < IMG SRC="name.ext" align=middle ><br />
To align the picture to the left of the page, <strong>and</strong> allow the text to flow down the<br />
right<br />
Use the code < IMG SRC="name.ext" align=left ><br />
To align the picture to the right of the page, <strong>and</strong> allow the text to flow down the<br />
left<br />
Use the code < IMG SRC="name.ext" align=right ><br />
To create a space on either side of the picture<br />
Use the code < IMG SRC="name.ext" hspace=5 ><br />
Remember hspace st<strong>and</strong>s <strong>for</strong> horizontal space.<br />
This will create a space 5 pixels wide on either side of the image.<br />
You can vary the number of pixels. Try <strong>using</strong> 10 or 20<br />
To create a space above <strong>and</strong> below the picture<br />
Use the code < IMG SRC="name.ext" vspace=5 ><br />
Remember vspace st<strong>and</strong>s <strong>for</strong> vertical space.<br />
This will create a space 5 pixels deep.<br />
Again, you can vary the number of pixels. Try <strong>using</strong> 10 or 20<br />
Here are some examples<br />
4. Changing the size of your pictures<br />
●<br />
●<br />
●<br />
●<br />
●<br />
Use < IMG SRC="name.ext" width="50%" ><br />
to <strong>for</strong>ce the picture to stretch across 50% of the page.<br />
Or use < IMG SRC="name.ext" height="50%" ><br />
to <strong>for</strong>ce the height of the picture in the same way<br />
Or use < IMG SRC="name.ext" width=100 ><br />
will make the picture 100 pixels wide<br />
Or use < IMG SRC="name.ext" height=200 ><br />
will make the picture 200 pixels high<br />
Or use < IMG SRC="name.ext" width=100 height=200 ><br />
to <strong>for</strong>ce the picture to resize to 100 pixels wide <strong>and</strong> 200 pixels high<br />
TIP<br />
When your page is loading up, any images on the page will take some time<br />
to appear. When they do appear, the page will appear to jump. This can be<br />
very annoying <strong>for</strong> your reader.<br />
http://subnet.virtual-pc.com/li542871/graphics.htm (3 of 4) [8/20/2000 12:24:38 PM]
Adding Pictures to your <strong>Web</strong> Page<br />
You can stop this happening by putting the real height <strong>and</strong> width of the<br />
image in the image tag. (You can find out the measurements of a picture by<br />
opening it in a graphics program <strong>and</strong> looking at the properties of the image.)<br />
Now try this<br />
1. Visit Microsoft's <strong>Web</strong> Gallery, <strong>using</strong> the link above, <strong>and</strong> collect some pictures<br />
2. Get a selection of icons, eg. printer icons, mail icons, <strong>and</strong> arrow icons. You will<br />
need these later.<br />
3. Find some interesting pictures or photos, <strong>and</strong> save these<br />
4. Now create a new web page with the title "Pictures I have found"<br />
Display 2 images on your new page.<br />
Give each one a heading, <strong>and</strong> write a paragraph of text about each one<br />
Create some space around each picture<br />
Align one of the pictures to the left, <strong>and</strong> one to the right of your page.<br />
5. Remember the poem you wrote? Try <strong>and</strong> find a picture to illustrate your poem.<br />
Display the picture in your poetry page.<br />
Use the center tags to position the picture in the middle of the page.<br />
6. Try changing the size of your pictures <strong>and</strong> see what happens when you shrink or<br />
exp<strong>and</strong> them.<br />
BACK INDEX NEXT<br />
These pages were designed <strong>and</strong> written by Ruth Livingstone. Sept 1996<br />
They may be printed out <strong>for</strong> personal use, but should not be copied <strong>and</strong> redistributed without my permission<br />
All mistakes are my own.<br />
Brick bats <strong>and</strong> bouquets to Ruth-Livingstone@ella.co.uk<br />
http://subnet.virtual-pc.com/li542871/graphics.htm (4 of 4) [8/20/2000 12:24:38 PM]
My Colour <strong>Web</strong> Page<br />
Remember to click view <strong>and</strong> source to<br />
see the code <strong>for</strong> this page<br />
This text is an olive colour, <strong>and</strong> I have chosen the font "arial"<br />
This link is a red colour because it takes you back to a page you have already visited<br />
Go back to the last page is a VISITED link.<br />
This link is a purple colour, because you have never been here<br />
This page will make your dreams come true<br />
Un<strong>for</strong>tunately you never will visit this page. It doesn't exist!<br />
You don't have to stick to these chosen colours<br />
Don't <strong>for</strong>get you can use FONT COLOR=name to <strong>for</strong>ce a change in font colour.<br />
when you want to return to your normal text colour use /FONT<br />
You should underst<strong>and</strong> all the HTML coding <strong>for</strong> this page, except <strong>for</strong> the LINKS.<br />
Click View <strong>and</strong> Source, <strong>and</strong> make have a look at the code.<br />
If you find all this too easy, then remember this is<br />
<strong>Web</strong> <strong>Pages</strong><br />
<strong>for</strong> Absolute Beginners<br />
http://subnet.virtual-pc.com/li542871/mycolour.htm [8/20/2000 12:24:39 PM]
Adding Backgrounds to your <strong>Web</strong> Page<br />
TECHNICAL NOTE<br />
BACK... INDEX ...NEXT<br />
Adding background<br />
I M A G E S<br />
to your pages<br />
Using Windows 95 <strong>and</strong> Microsoft <strong>Internet</strong> <strong>Explorer</strong><br />
1.<br />
2.<br />
This page will show you how to -<br />
Add a background to your page<br />
Style tips<br />
You may wish to print out this page <strong>for</strong> future reference<br />
Remember, there are two types of images which are commonly used on web pages<br />
1. GIF, ending with .gif<br />
Usually drawings, cartoons <strong>and</strong> diagrams<br />
2. JPEG, ending with .jpg or .jpeg<br />
Usually photos or complex computer art<br />
1. Adding images to your background<br />
In the BODY tag, use the following code -<br />
BACKGROUND="named.ext"<br />
eg. < BODY BACKGROUND="marble.gif" ><br />
Remember, the image file must be in the same folder as your web page.<br />
Your image will appear tiled in the background.<br />
You can use small images, which will load quickly on the page.<br />
http://subnet.virtual-pc.com/li542871/backgr.htm (1 of 3) [8/20/2000 12:24:43 PM]
Adding Backgrounds to your <strong>Web</strong> Page<br />
2. Style tips<br />
●<br />
●<br />
Remember, your text must st<strong>and</strong> out against the background.<br />
If you use a dark background image, use a light coloured text.<br />
If you use a light background image, use a dark text.<br />
Check the file size of the images you use. Large images will take a long time to<br />
appear, <strong>and</strong> your viewer will get bored waiting.<br />
I suggest you keep background images less than 5 KB<br />
I suggest you keep other pictures less than 20 KB, <strong>and</strong> smaller if<br />
possible<br />
Here are some examples<br />
1st example<br />
2nd example<br />
Now try this<br />
1. Look at the examples above, <strong>and</strong> save the background image from each<br />
2. Add the "bright.gif" image to one of your pages<br />
3. Now change the background to "dark.gif"<br />
Make sure you change the text colour<br />
You have come a long way.<br />
You know how to make a web page <strong>using</strong> Notepad, <strong>and</strong> how to edit your page. You can<br />
arrange your text on the page, <strong>using</strong> headings, line breaks <strong>and</strong> paragraphs. You can make<br />
a variety of lists, <strong>and</strong> use horizontal rules to break up your text. You can use different<br />
colours <strong>and</strong> fonts <strong>for</strong> your text <strong>and</strong> change the background colour of your page.<br />
You now know how to add images to your pages, either as pictures on your page, or as a<br />
background to your page.<br />
If you have been trying the Now try this excercises, you should now have a number of<br />
different pages on your computer.<br />
You should have made the following pages<br />
1. "mypage.htm" with some in<strong>for</strong>mation about yourself<br />
2. "friend.htm" about a friend of yours<br />
http://subnet.virtual-pc.com/li542871/backgr.htm (2 of 3) [8/20/2000 12:24:43 PM]
Adding Backgrounds to your <strong>Web</strong> Page<br />
3. "poem.htm" with a poem<br />
You need these pages <strong>for</strong> the next stage, so make sure you have them ready.<br />
Now it's time to put all these pages together.<br />
We need to make some links.<br />
BACK INDEX NEXT<br />
These pages were designed <strong>and</strong> written by Ruth Livingstone. Sept 1996<br />
They may be printed out <strong>for</strong> personal use, but should not be copied <strong>and</strong> redistributed without my permission<br />
All mistakes are my own.<br />
Brick bats <strong>and</strong> bouquets to Ruth-Livingstone@ella.co.uk<br />
http://subnet.virtual-pc.com/li542871/backgr.htm (3 of 3) [8/20/2000 12:24:43 PM]
Adding Images<br />
Here is all the stuff you may have written be<strong>for</strong>e.<br />
I hope you have been doing lots of experimenting with lists <strong>and</strong> headings<br />
Make sure there is a BReak or Paragraph be<strong>for</strong>e you add your image<br />
This is a picture of a printer<br />
http://subnet.virtual-pc.com/li542871/image.htm [8/20/2000 12:24:44 PM]
Examples of positioning Images<br />
Different ways of displaying an image on<br />
your page<br />
Remember - you can click View <strong>and</strong> Source to see the HTML coding behind this page.<br />
This is a picture of a printer. Notice that the picture will appear on the left, <strong>and</strong> any following text<br />
will be in line with the bottom of the picture.<br />
This picture is aligned to the top of any text that follows it. But, the next line of text will appear<br />
below the picture, so this can lead to odd gaps in a paragraph.<br />
Here, the text is aligned to the middle of the picture. Notice how the next line of text will appear<br />
below the picture. To prevent this, you can use align=right or align=left as shown below.<br />
If you use align=left , the picture will appear on the left side of the page, <strong>and</strong> text will flow down<br />
beside the picture, without any gaps.<br />
If you use align=right , the picture will appear on the right side of the page, <strong>and</strong> text will flow<br />
down beside the picture, without any gaps. However, this will only work <strong>for</strong> people <strong>using</strong> Netscape<br />
or <strong>Internet</strong> <strong>Explorer</strong>.<br />
Here are 3 pictures, with 5 pixels of horizontal space between each one.<br />
This picture has 10 pixels of horizontal space on either side.<br />
This picture has 50 pixels of horizontal space on either side.<br />
http://subnet.virtual-pc.com/li542871/egimgs.htm [8/20/2000 12:24:44 PM]
Adding Links <strong>for</strong> Absolute Beginners<br />
BACK... INDEX ...NEXT<br />
LINKING your pages together<br />
Using Windows 95 <strong>and</strong> Microsoft <strong>Internet</strong> <strong>Explorer</strong><br />
1.<br />
2.<br />
3.<br />
4.<br />
This page will show you how to -<br />
Link your pages together with text<br />
Link your pages together <strong>using</strong> icons<br />
Link to a particular place in a document<br />
Create an Index page<br />
You may wish to print out this page <strong>for</strong> future reference<br />
1. Linking your pages with text<br />
The code you need to use is Type any text you want<br />
here<br />
A text link is called a hypertext link.<br />
The A st<strong>and</strong>s <strong>for</strong> 'Anchor' <strong>and</strong> the HREF st<strong>and</strong>s <strong>for</strong> Hypertext REFerence.<br />
For example - Click here to go to my Magic page <br />
Now you can make a hypertext link from mypage.htm to friend.htm.<br />
1. Make sure both these documents are in the same folder (HTMLwork)<br />
2. Open mypage.htm <strong>and</strong> find a suitable place to add your link.<br />
3. Click View <strong>and</strong> Source, <strong>and</strong> type in the following<br />
Click here to read about my friend<br />
4. Now save your changes <strong>and</strong> refresh your page to view the link.<br />
5. The link should appear underlined, <strong>and</strong> is usually a blue colour.<br />
Remember you can change the colour of the link by adding<br />
LINK=colour name or code in the body tag.<br />
6. Click on your new link, <strong>and</strong> your friend.htm page should open.<br />
http://subnet.virtual-pc.com/li542871/links.htm (1 of 4) [8/20/2000 12:24:48 PM]
Adding Links <strong>for</strong> Absolute Beginners<br />
2. Linking your pages with icons<br />
You can use images to link your pages. Small images are known as icons.<br />
Icons are usually small .gif files , but .jpg or .jpeg files can be used.<br />
The code you need is <br />
This looks complicated, but you are simply adding an image to your page <strong>using</strong> the IMG<br />
tag,<br />
<strong>and</strong> putting a hyperlink anchor tag around the image tag.<br />
Now you can use an icon to link your mypage.htm to friend.htm.<br />
You need a small arrow icon, which you should have collected earlier from Microsoft's<br />
<strong>Web</strong> Gallery<br />
1. Find the icon you want to use.<br />
2. Rename it, if you wish, to arrow1.gif<br />
3. Move, or copy it, into your HTMLwork folder<br />
4. Open mypage.htm, <strong>and</strong> click View <strong>and</strong> Source<br />
5. At the bottom of the page, type the following code<br />
6. <br />
7. Save your work, refresh your page, <strong>and</strong> test your link.<br />
Notice that your icon link has border around it. This border is usually blue.<br />
● You can change the colour of the border by <strong>using</strong><br />
LINK=colour name or code in the body tag.<br />
● You can get rid of this border by adding BORDER=0 to the IMG<br />
tag.<br />
For example,<br />
<br />
● You can create a thick border by adding BORDER=n to the IMG<br />
tag.<br />
n can be any number you like. For example,<br />
<br />
3.Link to a particular place in a document<br />
It can be useful to provide a link which will jump to a specific place in the same page.<br />
For examples of this, look at the numbered links at the top of this page.<br />
1. Firstly, you need to name the text you want to jump to.<br />
Here is the text you want to jump to <br />
http://subnet.virtual-pc.com/li542871/links.htm (2 of 4) [8/20/2000 12:24:48 PM]
Adding Links <strong>for</strong> Absolute Beginners<br />
2.<br />
Secondly, you need to include that name in the link.<br />
Click here to jump to text somewhere else in this<br />
document <br />
You can also jump to a named area in another page.<br />
Go to a named area in another document <br />
Trouble Shooting<br />
If your link doesn't work, check the following<br />
● First, check the name in the link looks exactly the same as your page name<br />
(Watch out <strong>for</strong> capital letters <strong>and</strong> simple spelling mistakes)<br />
● Check you have used inverted commas around the linked page name<br />
● Make sure you have all your linked pages in the same folder<br />
● Make sure you have closed your anchor tag with <br />
Now try this<br />
1. Make a text link from mypage.htm to your poetry page<br />
2. Now use your arrow icon to make a link from your poetry page back to<br />
mypage.htm<br />
3. Get rid of the border around the arrow icon<br />
4. To make it clear where your arrow icon is linking to, you need to add some text as<br />
well.<br />
Make a hypertext link to go with your linked arrow icon.<br />
4. Create an Index page<br />
You should now have a number of web pages prepared <strong>and</strong> you know how to link them<br />
together <strong>using</strong> text or images.<br />
The next step is to create a page called index.html or index.htm. Most <strong>Internet</strong><br />
computers will expect you to have a page called index.html or index.htm. Be<strong>for</strong>e you<br />
put your pages on the <strong>Internet</strong>, you will need to make sure that you have an Index page.<br />
1. Make a new HTML page, <strong>and</strong> call it index.html.<br />
2. In index.html, list all the pages you have created so far.<br />
3. From this list, create text links to your pages<br />
http://subnet.virtual-pc.com/li542871/links.htm (3 of 4) [8/20/2000 12:24:48 PM]
Adding Links <strong>for</strong> Absolute Beginners<br />
4.<br />
5.<br />
6.<br />
eg.<br />
Read about me<br />
Read about my friend<br />
Fancy some poetry?<br />
Save your changes.<br />
Check your links work.<br />
Now you can rearrange your page - add images <strong>and</strong> background etc.<br />
Your Index page will be the first page your viewers see, so make it look stunning!<br />
BACK INDEX NEXT<br />
These pages were designed <strong>and</strong> written by Ruth Livingstone. Sept 1996<br />
They may be printed out <strong>for</strong> personal use, but should not be copied <strong>and</strong> redistributed without my permission<br />
All mistakes are my own.<br />
Brick bats <strong>and</strong> bouquets to Ruth-Livingstone@ella.co.uk<br />
http://subnet.virtual-pc.com/li542871/links.htm (4 of 4) [8/20/2000 12:24:48 PM]
Example1.htm<br />
Using a Background image<br />
This background image is 50 pixels square, <strong>and</strong> is tiled to <strong>for</strong>m a<br />
background <strong>for</strong> this web page.<br />
You can save this image by clicking on the background, with<br />
your right mouse button.<br />
Choose "Save Backgound as" <strong>and</strong> save the .gif file in your<br />
HTMLwork folder.<br />
http://subnet.virtual-pc.com/li542871/egbkgr1.htm [8/20/2000 12:24:57 PM]
Example2.htm<br />
Using a Background image<br />
This background image is 50 pixels square, <strong>and</strong> is tiled to <strong>for</strong>m a<br />
background <strong>for</strong> this web page.<br />
You can save this image by clicking on the background, with<br />
your right mouse button.<br />
Choose "Save Background As" <strong>and</strong> save the .gif file in your<br />
HTMLwork folder.<br />
http://subnet.virtual-pc.com/li542871/egbkgr2.htm [8/20/2000 12:24:58 PM]
Adding other Links<br />
BACK... INDEX ...NEXT<br />
Adding LINKS<br />
to other folders <strong>and</strong> files<br />
Using Windows 95 <strong>and</strong> Microsoft <strong>Internet</strong> <strong>Explorer</strong><br />
1.<br />
2.<br />
This page will show you how to -<br />
Link to pages in other folders<br />
Link to other files<br />
You may wish to print out this page <strong>for</strong> future reference<br />
1. Making links to pages in another folder<br />
●<br />
●<br />
As your web pages grow, <strong>and</strong> you will find it easier to make subfolders in your<br />
HTMLwork folder. To link to pages stored in a subfolder, you need to use the<br />
following code.<br />
Type any text you want here<br />
For example, you could create a subfolder called "Friends" <strong>and</strong> move<br />
friend.htm into this new folder. Now, any links to friend.htm would<br />
no longer work. You would have to change your links to something<br />
like this :-<br />
Click here to read about my<br />
friend<br />
To link to pages stored in a folder above this one, you need to use the following<br />
code<br />
Type any text you want here<br />
For example, let's assume you have moved friend.htm to a subfolder<br />
called Friends. Now, you want to make a link from friend.htm back<br />
to mypage.htm<br />
The code you need to use should look something like this -<br />
Go back to my main page <br />
http://subnet.virtual-pc.com/li542871/folders.htm (1 of 3) [8/20/2000 12:25:02 PM]
Adding other Links<br />
●<br />
If you want to move up TWO folders, use<br />
Go back to this page <br />
You can link to any file on your computer by typing the complete path in the A<br />
HREF tag.<br />
Type any text you want<br />
here<br />
eg Type any text you<br />
want here<br />
Of course, this only works <strong>for</strong> viewing your pages on your own computer, <strong>and</strong><br />
assumes that your main hard drive is called C.<br />
If this sounds too complicated, don't worry. Just keep all your files in one folder.<br />
2. Making links to other files<br />
You can add links to text documents, image files, sound files etc<br />
Type any text you want here <br />
For example, to download a short wav file click here<br />
Remember<br />
If you want someone to download a file from your web site<br />
1. You must upload the file to your web site<br />
2. Your viewer must have the right software to read the file<br />
You can assume everyone can read plain text files. However, if you want to make<br />
a Lotus 123 Spreadsheet available, only people with Lotus 123 will be able to read<br />
it<br />
Now try this<br />
If you haven't already done this, try the following<br />
1. Create a folder called Friends within your HTMLwork folder<br />
Move your page called friend.htm into this folder.<br />
Look at mypage.htm <strong>and</strong> find any links that lead to friend.htm<br />
Now change your links in mypage.htm <strong>and</strong> check that you can open friend.htm<br />
Make sure you also change any links in friend.htm.<br />
2. Create a new web page, <strong>and</strong> call it index.htm<br />
Start with a welcome message, <strong>and</strong> a few brief sentences about yourself.<br />
http://subnet.virtual-pc.com/li542871/folders.htm (2 of 3) [8/20/2000 12:25:02 PM]
Adding other Links<br />
3.<br />
Then make a list of all the pages you have created so far.<br />
Make hypertext links from this index page to your pages.<br />
Link your other pages back to your index page.<br />
Try adding small icons to the index page, <strong>and</strong> use these in your links.<br />
Try <strong>and</strong> make it easy <strong>for</strong> your viewer to move from one page to another<br />
Make sure every page has a link, so the viewer can move on to another page<br />
You should always give your readers an chance to Email you.<br />
You can make this easy by putting a special link on your pages<br />
BACK INDEX NEXT<br />
These pages were designed <strong>and</strong> written by Ruth Livingstone. Sept 1996<br />
They may be printed out <strong>for</strong> personal use, but should not be copied <strong>and</strong> redistributed without my permission<br />
All mistakes are my own.<br />
Brick bats <strong>and</strong> bouquets to Ruth-Livingstone@ella.co.uk<br />
http://subnet.virtual-pc.com/li542871/folders.htm (3 of 3) [8/20/2000 12:25:02 PM]
Provide an Email link<br />
BACK... INDEX ...NEXT<br />
Provide an<br />
E MAIL LINK<br />
in your pages<br />
Using Windows 95 <strong>and</strong> Microsoft <strong>Internet</strong> <strong>Explorer</strong><br />
●<br />
This page will show you how to -<br />
Provide an Email link<br />
You may wish to print out this page <strong>for</strong> future reference<br />
Provide an E mail link<br />
The code you need is<br />
Whatever text you like here <br />
For example, if your ID is Jo_Bloggs <strong>and</strong> your <strong>Internet</strong> Service provider is msn.com :-<br />
Click here to send me mail <br />
But some viewers may not be able to use this mailto: facility. You should also supply<br />
your full Email address somewhere on your pages.<br />
Instead of Click here to send me mail you can type your real Email address.<br />
Jo_Bloggs@msn.com <br />
Now try this<br />
1.<br />
2.<br />
Place an Email link on your index page. Test it.<br />
Find a suitable image (icon) <strong>for</strong> Email <strong>and</strong> make an Email link <strong>using</strong> this icon.<br />
The web is a network of links. Make sure you provide plenty of links on your pages, <strong>and</strong><br />
http://subnet.virtual-pc.com/li542871/email.htm (1 of 2) [8/20/2000 12:25:03 PM]
Provide an Email link<br />
don't lead your viewer into a dead end.<br />
Now you need to provide some links to other people's pages on the internet<br />
BACK INDEX NEXT<br />
These pages were designed <strong>and</strong> written by Ruth Livingstone. Sept 1996<br />
They may be printed out <strong>for</strong> personal use, but should not be copied <strong>and</strong> redistributed without my permission<br />
All mistakes are my own.<br />
Brick bats <strong>and</strong> bouquets to Ruth-Livingstone@ella.co.uk<br />
http://subnet.virtual-pc.com/li542871/email.htm (2 of 2) [8/20/2000 12:25:03 PM]
Adding Links to Other People's <strong>Pages</strong><br />
BACK... INDEX ...NEXT<br />
Make LINKS<br />
to other people's pages<br />
Using Windows 95 <strong>and</strong> Microsoft <strong>Internet</strong> <strong>Explorer</strong><br />
●<br />
This page will show you how to -<br />
Make links to other people's pages<br />
You may wish to print out this page <strong>for</strong> future reference<br />
Make links to other people's pages<br />
To make a link to another page, you need to provide the complete internet address.<br />
The code you need is<br />
Text goes here <br />
For example, if you would like to make a link to Yahoo :-<br />
Click here to go to Yahoo <br />
On your page, this should look like this:-<br />
Click here to go to Yahoo<br />
Simple.<br />
You can use icons <strong>for</strong> links, <strong>using</strong> the code<br />
<br />
Now try this<br />
1.<br />
2.<br />
Create a new page called links.htm<br />
List your favourite pages, arranging them under headings<br />
eg. Links to friends pages, links to useful sites, etc<br />
http://subnet.virtual-pc.com/li542871/other.htm (1 of 2) [8/20/2000 12:25:04 PM]
Adding Links to Other People's <strong>Pages</strong><br />
3. Make links to these pages<br />
4. If you have an internet connection, you can connect <strong>and</strong> check your links work<br />
5. Don't <strong>for</strong>get to link your links.htm page to your index.htm page<br />
Summary<br />
You have created a series of pages. You have a page called index.htm, <strong>and</strong> you have<br />
linked your pages together <strong>using</strong> hypertext <strong>and</strong> icons. You know how to create links to<br />
places on the internet.<br />
Well done. You have created your own little web site.<br />
Your pages only exist on your own computer.<br />
If you want to share them with the rest of the world - read on -<br />
BACK INDEX NEXT<br />
These pages were designed <strong>and</strong> written by Ruth Livingstone. Sept 1996<br />
They may be printed out <strong>for</strong> personal use, but should not be copied <strong>and</strong> redistributed without my permission<br />
All mistakes are my own.<br />
Brick bats <strong>and</strong> bouquets to Ruth-Livingstone@ella.co.uk<br />
http://subnet.virtual-pc.com/li542871/other.htm (2 of 2) [8/20/2000 12:25:04 PM]
Putting your pages on the internet <strong>for</strong> Absolute Beginners<br />
BACK... INDEX ...NEXT<br />
Putting your pages<br />
on the INTERNET<br />
<strong>for</strong> Absolute Beginners<br />
With Microsoft <strong>Internet</strong> <strong>Explorer</strong> <strong>and</strong> Windows 95/98<br />
1.<br />
2.<br />
3.<br />
This page will show you how to -<br />
Find a company to host your pages<br />
Find a program to to upload your pages<br />
Check that everything works<br />
You may wish to print out this page <strong>for</strong> future reference<br />
1. Find a company to host your pages<br />
If you are viewing this page on the internet, you will probably be <strong>using</strong> an <strong>Internet</strong><br />
Service Provider (ISP). You may have your own account with an ISP, or you may get<br />
free access from work or college.<br />
To put your own pages on the web, you will need to find an ISP who will act as your<br />
"host".<br />
Most ISPs now provide this service, although there is often a limit to the amount of<br />
space they will let you have. The Microsoft Network is one ISP which does NOT<br />
provide web space.<br />
It is difficult to give you up to date in<strong>for</strong>mation about ISPs, because things change so<br />
fast !! Here are some ways to make a choice.<br />
● Contact your current ISP (if you have one) <strong>and</strong> ask about personal web space<br />
● Look in your local paper <strong>for</strong> adverts.<br />
● Read the computer mags <strong>for</strong> in<strong>for</strong>mation<br />
● More in<strong>for</strong>mation about UK ISPs at <strong>Internet</strong> UK<br />
http://subnet.virtual-pc.com/li542871/internet.htm (1 of 3) [8/20/2000 12:25:05 PM]
Putting your pages on the internet <strong>for</strong> Absolute Beginners<br />
●<br />
Visit my main internet service provider UKonline who provide unlimited web<br />
space<br />
2. Find a program to upload your pages<br />
After you have found an <strong>Internet</strong> Service Provider (ISP) to host your pages, you will<br />
need some special software to upload your pages to the internet.<br />
First, check with your ISP. They may recommend or supply you with their own software<br />
to do this. Most ISPs will advise you to get a File Transfer Protocol (FTP) program<br />
Here are sites where you can download FTP programs:<br />
● I recommend WS_FTP. You have to buy the full program.<br />
● A 'lite' version of WS_FTP can be downloaded from here free of charge.<br />
● You will find a selection of other FTP programs on this Tucows page.<br />
Once you have downloaded your FTP program you will need to configure it, to give you<br />
access to your ISPs web space. Please contact your ISP about this. They will tell you<br />
how to connect to your "host".<br />
Here is some in<strong>for</strong>mation about <strong>using</strong> WS_FTP<br />
3. Check that everything works<br />
TECHNICAL NOTE<br />
You will need an index page called index.html or index.htm<br />
Be<strong>for</strong>e you load up your precious pages, make sure they work properly.<br />
● Look at each page individually<br />
● Check your images appear<br />
● Check your links work<br />
● Check your spelling<br />
● Make sure you can find your way from one page to another<br />
● Have you included your Email address?<br />
Then start your FTP program, connect to your ISP <strong>and</strong> transfer your files to the internet.<br />
Then close your FTP program, connect to the internet <strong>and</strong> view your pages on the web.<br />
<strong>and</strong> check everything again<br />
http://subnet.virtual-pc.com/li542871/internet.htm (2 of 3) [8/20/2000 12:25:05 PM]
Putting your pages on the internet <strong>for</strong> Absolute Beginners<br />
Tips<br />
Keep copies of your pages on your own computer.<br />
You can easily edit <strong>and</strong> change them whenever you wish.<br />
(ISPs can crash <strong>and</strong> all your hard work will be lost!)<br />
Keep checking your pages, at least once a week. Links can disappear, image<br />
files can be accidentally deleted, your Email address can change.<br />
Keep your pages up to date. No one likes to read in<strong>for</strong>mation that is old. <strong>Web</strong><br />
pages are easy to change, <strong>and</strong> it only takes a few minutes to upload your new<br />
pages to the web.<br />
Here are some more tips to remember when writing your pages<br />
BACK INDEX NEXT<br />
These pages were designed <strong>and</strong> written by Ruth Livingstone, Sept 1996. Revised January 2000<br />
They may be printed out <strong>for</strong> personal use, but should not be copied <strong>and</strong> redistributed without my permission<br />
All mistakes are my own.<br />
Brick bats <strong>and</strong> bouquets to Ruth-Livingstone@ella.co.uk<br />
http://subnet.virtual-pc.com/li542871/internet.htm (3 of 3) [8/20/2000 12:25:05 PM]
Hints <strong>and</strong> Tips <strong>for</strong> Absolute Beginners<br />
BACK... INDEX ...NEXT<br />
Tips <strong>and</strong> Hints<br />
<strong>for</strong> Absolute Beginners<br />
With Microsoft <strong>Internet</strong> <strong>Explorer</strong> <strong>and</strong> Windows 95<br />
1.<br />
2.<br />
Tips to help you-<br />
Make life easy <strong>for</strong> yourself<br />
Make life easy <strong>for</strong> your viewer<br />
1. Make life easy <strong>for</strong> yourself<br />
●<br />
●<br />
●<br />
●<br />
●<br />
●<br />
If you write your HTML <strong>using</strong> capital letters in tags, <strong>and</strong> keep your work well<br />
spaced out, you will find it much easier to read <strong>and</strong> edit your coding.<br />
Don't be too ambitious. Start with an index.htm <strong>and</strong> a few other pages. Your pages<br />
have plenty of time to develop.<br />
Everything gets easier with practice. You won't produce the coolest web site ever<br />
in a few hours. Keep trying. Keep experimenting<br />
Watch out <strong>for</strong> mistakes, (we all make them), <strong>and</strong> then put things right. Ask your<br />
friends to look at your pages <strong>and</strong> accept their criticisms.<br />
Remember, there is a great deal more to learn about HTML. If you see a page you<br />
like on the net, just click View <strong>and</strong> Source, <strong>and</strong> you will be able to see the coding<br />
behind the page.<br />
Don't be put off by friends who tell you to download the latest wonderful home<br />
page editor. Your friends won't know what to do when things go wrong. YOU<br />
know how to write real HTML code. You will be able to work out any problems<br />
<strong>and</strong> put things right.<br />
2. Make life easy <strong>for</strong> your viewer<br />
●<br />
●<br />
Make your text easy to read. Beware of weird fonts. Your viewer may not have<br />
the same fonts as you. Don't type lines of text in capital letters, because these are<br />
hard to read. Break up your text frequently <strong>using</strong> paragraphs <strong>and</strong> horizontal rules.<br />
Keep plenty of contrast between your text <strong>and</strong> background. Don't give your<br />
viewer migraines ! Remember that your viewer may see your colours differently<br />
http://subnet.virtual-pc.com/li542871/tips.htm (1 of 2) [8/20/2000 12:25:06 PM]
Hints <strong>and</strong> Tips <strong>for</strong> Absolute Beginners<br />
●<br />
●<br />
●<br />
on their own computer.<br />
Keep your images small. Make sure your icons are only a few kilobytes in size.<br />
No one likes waiting ages <strong>for</strong> a page to download. In particular, your first page<br />
(index.htm) should be quick to download.<br />
Make it easy to find your way around your web site. Use plenty of well labelled<br />
links.<br />
The web is a network of links. Be part of the network. Make lots of links to other<br />
people's pages.<br />
Most important tip of all - ENJOY yourself !<br />
There are many internet sites about HTML. Shall we have a look at some?<br />
BACK INDEX NEXT<br />
These pages were designed <strong>and</strong> written by Ruth Livingstone. Sept 1996<br />
They may be printed out <strong>for</strong> personal use, but should not be copied <strong>and</strong> redistributed without my permission<br />
All mistakes are my own.<br />
Brick bats <strong>and</strong> bouquets to Ruth-Livingstone@ella.co.uk<br />
http://subnet.virtual-pc.com/li542871/tips.htm (2 of 2) [8/20/2000 12:25:06 PM]
FTP<br />
Be<strong>for</strong>e you start:<br />
Using WS_FTP<br />
Check with your ISP - make sure you have the correct in<strong>for</strong>mation to configure your FTP<br />
program to connect to your ISP's web space.<br />
Make sure that you have an index page, called index.htm or index.html.<br />
When you first connect you may have no files on your web space. However, you may see a<br />
few odd files with names like CGI BIN. Leave these alone. They may contain important<br />
programs, provided by your ISP, which you can use later.<br />
This is an image of my WS-FTP program in action.<br />
The left h<strong>and</strong> screen contains files on my own computer.<br />
http://subnet.virtual-pc.com/li542871/ftp.htm (1 of 2) [8/20/2000 12:25:09 PM]
FTP<br />
The right h<strong>and</strong> screen contains files on my web space.<br />
I can move around my computer, <strong>and</strong> open different folders, by clicking on arrows <strong>and</strong><br />
folders in the left h<strong>and</strong> screen.<br />
I can move around my web site in the same way, <strong>using</strong> the right h<strong>and</strong> side of the screen.<br />
I can transfer files from my computer to the web site, <strong>using</strong> the --> button.<br />
I can transfer files from my web site, back to my own computer <strong>using</strong> the
HTML help <strong>for</strong> Absolute Beginners<br />
BACK... INDEX... NEXT<br />
HTML help sources<br />
<strong>for</strong> Absolute Beginners<br />
With Microsoft <strong>Internet</strong> <strong>Explorer</strong> <strong>and</strong> Windows 95<br />
1.<br />
2.<br />
3.<br />
4.<br />
Sites where you can learn more<br />
General<br />
Specialised<br />
Get your site noticed<br />
1. General HTML sites<br />
●<br />
●<br />
●<br />
●<br />
●<br />
●<br />
Free images <strong>and</strong> icons you can use<br />
NCSA Beginners Guide to HTML: provides good, basic in<strong>for</strong>mation.<br />
<strong>Web</strong> Resources HTML help: this friendly site is strongly recommended.<br />
HTML help from the <strong>Web</strong> Design Group.<br />
<strong>Web</strong>zone provides links to plenty of helpful sites.<br />
HTML Goodies provides a good basic HTML tutorial - almost as good as this<br />
one!<br />
Tucows HTML section provides free goodies to help you look after your <strong>Web</strong><br />
site.<br />
2. Specialised sites<br />
●<br />
●<br />
●<br />
●<br />
●<br />
Fast Counter from Link Exchange - a good, reliable visitor counter.<br />
HTMLgoodies Tutorial on Forms: tells you how to add a <strong>for</strong>m to your page.<br />
Onelist provides you with a free e-mail discussion list service.<br />
Bad style page with tips on what to avoid.<br />
Beyond the bones of HTML has some general style ideas.<br />
http://subnet.virtual-pc.com/li542871/html.htm (1 of 3) [8/20/2000 12:25:10 PM]
HTML help <strong>for</strong> Absolute Beginners<br />
●<br />
●<br />
●<br />
<strong>Web</strong> Wonk has some excellent ideas on style <strong>and</strong> presentation.<br />
The <strong>Web</strong> Developer's Virtual Library has more in<strong>for</strong>mation than you can h<strong>and</strong>le!<br />
HTML Doctor will check your HTML coding <strong>for</strong> you.<br />
● Htmlhelp's Validator is another way to check your HTML but is very fussy. Be<br />
warned - it will seriously depress you.<br />
Sites only <strong>for</strong> advanced <strong>Web</strong> page makers!<br />
● Frames are tricky: try this tutorial by Selena Sol.<br />
●<br />
●<br />
●<br />
●<br />
●<br />
●<br />
Justanotherwebsite has a Frames FAQ.<br />
Easy Javascript can add extra functions to your site.<br />
Javascripts.com is another source of free JavaScript.<br />
Introduction to Style Sheets from the <strong>Web</strong> Developers Library.<br />
Boinko.com provides an excellent PERL tutorial.<br />
Matt's Free Perl Scripts are justifiably famous.<br />
3. Get your site noticed<br />
There are no short cuts. To get your site noticed you have to visit the <strong>Internet</strong> 'Search<br />
Engines' <strong>and</strong> tell them you exist. These links will help you on your way to <strong>Internet</strong> fame.<br />
● Add me will help you submit your site to 30 search engines.<br />
● Add your site to Alta Vista<br />
● Add your site to Hot Bot<br />
● Add your site to Starting Point<br />
● ReSubmit.com will submit your page to 90<br />
search sites, free in exchange <strong>for</strong> a link.<br />
http://subnet.virtual-pc.com/li542871/html.htm (2 of 3) [8/20/2000 12:25:10 PM]<br />
4. Free images <strong>and</strong><br />
icons you can use<br />
●<br />
●<br />
●<br />
●<br />
My icon page<br />
The icon browser<br />
Microsoft's <strong>Web</strong> Gallery<br />
Animated Gifs
HTML help <strong>for</strong> Absolute Beginners<br />
●<br />
●<br />
●<br />
Media Links free graphics<br />
A+ Art<br />
Icon Bazaar<br />
Would you like to learn how to add sounds to your pages ?<br />
BACK INDEX NEXT<br />
These pages were designed <strong>and</strong> written by Ruth Livingstone in Sept 1996 <strong>and</strong> revised in January 2000<br />
They may be printed out <strong>for</strong> personal use, but should not be copied <strong>and</strong> redistributed without my permission<br />
All mistakes are my own.<br />
Brick bats <strong>and</strong> bouquets to Ruth-Livingstone@ella.co.uk<br />
http://subnet.virtual-pc.com/li542871/html.htm (3 of 3) [8/20/2000 12:25:10 PM]
Adding sound to your pages<br />
BACK... INDEX... NEXT<br />
Adding SOUND<br />
to your pages<br />
Using Windows 95 <strong>and</strong> Microsoft <strong>Internet</strong> <strong>Explorer</strong><br />
1.<br />
2.<br />
3.<br />
TECHNICAL NOTE<br />
This page will show you how to -<br />
Find sounds <strong>for</strong> your pages<br />
Add background sound <strong>for</strong> Microsoft <strong>Internet</strong> <strong>Explorer</strong><br />
Or offer your viewer a sound link<br />
You may wish to print out this page <strong>for</strong> future reference<br />
There are two types of sounds you can use<br />
1. .wav files<br />
useful <strong>for</strong> short noises or very short pieces of speech<br />
2. .mid files<br />
which play tunes, but can't transmit the human voice<br />
To hear sounds, you need a computer with a sound card <strong>and</strong> speakers. You also need some<br />
software to play the sound. Windows 95 comes with Media Player, <strong>and</strong> you should hear the<br />
1812 overture playing on this page.<br />
1. Find sounds <strong>for</strong> your pages<br />
1.<br />
Make your own !<br />
Windows 95 comes with a program called Sound Recorder.<br />
You can use this to record .wav sounds.<br />
You will need a microphone - these are cheap to buy if you don't already have one.<br />
TIP - If you use Sound Recorder, click Edit <strong>and</strong> make sure the Audio Properties are set to<br />
"telephone". "Radio" <strong>and</strong> "CD" produce better quality recordings, but the .wav files<br />
http://subnet.virtual-pc.com/li542871/sound.htm (1 of 3) [8/20/2000 12:25:11 PM]
Adding sound to your pages<br />
2.<br />
produced will be too large to use on your pages.<br />
Some people have midi keyboards, <strong>and</strong> with the right software, can produce their own<br />
midi compositions.<br />
Pinch them from the web<br />
BEWARE - the usual copyright regulations apply to wav <strong>and</strong> midi files.<br />
However, some sites offer free files <strong>for</strong> downloading.<br />
Click here to go to Microsoft's <strong>Web</strong> Gallery<br />
2. Adding background sound to your pages<br />
The code you need is<br />
<br />
You can specify how often you want the sound to repeat, by <strong>using</strong> LOOP=n<br />
<strong>for</strong> example <br />
You can also specify an infinite number of repeats<br />
<strong>for</strong> example <br />
Only people <strong>using</strong> Microsoft <strong>Internet</strong> <strong>Explorer</strong> will be able to hear your background sound. If<br />
you want to give other viewers the chance to hear your sounds, you will have to provide a link<br />
on the page, see below <strong>for</strong> details.<br />
3. Offer your viewer a sound link<br />
The code you need is simply<br />
Click here to hear this <br />
You can also use an image in your link, like this .......<br />
TIP<br />
Remember to upload the sound files to your web site !<br />
Keep your sound files small. Keep background sounds less than 20K if possible.<br />
Don't irritate your viewer - annoying sounds can be plain annoying.<br />
http://subnet.virtual-pc.com/li542871/sound.htm (2 of 3) [8/20/2000 12:25:11 PM]
Adding sound to your pages<br />
You can also add irritating marquees <strong>and</strong> blinking text to your pages !<br />
BACK INDEX NEXT<br />
These pages were designed <strong>and</strong> written by Ruth Livingstone. Sept 1996<br />
They may be printed out <strong>for</strong> personal use, but should not be copied <strong>and</strong> redistributed without my permission<br />
All mistakes are my own.<br />
Brick bats <strong>and</strong> bouquets to Ruth-Livingstone@ella.co.uk<br />
http://subnet.virtual-pc.com/li542871/sound.htm (3 of 3) [8/20/2000 12:25:11 PM]
Scrolling Marquees <strong>and</strong> Blinking Text, <strong>for</strong> Absolute Beginners<br />
BACK... INDEX... NEXT...<br />
Adding<br />
Marquees <strong>and</strong> Blinking Text<br />
to your pages<br />
Using Windows 95 <strong>and</strong> Microsoft <strong>Internet</strong> <strong>Explorer</strong><br />
1.<br />
2.<br />
This page will show you how to -<br />
Place a scrolling marquee on your page<br />
Make text blink<br />
You may wish to print out this page <strong>for</strong> future reference<br />
1. Place a scrolling marquee on your page<br />
Scrolling marquees can only be seen by viewers <strong>using</strong> Microsoft <strong>Internet</strong> <strong>Explorer</strong> 3.<br />
If you are <strong>using</strong> this browser, you will see an example of a scrolling marquee at the top of this<br />
page. Other viewers will see the words "Using Windows 95 <strong>and</strong> Microsoft <strong>Internet</strong> <strong>Explorer</strong>",<br />
but will not see any movement.<br />
Here is the code you need to produce scrolling text<br />
Your scrolling text goes here<br />
This should produce the following effect, only visible to people <strong>using</strong> the latest <strong>Internet</strong><br />
<strong>Explorer</strong><br />
Your scrolling text goes here<br />
To vary the width of the marquee<br />
Add WIDTH to the MARQUEE tag<br />
eg Your scrolling text goes herewill produce<br />
scrolling text that looks like this<br />
http://subnet.virtual-pc.com/li542871/marquee.htm (1 of 3) [8/20/2000 12:25:12 PM]
Scrolling Marquees <strong>and</strong> Blinking Text, <strong>for</strong> Absolute Beginners<br />
Your scrolling text goes here<br />
To vary the background colour of the marquee<br />
Add BGCOLOR="colour name or code" to the MARQUEE tag<br />
eg Your scrolling text goes here will<br />
produce this<br />
Your scrolling text goes here<br />
If you are unsure of colour names <strong>and</strong> codes, look at this page again.<br />
To vary the direction of the marquee<br />
Add BEHAVIOR=alternate to the MARQUEE tag (note the American spelling of behavior)<br />
eg Your scrolling text goes here will<br />
produce this<br />
Your scrolling text goes here<br />
Or add DIRECTION=right to the MARQUEE tag<br />
eg Your scrolling text goes here will<br />
produce this<br />
Your scrolling text goes here<br />
2. Making text blink<br />
There is an HTML tag which will make text blink off <strong>and</strong> on, but, only people who use<br />
Netscape Navigator can see this effect.<br />
This is the code to use<br />
Your blinking text goes here<br />
Netscape Navigator users will see the words below blinking off <strong>and</strong> on. <strong>Internet</strong> <strong>Explorer</strong><br />
viewers, will just see the words ...<br />
Blinking text can drive you MAD<br />
Style tips<br />
Marquees <strong>and</strong> blinking text can be extremely irritating<br />
Don't use these tags too often !!<br />
http://subnet.virtual-pc.com/li542871/marquee.htm (2 of 3) [8/20/2000 12:25:12 PM]
Scrolling Marquees <strong>and</strong> Blinking Text, <strong>for</strong> Absolute Beginners<br />
Are you ready to learn about TABLES ?<br />
BACK INDEX NEXT<br />
These pages were designed <strong>and</strong> written by Ruth Livingstone. Sept 1996<br />
They may be printed out <strong>for</strong> personal use, but should not be copied <strong>and</strong> redistributed without my permission<br />
All mistakes are my own.<br />
Brick bats <strong>and</strong> bouquets to Ruth-Livingstone@ella.co.uk<br />
http://subnet.virtual-pc.com/li542871/marquee.htm (3 of 3) [8/20/2000 12:25:12 PM]
<strong>Web</strong> pages <strong>for</strong> <strong>absolute</strong> <strong>beginners</strong> - Making Tables - Part 1<br />
BACK... INDEX ...NEXT<br />
Making Tables<br />
<strong>for</strong> Absolute Beginners<br />
Using Windows 95 <strong>and</strong> Microsoft <strong>Internet</strong> <strong>Explorer</strong><br />
1.<br />
2.<br />
3.<br />
4.<br />
1. What is a table?<br />
This page will show you -<br />
What is a table?<br />
Why you should use tables<br />
How to construct a simple table<br />
Placing images in a table<br />
You may wish to print out this page <strong>for</strong> future reference<br />
Tables consist of rows of data cells.<br />
You can think of each table data cell as a compartment, into which you can put text or images.<br />
Cell 1 Cell 2 Cell 3 Cell 4 Cell 5<br />
Cell 6 Cell 7 Cell 8 Cell 9 Cell 10<br />
Cell 11 Cell 12 Cell 13 Cell 14 Cell 15<br />
This table consists of 3 table rows, <strong>and</strong> each row contains 5 table data cells.<br />
You can put as many table cells in each row, <strong>and</strong> as many rows in your table, as you wish.<br />
2. Why you should use tables<br />
Tables are used <strong>for</strong> two reasons<br />
1. To display in<strong>for</strong>mation as a table<br />
http://subnet.virtual-pc.com/li542871/table.htm (1 of 4) [8/20/2000 12:25:13 PM]
<strong>Web</strong> pages <strong>for</strong> <strong>absolute</strong> <strong>beginners</strong> - Making Tables - Part 1<br />
2.<br />
Click here to see an example<br />
To position text <strong>and</strong> images on a page<br />
Click here to see an example<br />
You may have noticed that most of the pages in Absolute Beginners use tables to <strong>for</strong>m<br />
left <strong>and</strong> right margins on each page. Click View <strong>and</strong> Source to see this.<br />
3. How to construct a simple table<br />
Here are the HTML tags you need to use<br />
this is the start of the table<br />
this the start of the first row (TR = Table Row)<br />
(TD = Table Data)<br />
Contents of the first cell go here<br />
<br />
<br />
Contents of the second cell go here<br />
<br />
this marks the end of the first row<br />
this the start of the second row<br />
<br />
Contents of the first cell, 2nd row, go here<br />
<br />
<br />
Contents of the second cell, 2nd row, go here<br />
<br />
this marks the end of the second row<br />
this marks the end of the table<br />
This is how your finished table should look<br />
Contents of the first cell go here Contents of the second cell go here<br />
Contents of the first cell, 2nd row, go here Contents of the second cell, 2nd row, go here<br />
Notice how the table has adjusted itself to fit around the contents of the table cells.<br />
You can add as many Table Rows as you wish, <strong>and</strong> your rows can contain as many<br />
Table Data cells as you require.<br />
TIPs<br />
1. You should make sure each table row has the same number of cells.<br />
2. Keep your HTML coding well spaced out, to make it easy to change <strong>and</strong> edit your<br />
table.<br />
http://subnet.virtual-pc.com/li542871/table.htm (2 of 4) [8/20/2000 12:25:13 PM]
<strong>Web</strong> pages <strong>for</strong> <strong>absolute</strong> <strong>beginners</strong> - Making Tables - Part 1<br />
4. Placing images in a table<br />
You can display images with a table cell, or a mixture of text <strong>and</strong> images.<br />
Use IMG SRC in the usual way.<br />
Here is an example -<br />
The first row of<br />
this table<br />
contains images<br />
The second row<br />
of this table<br />
contains text<br />
The third row of<br />
this table<br />
contains text <strong>and</strong><br />
icons<br />
This table<br />
consists of 3<br />
rows<br />
Notice how the<br />
table will<br />
arrange itself to<br />
fit around the<br />
text <strong>and</strong> images.<br />
Each row contains<br />
4 table cells,<br />
making a table<br />
with 4 columns.<br />
You will learn how<br />
to position your<br />
table on you web<br />
page, <strong>and</strong> how to<br />
position the<br />
contents of each<br />
table cell.<br />
Remember to make<br />
sure each table row<br />
contains the same<br />
number of cells.<br />
Otherwise your table<br />
may not display<br />
correctly.<br />
Now try this -<br />
but be<strong>for</strong>e you<br />
continue, please<br />
experiment with some<br />
simple tables first. Take<br />
another look at this<br />
table, <strong>and</strong> try <strong>and</strong><br />
construct a similar table<br />
<strong>for</strong> your own family or<br />
friends.<br />
Now you can make a simple table, <strong>and</strong> display in<strong>for</strong>mation within the table cells.<br />
However, there are a lot of interesting things you can do with tables.<br />
Find out more about tables<br />
BACK INDEX NEXT<br />
http://subnet.virtual-pc.com/li542871/table.htm (3 of 4) [8/20/2000 12:25:13 PM]
<strong>Web</strong> pages <strong>for</strong> <strong>absolute</strong> <strong>beginners</strong> - Making Tables - Part 1<br />
These pages were designed <strong>and</strong> written by Ruth Livingstone. Sept 1996<br />
They may be printed out <strong>for</strong> personal use, but should not be copied <strong>and</strong> redistributed without my permission<br />
All mistakes are my own.<br />
Brick bats <strong>and</strong> bouquets to Ruth-Livingstone@ella.co.uk<br />
http://subnet.virtual-pc.com/li542871/table.htm (4 of 4) [8/20/2000 12:25:13 PM]
<strong>Web</strong> pages <strong>for</strong> <strong>absolute</strong> <strong>beginners</strong> - Making Tables - Part 2<br />
BACK... INDEX ...NEXT<br />
More about Tables<br />
<strong>for</strong> Absolute Beginners<br />
Using Windows 95 <strong>and</strong> Microsoft <strong>Internet</strong> <strong>Explorer</strong><br />
1.<br />
2.<br />
3.<br />
4.<br />
This page will show you -<br />
How to adjust the size of your table<br />
Adjusting the position of your table on the page<br />
Adjusting the position of your cell contents<br />
Making a cell span several rows or columns<br />
You may wish to print out this page <strong>for</strong> future reference<br />
1. How to adjust the size of your table<br />
You can alter the size of your table, <strong>using</strong> WIDTH inside the table tag.<br />
You can use pixels or percentages.<br />
eg or <br />
You can also specify how wide each table cell should be<br />
eg or <br />
Make sure your cells will fit into your table. For example, a table 600 pixels wide could contain 6 cells<br />
100 pixels wide, or one large 300 pixel cell, <strong>and</strong> two smaller 150 pixel cells.<br />
Your viewer's browser will try <strong>and</strong> fit the table around the table cell contents, <strong>and</strong> sometimes will ignore<br />
the WIDTH you specified, especially if you get your sums wrong.<br />
TIPs<br />
1. If you want everyone to see your table without having to scroll across the page,<br />
keep your table width to 600 pixels or less.<br />
2. To try <strong>and</strong> ensure that your table follows your size instructions<br />
- define the TABLE WIDTH in pixels<br />
- define each TD WIDTH in pixels - make sure all the TD widths in each row<br />
add up to the TABLE width<br />
http://subnet.virtual-pc.com/li542871/table2.htm (1 of 3) [8/20/2000 12:25:17 PM]
<strong>Web</strong> pages <strong>for</strong> <strong>absolute</strong> <strong>beginners</strong> - Making Tables - Part 2<br />
2.Adjusting the position of your table on the page<br />
You can use the tag to centre your table on the page.<br />
You can also use align as follows -<br />
1a 2a 3a 4a<br />
1b 2b 3b 4b<br />
1c 2c 3c 4c<br />
will align your table to the left of your page<br />
Any other text will flow down beside your table.<br />
will align your table to the right of your page<br />
3. Adjusting the position of cell contents<br />
1a 2a 3a 4a<br />
1b 2b 3b 4b<br />
1c 2c 3c 4c<br />
Your table will try <strong>and</strong> adjust itself to fit around your cell contents, but you have some control over how<br />
the cell contents are displayed -<br />
Use align <strong>and</strong> valign to position your data within your table cells.<br />
will position the contents to the left of the cell<br />
will position the contents to the right of the cell<br />
will position the contents in the centre of the cell<br />
will position the contents at the top of the cell<br />
will position the contents in the middle of the cell<br />
will position the contents at the bottom of the cell<br />
Of course, you can mix align <strong>and</strong> valign<br />
eg. will position contents in the bottom left h<strong>and</strong> corner of a cell<br />
left <strong>and</strong> top<br />
This text<br />
is<br />
right <strong>and</strong> top<br />
left <strong>and</strong> bottom<br />
centered<br />
right <strong>and</strong> bottom<br />
right <strong>and</strong> middle not specified left <strong>and</strong> middle<br />
4. Making a cell span several rows or columns<br />
You can enlarge a table cell by <strong>using</strong> COLSPAN=n or ROWSPAN=n in the tag<br />
n is the number of rows or columns to be spanned.<br />
eg. will create a cell which spans 3 rows<br />
eg. will create a cell which spans 4 columns<br />
This table cell spans 4 columns<br />
http://subnet.virtual-pc.com/li542871/table2.htm (2 of 3) [8/20/2000 12:25:17 PM]
<strong>Web</strong> pages <strong>for</strong> <strong>absolute</strong> <strong>beginners</strong> - Making Tables - Part 2<br />
this is the second cell, this is the third cell, this is the fourth cell,<br />
This table cell in the second row in the second row in the second row<br />
spans 3 rows it is easy ... to get confused .... when spanning ....<br />
like<br />
this<br />
TIP it helps to draw a diagram<br />
of your table<br />
<strong>using</strong> pen <strong>and</strong> paper .... be<strong>for</strong>e you start.<br />
You now know how to create a table, how to adjust the size <strong>and</strong> how to position your table on your page.<br />
You know how to align text or images within a table cell, <strong>and</strong> how to create cells which span several rows<br />
or columns.<br />
It is time to make your tables more attractive<br />
BACK INDEX NEXT<br />
These pages were designed <strong>and</strong> written by Ruth Livingstone. Sept 1996<br />
They may be printed out <strong>for</strong> personal use, but should not be copied <strong>and</strong> redistributed without my permission<br />
All mistakes are my own.<br />
Brick bats <strong>and</strong> bouquets to Ruth-Livingstone@ella.co.uk<br />
http://subnet.virtual-pc.com/li542871/table2.htm (3 of 3) [8/20/2000 12:25:17 PM]
Displaying in<strong>for</strong>mation as a table<br />
Displaying In<strong>for</strong>mation as a table<br />
Name Age shoe size Favourite colour Favourite food<br />
Ella 12 7 red chocolate<br />
Lucy 10 3 purple chocolate<br />
Annie 8 2 turquoise cottage pie<br />
Ruth ??? 6 dark blue chocolate<br />
John 92 8 black garlic<br />
http://subnet.virtual-pc.com/li542871/tableeg1.htm [8/20/2000 12:25:17 PM]
Using a table to position text <strong>and</strong> images<br />
Positioning text <strong>and</strong> images, <strong>using</strong> tables<br />
The table on this page has no border, <strong>and</strong> so is<br />
invisible to the viewer. This table consist of 3 Table<br />
Data cells, arranged in a single row.<br />
This layout would be difficult to create without <strong>using</strong><br />
tables. Try it - <strong>and</strong> see !<br />
By clicking View <strong>and</strong> Source, you can see the coding<br />
used to create this simple table.<br />
http://subnet.virtual-pc.com/li542871/tableeg2.htm [8/20/2000 12:25:20 PM]
<strong>Web</strong> pages <strong>for</strong> <strong>absolute</strong> <strong>beginners</strong> - Making Tables - Part 3<br />
BACK... INDEX<br />
Making your Tables<br />
look better<br />
Using Windows 95 <strong>and</strong> Microsoft <strong>Internet</strong> <strong>Explorer</strong><br />
1.<br />
2.<br />
3.<br />
4.<br />
This page will show you how to -<br />
Change the border of your table<br />
Change the text in your table<br />
Change the background colour<br />
Change the cellpadding <strong>and</strong> spaces between cells<br />
You may wish to print out this page <strong>for</strong> future reference<br />
1. Change the border of your table<br />
You can alter the size of the border, by <strong>using</strong> border=n within the TABLE tag.<br />
n can be any number you like.<br />
1a 2a 3a 4a<br />
1b 2b 3b 4b<br />
1c 2c 3c 4c<br />
For example <br />
will give you a table that looks like this.<br />
Or get rid of the border altogether by <strong>using</strong> border=0<br />
If you don't use border=, by default your table will have no border.<br />
2. Change the text in your table<br />
Any font tags you have used outside the table, will be ignored inside the table. You will need to<br />
specify your choice of font face <strong>and</strong> colour within each table cell.<br />
<br />
http://subnet.virtual-pc.com/li542871/table3.htm (1 of 3) [8/20/2000 12:25:21 PM]
<strong>Web</strong> pages <strong>for</strong> <strong>absolute</strong> <strong>beginners</strong> - Making Tables - Part 3<br />
your text goes here<br />
<br />
This is Comic Sans <strong>MS</strong> font<br />
red<br />
This is Times New Roman font<br />
blue<br />
3. Change the background colour<br />
You can alter the background of a table by <strong>using</strong> BGCOLOR=<br />
this is a<br />
yellow background<br />
this is a<br />
green row<br />
this is a<br />
red cell<br />
eg try to change the whole<br />
table<br />
try to alter a whole row<br />
or to alter a single table cell<br />
You can even use a background image within a table, but this will only be seen by viewers with<br />
<strong>MS</strong> <strong>Internet</strong> <strong>Explorer</strong>.<br />
this is a<br />
dark background<br />
eg <br />
If you are <strong>using</strong> a dark image you will need to use a light colour <strong>for</strong> your font. Remember to<br />
specify a dark BGCOLOR <strong>for</strong> the table, or your writing may be invisible to other people.<br />
You can achieve some wonderful effects with tables. Look here.<br />
4. Cellpadding <strong>and</strong> spaces between cells<br />
Cellpadding<br />
This is the space between the edge of the cell <strong>and</strong> it's contents.<br />
You can vary this space by adding CELLPADDING=n, to your TABLE tag.<br />
n can be any number of pixels you like.<br />
1a 2a 3a 4a<br />
eg leaves a margin 7 pixels wide.<br />
Your text will be much easier to read if you include CELLPADDING in<br />
1b 2b 3b 4b<br />
your table tag.<br />
1c 2c 3c 4c<br />
1a 2a 3a 4a This is the same table with cellpadding=0<br />
http://subnet.virtual-pc.com/li542871/table3.htm (2 of 3) [8/20/2000 12:25:21 PM]
<strong>Web</strong> pages <strong>for</strong> <strong>absolute</strong> <strong>beginners</strong> - Making Tables - Part 3<br />
1b 2b 3b 4b Notice there is no space between the text <strong>and</strong> the edge of the cell,<br />
1c 2c 3c 4c making the table look crowded <strong>and</strong> difficult to read.<br />
Spaces between cells<br />
1a 2a 3a 4a<br />
1b 2b 3b 4b<br />
This table has a red background.<br />
The cells have a white background.<br />
You can clearly see spaces between each cell, where the red table colour is visible.<br />
You can increase or decrease the spaces between cells by <strong>using</strong><br />
CELLSPACING=n in the TABLE tag.<br />
eg <br />
1a 2a 3a 4a<br />
1b 2b 3b 4b<br />
1a 2a 3a 4a You can get rid of cellspacing altogether by <strong>using</strong><br />
1b 2b 3b 4b<br />
<br />
eg <br />
Congratulations.<br />
You now know (nearly) everything there is to know about tables.<br />
You should be able to use tables to display in<strong>for</strong>mation, <strong>and</strong> to arrange text <strong>and</strong> images on your<br />
web page.<br />
BACK INDEX<br />
These pages were designed <strong>and</strong> written by Ruth Livingstone. Sept 1996<br />
They may be printed out <strong>for</strong> personal use, but should not be copied <strong>and</strong> redistributed without my permission<br />
All mistakes are my own.<br />
Brick bats <strong>and</strong> bouquets to Ruth-Livingstone@ella.co.uk<br />
http://subnet.virtual-pc.com/li542871/table3.htm (3 of 3) [8/20/2000 12:25:21 PM]
Wonderful effects with tables<br />
This is a series of nested tables<br />
http://subnet.virtual-pc.com/li542871/tableeg3.htm [8/20/2000 12:25:23 PM]