Pipeline User's Guide - Telestream
Pipeline User's Guide - Telestream
Pipeline User's Guide - Telestream

You also want an ePaper? Increase the reach of your titles
YUMPU automatically turns print PDFs into web optimized ePapers that Google loves.
95881<br />
Adding <strong>Pipeline</strong> to a Network<br />
<strong>Pipeline</strong> User’s <strong>Guide</strong><br />
Use the instructions in this section to make Ethernet and video connections to your <strong>Pipeline</strong> when<br />
connecting it to a Mac OS X or Windows computer – either directly or via a switch.<br />
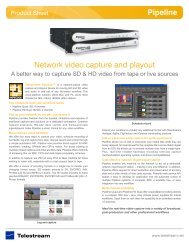
Figure 2–9. <strong>Pipeline</strong> video, VTR & network connections<br />
RS-422<br />
VTR Control<br />
SDI<br />
Video/Audio<br />
Ethernet<br />
1. Make sure the <strong>Pipeline</strong> is not plugged in.<br />
2. Connect the <strong>Pipeline</strong> Ethernet port directly, or via a switch, to the computer with an Ethernet cable. (A<br />
crossover cable may be required for direct connections with some NICs.)<br />
3. Connect your VTR SDI Out port to the <strong>Pipeline</strong> SDI In port with a BNC coax cable connected to your<br />
video source – a VTR, for example.<br />
4. (Optional) Connect the VTR RS-422 port to the <strong>Pipeline</strong> RS-422 port.<br />
5. (<strong>Pipeline</strong> Quad/HD – Optional) Connect video equipment to your Sync In and Sync Out video ports.<br />
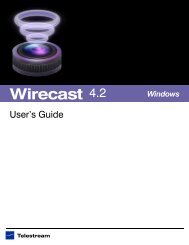
ADDING PIPELINE TO A NETWORK<br />
RS-422<br />
VTR Control<br />
SDI<br />
Video/Audio<br />
Ethernet<br />
One or more <strong>Pipeline</strong>s can connect to a LAN. To assure acceptable performance, be sure to connect<br />
<strong>Pipeline</strong>s to a media network or a single Gigabit switch dedicated specifically for <strong>Pipeline</strong>s, edit stations,<br />
and media servers. If you connect to a backbone, ensure it is Gigabit, to handle the real-time traffic. Make<br />
certain that switches do not have a firewall, and that TCP and UDP ports 7000/7002 (video), 7004/7006<br />
(audio), 7008/7010 (status), 554 (RTSP), and 80 (http) are open.<br />
Each <strong>Pipeline</strong> channel is assigned a unique, automatically assigned, link-local IP address in the range<br />
169.254.1.0 to 169.254.255.255, so that it can communicate directly with your computer without a<br />
gateway. Each of the <strong>Pipeline</strong>s (channels) in a <strong>Pipeline</strong> HD Dual and <strong>Pipeline</strong> Quad is assigned an<br />
incremental IP address.<br />
You can also set up the <strong>Pipeline</strong> with a static address. Make IP address modifications with <strong>Pipeline</strong><br />
Administrator, a Web application built into each <strong>Pipeline</strong> (Using the Configure Panel on page 46).<br />
WARNING<br />
Do not enable Windows or Internet Explorer Proxy server on a <strong>Pipeline</strong> System<br />
host machine. This may cause various network and performance issues related<br />
to the <strong>Pipeline</strong> Control application.<br />
19