Bell & Howell - Projector - Filmosound 641 - 642 ... - Cine Information
Bell & Howell - Projector - Filmosound 641 - 642 ... - Cine Information
Bell & Howell - Projector - Filmosound 641 - 642 ... - Cine Information

You also want an ePaper? Increase the reach of your titles
YUMPU automatically turns print PDFs into web optimized ePapers that Google loves.
Warning - Many of the procedures listed<br />
in this section require operation with the<br />
rear cover removed. To avoid shock<br />
hazards, disconnect the power and discharge<br />
the motor starting capacitor, when<br />
not required.<br />
41. INTRODUCTION<br />
The adjustments listed in this section<br />
are those which either require special<br />
tools, are of such nature as to require<br />
tolerances or sequential adjustments not<br />
readily determinable by inspection or<br />
which differ radically from service procedures<br />
applicable to prior <strong>Filmosound</strong><br />
designs. Routine adjustments such as<br />
those applicable to sliding fits, bearing<br />
clearances and endplay (within normal<br />
shop practices) have not been listed. All<br />
ADJUSTMENTS<br />
special tools required to perform adjustment<br />
procedures are illustrated in<br />
Figure A.<br />
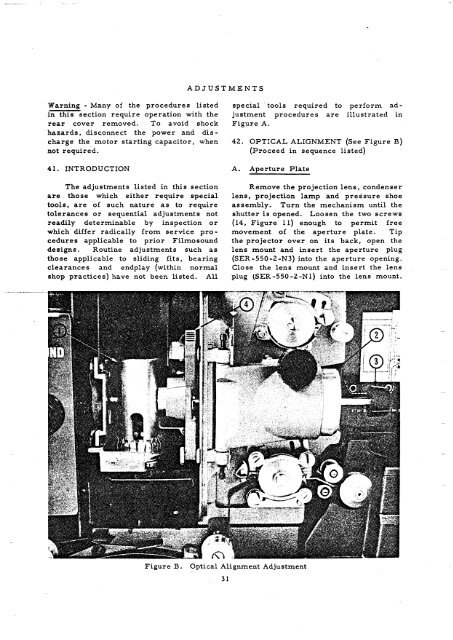
42. OPTICAL ALIGNMENT (See Figure B)<br />
(Proceed in sequence listed)<br />
A. Aperture Plate<br />
Remove the projection lens, condenser<br />
lens, projection lamp and pressure shoe<br />
assembly. Turn the mechanism until the<br />
shutter is opened. Loosen the two screws<br />
(14, Figure 11) enough to permit free<br />
movement of the aperture plate. Tip<br />
the projector over on its back, open the<br />
lens mount and insert the aperture plug<br />
(SER-550-2-N3) into the aperture opening.<br />
Close the lens mount and insert the lens<br />
plug (SER-550-2-N1) into the lens mount.