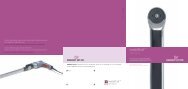
SWISSFLOAT Operating manual E KRESS - Eisenhut-Vet AG
SWISSFLOAT Operating manual E KRESS - Eisenhut-Vet AG
SWISSFLOAT Operating manual E KRESS - Eisenhut-Vet AG

Create successful ePaper yourself
Turn your PDF publications into a flip-book with our unique Google optimized e-Paper software.
2010-03-17<br />
Dok-ID: EV-0708-F3<br />
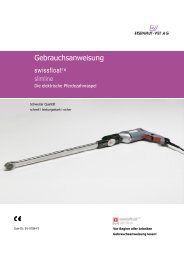
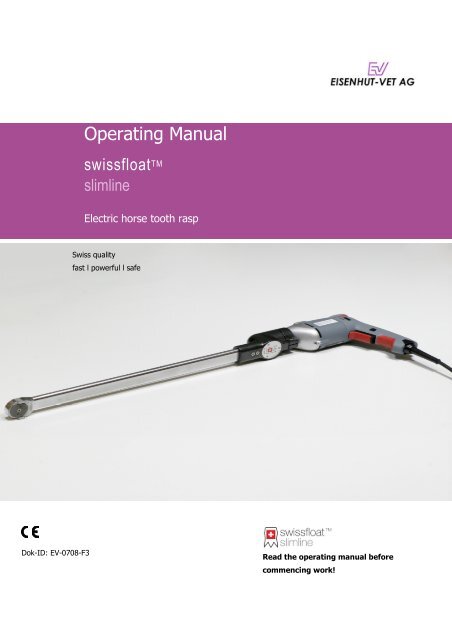
<strong>Operating</strong> Manual<br />
swissfloat TM<br />
slimline<br />
Electric horse tooth rasp<br />
Swiss quality<br />
fast l powerful l safe<br />
Read the operating <strong>manual</strong> before<br />
commencing work!
© EISENHUT-VET <strong>AG</strong><br />
<strong>Vet</strong>erinarian instruments<br />
Sandweg 52<br />
CH-4123 Allschwil<br />
Tel.: +41 (0) 61 307 9000<br />
Fax: +41 (0) 61 307 9009<br />
E-mail: info@eisenhut-vet.ch<br />
Web: www.eisenhut-vet.ch<br />
swissfloat TM slimline is a registered trademark<br />
of EISENHUT-VET <strong>AG</strong><br />
Created by:<br />
Kothes! Schweiz GmbH<br />
www.kothes.ch<br />
2 2010-03-17
Electric horse tooth rasp<br />
Contents<br />
1 General information......................................................6<br />
1.1 Information about this operating <strong>manual</strong> .................... 6<br />
1.2 Explanation of symbols .............................................. 7<br />
1.3 Limitation of liability .................................................. 8<br />
1.4 Copyright.................................................................. 8<br />
1.5 Spare parts ............................................................... 9<br />
1.6 Customer service....................................................... 9<br />
2 Safety..........................................................................10<br />
2.1 Responsibilities of the user....................................... 10<br />
2.2 Personnel requirements ........................................... 11<br />
2.3 Intended use........................................................... 12<br />
2.4 Personal protective equipment ................................. 13<br />
2.5 Particular dangers ................................................... 14<br />
2.6 Environmental protection ......................................... 16<br />
3 Technical Specifications .............................................17<br />
3.1 General information................................................. 17<br />
3.2 Connected loads...................................................... 18<br />
3.3 Emissions................................................................ 18<br />
3.4 Nameplate .............................................................. 19<br />
4 Setup and function .....................................................20<br />
4.1 Entire machine ........................................................ 20<br />
4.2 Description of components....................................... 21<br />
4.2.1 Rasping head............................................ 21<br />
4.2.2 Power unit ................................................ 21<br />
4.2.3 Fitting....................................................... 22<br />
4.2.4 Residual current circuit breaker.................. 22<br />
5 Transport, packaging, and storage.............................23<br />
5.1 Transport inspection................................................ 23<br />
5.2 Packaging ............................................................... 23<br />
5.3 Storage................................................................... 24<br />
2010-03-17 3
Electric horse tooth rasp<br />
Contents<br />
6 Use ..............................................................................25<br />
6.1 Safety .....................................................................25<br />
6.2 Initial operation .......................................................26<br />
6.2.1 Mounting the rasping disk ..........................26<br />
6.2.2 Marking the residual current circuit breaker.27<br />
6.3 Activities prior to use ...............................................28<br />
6.3.1 Function check residual current circuit<br />
breaker .....................................................28<br />
6.4 <strong>Operating</strong> the machine.............................................29<br />
6.4.1 Switching the machine on ..........................29<br />
6.4.2 Locking rotating speed...............................29<br />
6.4.3 Switching the machine off ..........................30<br />
6.5 Dental treatment .....................................................31<br />
6.5.1 Safety .......................................................31<br />
6.5.2 Dental treatment .......................................32<br />
6.5.2.1 Lower jaw ...................................33<br />
6.5.2.2 Upper jaw ...................................33<br />
6.5.2.3 Hook at lower jaw .......................33<br />
6.5.2.4 Hook at upper jaw.......................34<br />
6.5.2.5 Incisors and canines ....................35<br />
6.5.2.6 Chewing surface..........................35<br />
6.6 Activities after use ...................................................36<br />
6.6.1 Cleaning after every use ............................36<br />
6.6.2 Cleaning as needed ...................................37<br />
6.7 Working on the machine ..........................................38<br />
6.7.1 Aligning the rasp attachment......................38<br />
6.7.2 Changing the rasping disk ..........................39<br />
7 Troubleshooting........................................................411<br />
7.1 Safety ................................................................... 411<br />
7.2 Troubleshooting table ............................................ 422<br />
7.3 Troubleshooting steps ............................................ 433<br />
7.3.1 Adjusting the belt tension (only when cold)433<br />
7.3.2 Changing the sealing ring......................... 444<br />
7.4 Use after fault has been corrected .......................... 455<br />
8 Disposal ....................................................................466<br />
9 Spare parts ...............................................................477<br />
9.1 Spare part orders................................................... 477<br />
9.2 Spare parts list ...................................................... 477<br />
4 2010-03-17
Electric horse tooth rasp<br />
Contents<br />
10 Appendix.....................................................................50<br />
10.1 Declaration of Conformity .......................... 50<br />
11 Index ..........................................................................51<br />
2010-03-17 5
Electric horse tooth rasp<br />
General information<br />
1 General information<br />
1.1 Information about this operating <strong>manual</strong><br />
This operating <strong>manual</strong> allows you to use the machine in a safe and<br />
efficient manner.<br />
Read this <strong>manual</strong> carefully before commencing work.<br />
It is essential for the safe operation of the machine that you follow<br />
all safety and operating instructions provided herein.<br />
Store this operating <strong>manual</strong> in a safe location. Include this<br />
operating <strong>manual</strong> if you pass the machine on to third parties.<br />
6 2010-03-17
1.2 Explanation of symbols<br />
Electric horse tooth rasp<br />
General information<br />
Safety instructions The safety instructions provided in this <strong>manual</strong> are marked by<br />
symbols. The safety instructions are preceded by signal word<br />
pointing out the extent of danger.<br />
Make sure to carefully observe the safety instructions to prevent<br />
accident as well as personal injury and property damage.<br />
DANGER!<br />
… indicates a hazardous situation which, if not<br />
avoided, will result in death or serious injury.<br />
WARNING!<br />
… indicates a hazardous situation which, if not<br />
avoided could result in death or serious injury.<br />
CAUTION!<br />
… indicates a hazardous situation which, if not<br />
avoided, could result in minor or moderate injury.<br />
NOTICE!<br />
… indicates a potentially hazardous situation which,<br />
if not avoided, may result in property damage.<br />
Special safety instructions To draw your attention to special dangers, this <strong>manual</strong> uses the<br />
following symbols in safety instructions:<br />
Tips and recommendations<br />
… identifies dangers caused by electric current.<br />
Failure to observe these safety instructions may<br />
cause serious injury or death.<br />
IMPORTANT!<br />
… points out useful tips and recommendations as<br />
well as information intended to guarantee efficient<br />
and trouble-free operation.<br />
2010-03-17 7
Electric horse tooth rasp<br />
General information<br />
1.3 Limitation of liability<br />
1.4 Copyright<br />
All information and instructions provided in this <strong>manual</strong> has been<br />
composed in compliance with all applicable standards and<br />
regulations, the state of the art as well as based on our long years<br />
of expertise and experience.<br />
The manufacturer will not assume any liability for damages caused<br />
by:<br />
� Failure to observe this <strong>manual</strong><br />
� Improper use<br />
� Use of unqualified personnel<br />
� Unauthorized retrofitting<br />
� Technical modifications<br />
� Use of unapproved spare parts<br />
The actually included components may vary from the explanations<br />
and illustrations herein for special models and custom orders or<br />
due to the latest technical modifications.<br />
The obligations agreed upon in the supply contract, the Terms and<br />
Conditions, the manufacturer's terms of delivery as well as the<br />
legal requirements applicable at the time of conclusion shall apply.<br />
We reserve the right to introduce technical modifications to<br />
improve the usability of the machine and develop it further.<br />
This <strong>manual</strong> is protected by copyright and intended for in-house<br />
purposes only.<br />
Passing this <strong>manual</strong> on to third parties, duplications of any kind -<br />
even in excerpts - or using and/or disclosing the content of the<br />
<strong>manual</strong> without the prior written of the manufacturer is prohibited<br />
except for in-house purposes. Any violations shall result in liability<br />
for damages. Further claims shall remain reserved.<br />
8 2010-03-17
1.5 Spare parts<br />
1.6 Customer service<br />
Electric horse tooth rasp<br />
General information<br />
WARNING!<br />
Safety risk due to incorrect spare parts!<br />
Incorrect or defective spare parts may affect safety<br />
and cause damage, malfunctions or total loss.<br />
Therefore:<br />
– Use only original spare parts made by the<br />
manufacturer.<br />
– Different spare parts may not be used without<br />
consulting the manufacturer in writing.<br />
Purchase spare parts from your authorized dealer or directly from<br />
the manufacturer. For address, see page 2.<br />
The spare parts list is included in the appendix.<br />
Our customer service will assist you with any technical questions<br />
you may have. For contact information, see page 2.<br />
Moreover, our employees are always interested in gaining new<br />
information and experience resulting from the use of our products<br />
which may help improve their quality.<br />
2010-03-17 9
Electric horse tooth rasp<br />
Safety<br />
2 Safety<br />
2.1 Responsibilities of the user<br />
This section provides an overview of all important safety aspects<br />
necessary to keep man and animal perfectly safe and provide for<br />
the safe and trouble-free operation of the machine.<br />
Failure to observe the instructions and safety information provided<br />
in this <strong>manual</strong> may lead to serious danger.<br />
This machine is intended to be used as veterinarian equipment.<br />
The person using the machine is, therefore, obligated to observe<br />
all legal requirements with regard to occupational safety.<br />
In addition to following the safety instructions provided in this<br />
<strong>manual</strong>, the user is also obligated to comply with all safety,<br />
accident prevention as well as animal and environmental<br />
protection regulations applicable for the application area of the<br />
machine. In particular, the user:<br />
� must become familiar with the applicable occupational health<br />
and safety regulations.<br />
� must ensure that all employees handling the machine have<br />
read and understood this <strong>manual</strong>.<br />
� must provide the necessary protective equipment.<br />
� must check all safety installations regularly for proper<br />
operation and completeness.<br />
� is responsible for keeping the machine in proper technical<br />
condition at all times.<br />
10 2010-03-17
2.2 Personnel requirements<br />
Qualifications<br />
WARNING!<br />
Risk of injury due to insufficient<br />
qualification!<br />
Electric horse tooth rasp<br />
Safety<br />
Improper use may lead to serious injury to man<br />
and animal as well as property damage.<br />
Therefore:<br />
– have all activities performed by qualified<br />
personnel only.<br />
This operating <strong>manual</strong> specified the following qualifications as<br />
required for different range of activity:<br />
� Qualified personnel<br />
are capable of performing the tasks assigned to them in a safe<br />
manner thanks to their expert training, skills and experience.<br />
Qualified personnel are capable of independently detecting,<br />
assessing and avoiding risks to themselves and the animal.<br />
Qualified personnel are familiar with the content of all<br />
applicable regulations, guidelines, and standards required by<br />
law for the safe use of the machine and are capable of<br />
implementing the specified requirements.<br />
Qualified personnel have the expert skills required for the<br />
machine's range of application and comply with all hygiene<br />
regulations applicable to the use of veterinary equipment.<br />
� Trained electrician<br />
is capable of performing work on electrical systems and<br />
independently detecting and avoiding any possible risks thanks<br />
to his or her expert training, skills and experience as well as his<br />
or her knowledge of all applicable standards and regulations.<br />
Trained electricians are trained to work in the specific location<br />
to which they are assigned and know all relevant standards and<br />
regulations.<br />
2010-03-17 11
Electric horse tooth rasp<br />
Safety<br />
2.3 Intended use<br />
The machine has been designed and constructed exclusively for<br />
the intended purpose described herein.<br />
� The machine may only be used for veterinary applications.<br />
� The machine may only be used specifically treat the teeth of<br />
horses and other equids.<br />
Intended use also includes compliance with all instructions<br />
provided in this <strong>manual</strong>.<br />
Any use exceeding or deviating from the intended use of the<br />
machine is considered improper and may lead to dangerous<br />
situations.<br />
WARNING!<br />
Risk due to improper use!<br />
Improper use of the machine may lead to<br />
dangerous situations.<br />
In particular, refrain from using the machine for<br />
the following purposes:<br />
– Use of the machine in human medicine.<br />
– Use of the machine as a grinding machine<br />
beyond the scope of veterinary medicine.<br />
Claims of any kind for damages caused by improper use shall be<br />
excluded.<br />
12 2010-03-17
2.4 Personal protective equipment<br />
Electric horse tooth rasp<br />
Safety<br />
Working with the machine requires that you wear personal<br />
protective equipment to minimize risks to the health of man and<br />
animal.<br />
Always wear the required protective equipment when working with<br />
the machine.<br />
Always wear When working with the machine, always wear:<br />
Suitable work clothes<br />
is clothing suitable for the activities performed in the work<br />
environment as well as the weather conditions.<br />
Refrain from wearing rings, chains or jewelry.<br />
Non-slip shoes<br />
provide protection from slipping.<br />
Wear for specific tasks Special protective equipment is required when performing specific<br />
tasks. Wear this equipment as required for the performance of<br />
these tasks. The following is an explanation of this special<br />
protective equipment:<br />
Hearing protection<br />
provide protection from hearing damage.<br />
Safety goggles<br />
protect the eyes from flying parts and splashes of liquid.<br />
Gloves protecting against microorganisms<br />
provided protection against microbiological hazards caused by<br />
viruses or bacteria.<br />
Check protective gloves for tightness before using them. Clean<br />
gloves before taking them off and store them in a well ventilated<br />
area.<br />
2010-03-17 13
Electric horse tooth rasp<br />
Safety<br />
2.5 Particular dangers<br />
Electric current<br />
Noise<br />
The following section specifies residual risks ascertained by means<br />
of a risk assessment.<br />
� The safety instructions herein and the warnings specified in the<br />
further chapters of this <strong>manual</strong> must be observed to reduce the<br />
risk of health hazards and dangerous situations.<br />
DANGER!<br />
Danger of death due to electric current!<br />
There is danger of death when coming into contact<br />
with live components. Damage to the insulation or<br />
individual components may lead to death.<br />
Therefore:<br />
– In the event of damage to the insulation,<br />
switch off the power supply immediately and<br />
initiate repairs.<br />
– Do not operate the machine without a residual<br />
current circuit breaker.<br />
– Check if the residual current circuit breaker<br />
functions properly before using the machine.<br />
– When disconnecting the residual current circuit<br />
breaker from the power socket, always use so<br />
by pulling on the plug but never on the cord.<br />
– Before connecting the machine to the power<br />
supply, compare the information provided in<br />
the Technical Specifications with the<br />
specifications of the mains supply.<br />
– Work on the electrical system may only be<br />
performed by trained electricians.<br />
WARNING!<br />
Hearing damage caused by noise!<br />
The noise level generated in the work area may<br />
cause hearing damage.<br />
Therefore:<br />
– Always wear hearing protection when working<br />
with the machine.<br />
14 2010-03-17
Rotating rasping disk<br />
Hot surfaces<br />
Electric horse tooth rasp<br />
Safety<br />
CAUTION!<br />
Risk of injury due to rotating rasping disks!<br />
Rotating rasping disks may cause injury by friction<br />
or abrasion.<br />
Therefore:<br />
– Do not reach into the rotating rasping disk while<br />
using the machine.<br />
– Avoid bodily contact and prevent third parties<br />
from coming into contact with the rotating<br />
rasping disk.<br />
CAUTION!<br />
Risk of sustaining burns on hot surfaces!<br />
Depending on the intensity of the pressure exerted<br />
on the rasping head and the duration of the<br />
grinding, the rasping head may become hot.<br />
Coming into contact with hot components may lead<br />
to burns.<br />
Therefore:<br />
– Stop grinding at regular intervals and cool the<br />
rasping head by immersing it briefly in water.<br />
– After use, do not touch the rasping head with<br />
your bare hands until after you have briefly<br />
immersed it in water.<br />
2010-03-17 15
Electric horse tooth rasp<br />
Safety<br />
2.6 Environmental protection<br />
Damage to the environment<br />
NOTICE!<br />
Environmental hazard due to improper<br />
handling!<br />
If environmentally hazardous substances are<br />
handled improperly (particularly, if these<br />
substances are disposed of in an unsuitable<br />
manner), damage may be caused to the<br />
environment.<br />
Therefore:<br />
– Always observe the information provided below.<br />
– Take immediate steps if environmentally<br />
hazardous substances are leaked into the<br />
environment by accident. If in doubt, notify the<br />
responsible local authorities about the damage<br />
immediately.<br />
The following environmentally hazardous substances are used:<br />
Lubricants Lubricants such as greases and oils contain toxic substances. They<br />
must not be introduced into the environment. They must be<br />
disposed of by a specialized waste management company.<br />
16 2010-03-17
3 Technical Specifications<br />
3.1 General information<br />
Tooth rasp "swissfloat TM slimline"<br />
Tooth rasp pony "swissfloat TM<br />
slimline"<br />
Specification without power<br />
drill<br />
Electric horse tooth rasp<br />
Technical Specifications<br />
Value Unit<br />
Length 65.0 cm<br />
Width 5.5 cm<br />
Height 6.2 cm<br />
Specification with power drill Value Unit<br />
Length 84.5 cm<br />
Width 6.5 cm<br />
Height 25.0 cm<br />
Specification without power<br />
drill<br />
Value Unit<br />
Length 53.7 cm<br />
Width 5.5 cm<br />
Height 6.2 cm<br />
Specification with power drill Value Unit<br />
Length 73.2 cm<br />
Width 6.5 cm<br />
Height 25.0 cm<br />
2010-03-17 17
Electric horse tooth rasp<br />
Technical Specifications<br />
Tooth rasp short "swissfloat TM<br />
slimline"<br />
3.2 Connected loads<br />
Electrical<br />
3.3 Emissions<br />
Specification without power<br />
drill<br />
Value Unit<br />
Length 30.2 cm<br />
Width 6.5 cm<br />
Height 6.2 cm<br />
Specification with power drill Value Unit<br />
Length 49.7 cm<br />
Width 6.5 cm<br />
Height 25.0 cm<br />
Specification Value Unit<br />
Rated voltage 230 V<br />
Rated current 10 A<br />
Power consumption, maximum 650 W<br />
Power output 220 W<br />
Specification Value Unit<br />
Noise emission machine 81 dB(A)<br />
The machine's sound pressure level may exceed 84 dB(A)<br />
depending on the task performed.<br />
18 2010-03-17
3.4 Nameplate<br />
Fig. 1<br />
Fig. 2<br />
1<br />
Electric horse tooth rasp<br />
Technical Specifications<br />
The nameplate is located above the cover of the fitting (1).<br />
It contains the following information:<br />
1 Serial number<br />
2 Manufacturer<br />
3 CE mark<br />
4 Web address<br />
2010-03-17 19
Electric horse tooth rasp<br />
Setup and function<br />
4 Setup and function<br />
4.1 Entire machine<br />
Overview<br />
Fig. 3<br />
1<br />
1 Rasping head<br />
2 Tube<br />
3 Residual current circuit breaker<br />
4 Cord<br />
5 Housing<br />
6 Power unit<br />
7 Controls power unit<br />
Brief description The machine is an electric tooth rasp used for treating tooth<br />
irregularities in horses and other equids by means of a rotating<br />
rasping disk. The machine is powered by a fully safety insulated<br />
single-gear power drill. To prevent fault currents, the machine is<br />
equipped with a residual current circuit breaker.<br />
20 2010-03-17<br />
2<br />
3<br />
4<br />
5<br />
6<br />
7
4.2 Description of components<br />
4.2.1 Rasping head<br />
Overview<br />
Fig. 4<br />
1 Rasping disk<br />
2 M5x8 countersunk screw<br />
3 Side flange<br />
4 Rasping head and tube<br />
Electric horse tooth rasp<br />
Setup and function<br />
Brief description Depending on the application as well as the experience of the<br />
operator, the rasping head is used to mount diamond-coated<br />
rasping disks or rasping disks made of hard metal. The side<br />
flanges are used to protect the mucous membrane of the animal<br />
and allow the operator to guide the rasping head along the row of<br />
teeth.<br />
4.2.2 Power unit<br />
Overview<br />
Fig. 5<br />
1<br />
2<br />
3<br />
1 Nameplate power unit<br />
2 ON/OFF button<br />
3 Lock button<br />
Brief description The machine is powered by a fully safety insulated single-gear<br />
power drill made by <strong>KRESS</strong>. The operator can use the ON/OFF<br />
button to infinitely adjust the speed of the power unit. The lock<br />
button makes it possible to lock the power unit at the highest<br />
speed.<br />
2010-03-17 21
Electric horse tooth rasp<br />
Setup and function<br />
4.2.3 Fitting<br />
Overview<br />
Fig. 6<br />
1 Two countersunk screws (M5x16)<br />
2 Three countersunk slotted screws (1x M3x12, 2x M3x40)<br />
3 Cover (with nameplate)<br />
4 Housing<br />
5 Fillister head screw (M5x16)<br />
Brief description The fitting is the interface between the power unit and the rasp<br />
attachment. A square bolt is used to insert the power unit into the<br />
receiver of the housing and secured by with fillister head screw<br />
(5). Loosening the fillister head screw makes it possible to rotate<br />
the fitting by 180° and align the rasp attachment. The belt tension<br />
is retained by two countersunk screws (1).<br />
4.2.4 Residual current circuit breaker<br />
Overview<br />
Fig. 7<br />
1 2 3 4 5<br />
1 Control lamp<br />
2 RESET button<br />
3 TEST button<br />
4 Power plug<br />
5 Nameplate residual current circuit breaker<br />
6 Cord<br />
Brief description The electronic residual current circuit breaker will cut off the<br />
current circuit from the rest of the mains if the current exceeds the<br />
amperage difference of 30 mA.<br />
22 2010-03-17
5 Transport, packaging, and storage<br />
5.2 Transport inspection<br />
5.3 Packaging<br />
About the packaging<br />
Fig. 8<br />
Electric horse tooth rasp<br />
Transport, packaging, and storage<br />
Check the shipment for completeness and transport damage<br />
immediately upon receiving it.<br />
In case of visible transport damage, proceed as follows:<br />
� Do not accept the shipment or accept it under protest.<br />
� Record the extent of the damage on the transport documents<br />
or the delivery note of the carrier.<br />
� Initiate a complaint.<br />
IMPORTANT!<br />
File a complaint immediately upon detecting the<br />
corresponding defect. Claims for damages can only<br />
be accepted if filed within the statutory deadlines<br />
for making a complaint.<br />
The machine has been packaged in a carrying bag and a covering<br />
box according to the expected transport and storage conditions.<br />
The packaging is made up exclusively of environmentally friendly<br />
materials.<br />
The packaging is intended to protect the machine from transport<br />
damage, corrosion and other kinds of damage. Therefore, store<br />
the machine in its carrying bag when not in use.<br />
2010-03-17 23
Electric horse tooth rasp<br />
Transport, packaging, and storage<br />
Handling packaging materials Dispose of packaging material in compliance with all applicable<br />
statutory and local regulations.<br />
5.4 Storage<br />
NOTICE!<br />
Damage to the environment due to incorrect<br />
disposal!<br />
Packaging materials are valuable resources and<br />
are, in many cases, suitable for continued use,<br />
reuse or recycling.<br />
Therefore:<br />
– Dispose of packaging materials in an<br />
environmentally safe manner.<br />
– Observe the local waste disposal regulations.<br />
Storing the machine Store the machine under the following conditions:<br />
� Store the machine in its carrying bag.<br />
� Store in a dry and dust-free environment.<br />
� Do not expose the machine to abrasive media.<br />
� Protect the machine from exposure to the sun.<br />
� Avoid mechanical vibrations.<br />
24 2010-03-17
6 Use<br />
6.1 Safety<br />
Electric horse tooth rasp<br />
Personal protective equipment Use the following protective equipment whenever you work with<br />
the machine:<br />
Improper use<br />
� suitable work cloths<br />
� non-slip shoes<br />
WARNING!<br />
Risk of injury due to improper use!<br />
Improper use may lead to serious injury or<br />
property damage.<br />
Therefore:<br />
– Follow all operating steps as specified by the<br />
instructions in this operating <strong>manual</strong>.<br />
– Before commencing work, make sure the<br />
residual current circuit breaker functions<br />
properly.<br />
2010-03-17 25<br />
Use<br />
– Keep the work area tidy and clean! Components<br />
and tools lying loosely about or on top of each<br />
other may cause accidents.
Electric horse tooth rasp<br />
Use<br />
6.2 Initial operation<br />
6.2.1 Mounting the rasping disk<br />
Fig. 9<br />
Fig. 10<br />
Fig. 11<br />
Depending on the machine's type of delivery, you will have to<br />
mount the rasping disk on the rasping head before you can use<br />
the machine for the first time:<br />
1. Remove the protective film from the rasping head.<br />
2. Unscrew the pre-installed M5x8 countersunk screw (1) from<br />
the bore.<br />
3. Align the driving pins (1) of the rasping head with the bores<br />
(2) on the rasping disk.<br />
4. Place the rasping disk onto the rasping head.<br />
5. Make sure that both driving pins are inside the bores of the<br />
rasping disk. If necessary, slightly turn the rasping disk until<br />
the driving pins lock into place.<br />
26 2010-03-17
Fig. 12<br />
Fig. 13<br />
Electric horse tooth rasp<br />
6. Insert the M5x8 countersunk screw into the bore on the<br />
rasping disk.<br />
7. Place the fixing plate (1) onto the rasping disk.<br />
2010-03-17 27<br />
Use<br />
8. Make sure that the fixing pins (2) of the fixing plate are inside<br />
the fixing holes (3) on the rasping disk. If necessary, turn the<br />
rasping disk slightly until the fixing pins lock into place.<br />
9. Use one finger to press and hold the fixing plate on the<br />
rasping disk.<br />
10. Tighten the M5x8 countersunk screw using a Torx 25<br />
screwdriver (1).<br />
6.2.2 Marking the residual current circuit breaker<br />
Fig. 14<br />
The residual current circuit breaker must be inserted vertically into<br />
the power socket. Marked on the nameplate of the residual current<br />
circuit breaker are the "top" and "bottom" positions. If necessary,<br />
you must stick the included labels in the language of your country<br />
over these markings.<br />
1. Check if the markings (1) are in the language of your country.<br />
2. Stick the new labels over the markings if necessary.<br />
3. Make sure the specified arrow directions are retained.
Electric horse tooth rasp<br />
Use<br />
6.3 Activities prior to use<br />
6.3.1 Function check residual current circuit breaker<br />
Fig. 15<br />
Fig. 16<br />
DANGER!<br />
Risk of injury due to electric current!<br />
If the residual current circuit breaker is not fully<br />
operational or used incorrectly, components may<br />
become live due to malfunctions. Coming into<br />
contact with live components may cause injury.<br />
Therefore:<br />
– Do not operate the machine without a residual<br />
current circuit breaker.<br />
– Check if the residual current circuit breaker<br />
functions properly prior to every use.<br />
– Never operate the machine unless the residual<br />
current circuit breaker is fully functional.<br />
Proceed as follows to test the operability of the residual current<br />
circuit breaker before using the machine:<br />
1. Insert the residual current circuit breaker vertically into the<br />
power socket.<br />
2. Press the RESET button (1) on the residual current circuit<br />
breaker.<br />
The residual current circuit breaker is not operational unless<br />
� the control lamp (2) lights up red.<br />
3. Press the TEST button (1) on the residual current circuit<br />
breaker.<br />
The residual current circuit breaker is not operational unless<br />
� the control lamp (2) goes out and<br />
� a distinct switching noise can be heard.<br />
After the function test was completed successfully:<br />
4. Press the RESET button.<br />
The residual current circuit breaker is operational.<br />
28 2010-03-17
6.4 <strong>Operating</strong> the machine<br />
6.4.1 Switching the machine on<br />
Fig. 17<br />
Fig. 18<br />
6.4.2 Locking rotating speed<br />
Fig. 19<br />
1<br />
1<br />
2<br />
Electric horse tooth rasp<br />
1. Insert the residual current circuit breaker vertically into the<br />
power socket.<br />
2. Press the RESET button (1) on the residual current circuit<br />
breaker.<br />
2010-03-17 29<br />
Use<br />
The control lamp (2) on the residual current circuit breaker lights<br />
up red. The residual current circuit breaker is switched on.<br />
3. Press the ON/OFF button (1) of the power unit.<br />
Depending on how you press the ON/OFF button (1), the machine<br />
will start up at variable speed:<br />
� Slight pressure: low speed, allows the machine to start up<br />
smoothly and in a controlled manner<br />
� Great pressure (up to the stop position): high speed, machine<br />
starts up quickly.<br />
To save you the trouble of pressing and holding the ON/OFF<br />
button during operation, you can lock the machine at the<br />
maximum rotating speed:<br />
1. Press the ON/OFF button (1) until you reach the stop and<br />
hold it.<br />
2. Press and hold the lock button (2).<br />
3. Release the ON/OFF button (1).<br />
The lock button (2) engages.<br />
4. Release the lock button (2).
Electric horse tooth rasp<br />
Use<br />
6.4.3 Switching the machine off<br />
Fig. 20<br />
1<br />
2<br />
If the ON/OFF button (1) is pressed:<br />
1. Release the ON/OFF button (1).<br />
If the rotating speed is locked:<br />
1. Press the ON/OFF button (1) until the lock button (2)<br />
disengages.<br />
2. Release the ON/OFF button (1).<br />
30 2010-03-17
Dental treatment<br />
6.5 Dental treatment<br />
6.5.1 Safety<br />
Electric horse tooth rasp<br />
Personal protective equipment Wear the following protective equipment while performing the<br />
dental treatment:<br />
Full mouth speculum<br />
Risk of injury to third parties<br />
� Hearing protection<br />
� Non-slip shoes<br />
2010-03-17 31<br />
Use<br />
It is at the discretion of the qualified personnel if the following<br />
protective equipment must be worn during the dental treatment:<br />
� Safety goggles<br />
� Protective gloves<br />
WARNING!<br />
Risk of injury if no full mouth speculum is<br />
used!<br />
Unless a full mouth speculum is used, there is a<br />
risk of injury to the operator and the animal during<br />
the dental treatment.<br />
Therefore:<br />
– Do not use the machine for dental treatments<br />
without a full mouth speculum.<br />
CAUTION!<br />
Risk of injuries to third parties standing in<br />
the work area!<br />
If the machine is used in a careless manner, third<br />
parties standing in the work area may become<br />
injured.<br />
Therefore:<br />
– Be aware of the machine's dimensions and<br />
weight while using the machine.<br />
– Pay attention to third parties in the work area<br />
when moving around with the machine.
Electric horse tooth rasp<br />
Use<br />
Risk of infection<br />
Overheating<br />
6.5.2 Dental treatment<br />
Bleeding<br />
T<br />
NOTICE!<br />
Risk of infection!<br />
The gums of the animal may become hurt during<br />
the dental treatment. As a consequence, bacteria<br />
may enter the wound and cause infections.<br />
Therefore:<br />
– Make sure the tetanus vaccination of the animal<br />
is up to date at the time the dental treatment is<br />
performed.<br />
NOTICE!<br />
Danger to the animal's health and risk of<br />
machine damage if the rasping head<br />
overheats!<br />
Depending on the intensity of the pressure exerted<br />
on the rasping head and the duration of the<br />
grinding, the rasping head may become hot. If<br />
overheated, the rasping head may burn the animal<br />
and cause damage to the machine.<br />
Therefore:<br />
– Stop grinding at regular intervals and cool the<br />
rasping head by immersing it briefly in water.<br />
IMPORTANT!<br />
There is no danger to the animal's health if<br />
bleeding of the gums occurs in the course of<br />
normal dental treatment.<br />
Bleeding may occur, in particular, during the<br />
treatment of the teeth in the back of the mouth<br />
(M3) as these teeth are rather close to the gums.<br />
The following is a list of recommended tasks to be performed<br />
during dental treatment. Each dental treatment must be performed<br />
and assessed individually and in accordance with the conditions<br />
present.<br />
32 2010-03-17
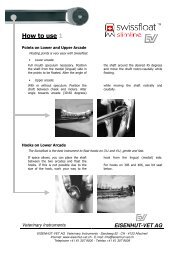
6.5.2.1 Lower jaw<br />
6.5.2.2 Upper jaw<br />
6.5.2.3 Hook at lower jaw<br />
The mouth must be opened all the way.<br />
Electric horse tooth rasp<br />
1. When positioning the rasping head at the location to be<br />
ground, align the rasping head parallel to the teeth on the<br />
tongue side.<br />
2010-03-17 33<br />
Use<br />
2. Move the rasping head from the back to the front. While doing<br />
so, rotate the rasping head by 45° across the chewing surface.<br />
1. Position the rasping head between cheek and grinder.<br />
2. Move the rasping head from the front to the back. While doing<br />
so, change the angle of approach by 30° to 60°.<br />
Fig. 21<br />
If there is enough room:<br />
1. Position the rasping head between upper and lower jaw.<br />
2. Grind off the hook at the lower jaw.<br />
If the rasping head cannot be positioned directly between upper<br />
and lower jaw due to the size of the hook:<br />
1. Position the rasping head parallel to the teeth on the tongue<br />
side and proceed to the spot that needs to be treated.<br />
Fig. 22
Electric horse tooth rasp<br />
Use<br />
6.5.2.4 Hook at upper jaw<br />
Hook at 106 and 206 1. Put the rasping head diagonally to the hook and round the<br />
hook from the front by grinding.<br />
Hook at 111 and 211 If there is enough room:<br />
1. Put the rasping head to the hook between upper and lower<br />
jaw.<br />
2. Grind off the hook.<br />
If the rasping head cannot be positioned directly between upper<br />
and lower jaw due to the size of the hook:<br />
1. Position the rasping head on the cheek side and proceed to<br />
the spot that needs to be treated.<br />
2. Make sure the cheek muscle is not tightened to prevent<br />
possible injury.<br />
Fig. 23<br />
34 2010-03-17
6.5.2.5 Incisors and canines<br />
6.5.2.6 Chewing surface<br />
Electric horse tooth rasp<br />
For perfect guidance of the machine during the treatment of<br />
incisors and canines:<br />
2010-03-17 35<br />
Use<br />
1. Place the machine between arm and body or rest it on your<br />
shoulder.<br />
2. Hold the rasping hand with one hand while putting the other<br />
hand to the incisor or canine.<br />
3. Switch the machine on and grind off the tooth exerting slight,<br />
controlled pressure on the ON/OFF button.<br />
Fig. 24<br />
306 and 406 Apply the following method for treating the chewing surface until<br />
you reach the desired result:<br />
1. Put the rasping head to 306 or 406.<br />
2. Push the rasping head down.<br />
To achieve perfect roundness:<br />
1. Put the rasping head diagonally to the teeth and ground them<br />
off on both sides.<br />
2. Make sure not to hurt the dental pulp.<br />
Fig. 25
Electric horse tooth rasp<br />
Use<br />
6.6 Activities after use<br />
After every use<br />
6.6.1 Cleaning after every use<br />
WARNING!<br />
Risk of infection to man and animal in case<br />
of improper cleaning and disinfection!<br />
There is a risk of infection caused by<br />
microorganisms passed on from animal to man and<br />
animal to animal if the machine is not properly<br />
cleaned and disinfected after use.<br />
Therefore:<br />
– Clean and disinfect the machine after each use.<br />
– Wear gloves protecting against microorganisms<br />
while using, cleaning, and disinfecting the<br />
machine.<br />
Clean and disinfect the rasp attachment after each use as<br />
described below:<br />
� use a soft plastic brush<br />
� use standard cleaning agents<br />
� use disinfectants<br />
� Use clear water to rinse cleaning agents and disinfectants off<br />
thoroughly<br />
IMPORTANT!<br />
Also follow the instructions with regard to contact<br />
times and concentrations of the cleaning agents<br />
and disinfectants provided by the manufacturers.<br />
36 2010-03-17
6.6.2 Cleaning as needed<br />
Fig. 26<br />
Fig. 27<br />
Cleaning the rasping head and the rasping disk:<br />
Electric horse tooth rasp<br />
2010-03-17 37<br />
Use<br />
1. Remove the rasping disk from the rasping head as described<br />
in steps 1 through 5 of chapter "Changing the rasping disk"<br />
(page 39).<br />
2. Use a soft plastic brush to thoroughly clean the rasping head.<br />
3. Use the cleaning tip (2) of the fixing plate (1) to remove dirt<br />
from hard-to-reach areas such as the fixing holes (3).<br />
4. Use a soft plastic brush to thoroughly clean the rasping disk.<br />
5. Re-attach the rasping disk to the rasping head as described in<br />
steps 6 through 13 of chapter "Changing the rasping disk"<br />
(pages 39 and 40).
Electric horse tooth rasp<br />
Use<br />
6.7 Working on the machine<br />
6.7.1 Aligning the rasp attachment<br />
Fig. 28<br />
Fig. 29<br />
Fig. 30<br />
Fig. 31<br />
2<br />
2<br />
1<br />
1<br />
The rasp attachment can be rotated by 180° to ensure the grip<br />
can be held ergonomically at any stage of use.<br />
1. Use the Torx 25 (1) screwdriver to loosen the M5x16 (2)<br />
fillister head screw on the fitting. Do not unscrew it.<br />
2. Rotate the fitting and align the rasp attachment as needed.<br />
3. Make sure the fitting is flush with the power unit. If<br />
necessary, slide the fitting all the way against the power unit.<br />
4. Tighten the M5x16 (2) fillister head screw using a Torx 25<br />
screwdriver (1).<br />
38 2010-03-17
6.7.2 Changing the rasping disk<br />
Fig. 32<br />
Fig. 33<br />
Fig. 34<br />
1. Place the fixing plate (1) onto the rasping disk.<br />
Electric horse tooth rasp<br />
2010-03-17 39<br />
Use<br />
2. Make sure that the fixing pins (2) of the fixing plate are inside<br />
the fixing holes (3) on the rasping disk. If necessary, turn the<br />
rasping disk slightly until the fixing pins lock into place.<br />
3. Use one finger to press and hold the fixing plate on the<br />
rasping disk.<br />
4. Unscrew and remove the M5x8 countersunk screw using a<br />
Torx 25 screwdriver (1).<br />
5. Remove the rasping disk from the rasping head.<br />
6. Align the driving pins (1) of the rasping head with the bores<br />
(2) on the rasping disk.<br />
7. Place the rasping disk onto the rasping head.<br />
8. Make sure that both driving pins (1) are inside the bores (2)<br />
of the rasping disk. If necessary, turn the rasping disk slightly<br />
until the fixing pins lock into place.
Electric horse tooth rasp<br />
Use<br />
Fig. 35<br />
Fig. 36<br />
Fig. 37<br />
9. Insert the M5x8 countersunk screw into the bore on the<br />
rasping disk.<br />
10. Place the fixing plate (1) onto the rasping disk.<br />
11. Make sure that the fixing pins (2) are inside the fixing holes<br />
(3). If necessary, turn the rasping disk slightly until the fixing<br />
pins lock into place.<br />
12. Use one finger to press and hold the fixing plate on the<br />
rasping disk.<br />
13. Tighten the M5x8 countersunk screw using a Torx 25<br />
screwdriver (1).<br />
40 2010-03-17
7 Troubleshooting<br />
7.1 Safety<br />
Electric horse tooth rasp<br />
Troubleshooting<br />
The following chapter contains fault indications as well as possible<br />
causes of and steps to correct faults.<br />
Contact the manufacturer (see service address on page 2) in case<br />
the information provided below is not sufficient to correct the fault<br />
you are experiencing.<br />
Personnel � Unless specified otherwise, the troubleshooting steps described<br />
here can be performed by the operator.<br />
Electrical system<br />
� Some troubleshooting steps may only be performed by specially<br />
trained experts or the manufacturer. The description of each<br />
fault will specify the personnel requirements for correcting the<br />
fault.<br />
� Work on the electrical system may only be performed by<br />
trained electricians.<br />
DANGER!<br />
Danger of death due to electric current!<br />
Coming into contact with live components may<br />
result in death. Switched-on electrical components<br />
may move uncontrollably and cause severe injury.<br />
Therefore:<br />
– Before commencing work, switch off the power<br />
supply and prevent it from coming back on.<br />
2010-03-17 41
Electric horse tooth rasp<br />
Troubleshooting<br />
Improper troubleshooting<br />
Actions in the event of a fault Always:<br />
7.2 Troubleshooting table<br />
WARNING!<br />
Risk of injury due to improper<br />
troubleshooting!<br />
Improper troubleshooting may lead to serious<br />
injury to man and animal as well as property<br />
damage.<br />
Therefore:<br />
– Make sure there is enough mounting clearance<br />
before starting to work.<br />
– Keep the installation site tidy and clean!<br />
Components and tools lying loosely about or on<br />
top of each other may cause accidents.<br />
– If components have previously been removed,<br />
make sure they are re-installed correctly before<br />
re-attaching all fixing elements and tightening<br />
them to torque.<br />
1. Switch off the machine immediately in the event of faults that<br />
pose an immediate danger to man, animal or property.<br />
2. Find the cause of the fault.<br />
3. Depending on the kind of the fault, have an authorized expert<br />
correct the fault or correct the fault yourself.<br />
IMPORTANT!<br />
The troubleshooting table below specifies who is<br />
authorized to correct each individual fault.<br />
Fault Possible cause Troubleshooting Correction by<br />
Rasping disk stops rotating<br />
at low bearing pressure.<br />
Dark liquid leaks from the<br />
rasping head.<br />
Residual current circuit<br />
breaker does not work.<br />
Belt tension too low. Increase belt tension<br />
(see chapter 7.3.1).<br />
Sealing ring defective. Replace sealing ring<br />
(see chapter 7.3.2).<br />
Residual current circuit<br />
breaker defective.<br />
Replace residual<br />
current circuit breaker.<br />
Operator<br />
Operator<br />
Trained electrician/<br />
manufacturer<br />
42 2010-03-17
7.3 Troubleshooting steps<br />
7.3.1 Adjusting the belt tension (only when cold)<br />
Fig. 38<br />
Fig. 39<br />
Fig. 40<br />
Electric horse tooth rasp<br />
Troubleshooting<br />
If the rasping disk stops at low bearing pressures, increase the<br />
belt tension of the machine proceeding as follows:<br />
1. Loosen both M5x16 countersunk screws (1) by one turn using<br />
a Torx 25 (2) screwdriver. Do not unscrew the screws.<br />
2. Press the housing edge (1) of the fitting against a straight<br />
edge (2). The tube must lie flat on the plane.<br />
3. Pull the tube (1) forward to increase the belt tension.<br />
4. Retain the tension while tightening both M5x16 countersunk<br />
screws using the Torx 25 screwdriver.<br />
2010-03-17 43
Electric horse tooth rasp<br />
Troubleshooting<br />
7.3.2 Changing the sealing ring<br />
Fig. 41<br />
Fig. 42<br />
Fig. 43<br />
Fig. 44<br />
If you change the sealing yourself, you do so at your own risk as<br />
replacing the sealing ring may damage the rasp attachment.<br />
Consult the manufacturer if necessary (for the manufacturer's<br />
address, see page 2).<br />
1. Use a soft plastic brush to thoroughly clean the rasping head.<br />
2. Let the rasping head dry.<br />
3. Put the screwdriver to the outer diameter of the sealing ring.<br />
4. Use the screwdriver to lift the sealing ring out of its holder.<br />
5. Apply silicon spray to the new sealing ring and the rasping<br />
head.<br />
6. Use both thumbs to press the sealing ring into the holder of<br />
the rasping head.<br />
7. Make sure the sealing ring is placed flush in the holder.<br />
44 2010-03-17
7.4 Use after fault has been corrected<br />
Electric horse tooth rasp<br />
Troubleshooting<br />
After correcting the fault, start the machine as specified in chapter<br />
"Use."<br />
2010-03-17 45
Electric horse tooth rasp<br />
Disposal<br />
8 Disposal<br />
Unless a return and disposal agreement has been made, recycle<br />
disassembled components as follows:<br />
� Scrap metals.<br />
� Recycle plastic components.<br />
� Dispose of the remaining components in accordance with the<br />
material of which they are made.<br />
NOTICE!<br />
Damage to the environment due to incorrect<br />
disposal!<br />
Electronic scrap, electronic components, lubricants<br />
and other supplies must be treated as hazardous<br />
waste and disposed of only by certified expert<br />
companies!<br />
Consult your local authorities or specialized waste management<br />
companies for information on environmentally safe disposal.<br />
46 2010-03-17
9 Spare parts<br />
9.1 Spare part orders<br />
9.2 Spare parts list<br />
Fig. 45<br />
Item Item number Description<br />
When ordering spare parts,<br />
1 10956/66 Torx screwdriver (TX 25)<br />
2 10956/65 Fixing plate<br />
Electric horse tooth rasp<br />
Spare parts<br />
� include the serial number of the machine (see nameplate) and<br />
� the item number of the spare part.<br />
3 10956/21 Countersunk screw (TX 25) M5x8<br />
4 10956/15 Rasping disk HM (hard metal)<br />
2010-03-17 47
Electric horse tooth rasp<br />
Spare parts<br />
Item Item number Description<br />
4 10956/15D1 Rasping disk, diamond, curved<br />
4 10956/15D2 Rasping disk, diamond, flat<br />
4 10956/15CC1 Barolin-compliant rasping disk<br />
5 10956/17 Sealing ring<br />
6 10956/116 Bearing cover F3<br />
7 10956/101 Slide ring<br />
8 10956/113 Driving pins 3h9/2.5x8 offset<br />
9 10956/115 Pulley front F3<br />
10 10956/19 Miniature bearing (head)<br />
11 10956/50/EU Coupling piece/driver EU<br />
11 10956/50/USA Coupling piece/driver USA<br />
12 10956/118 Drive belt RB 3x1,200<br />
12 10956/119 Drive belt RB 3x965 (pony)<br />
13 10956/10484 Head and tube Slimline 1200<br />
13 10956/108 Head and tube Slimline 965 (pony)<br />
14 10956/61 Countersunk slotted screw M3x40<br />
15 10956/25 O-ring<br />
16/26 10956/106 Set of gears<br />
17 10956/63 Shim washer<br />
18 10956/23 Countersunk screw (TX 25) M5x16<br />
19 10956/109 O-ring housing (front piece)<br />
20 10956/62 Countersunk slotted screw M3x12<br />
21 10956/02 Cover with serial number<br />
22 10956/16 Miniature bearing (housing)<br />
23 10956/52 Ball bearing (housing)<br />
24 10956/60 Seeger ring<br />
48 2010-03-17
Item Item number Description<br />
25 10956/111 O-ring bevel wheel (bearing)<br />
27 10956/83 Buckle<br />
28 10956/117 Housing<br />
29 10956/24 Fillister head screw M5x16<br />
30 10956/110 O-ring housing (bearing)<br />
31 10956/54 Seeger ring<br />
10956/95 Power unit <strong>KRESS</strong> incl. 4m cable<br />
10956/97 Cable 4m to <strong>KRESS</strong> power unit<br />
10956/74 Residual current circuit breaker CH<br />
10956/75 Residual current circuit breaker Schuko<br />
10956/120 Set of sealings<br />
10956/SL Electric tooth rasp "swissfloat TM slimline" (1200)<br />
10956/SL-P Electric tooth rasp "swissfloat TM slimline" (965), model: Pony<br />
10957/SL<br />
Custom models: inquire about spare parts.<br />
Electric tooth rasp "swissfloat TM slimline", model: Short<br />
Electric horse tooth rasp<br />
Spare parts<br />
2010-03-17 49
Electric horse tooth rasp<br />
Appendix<br />
10 Appendix<br />
10.1.1 Declaration of Conformity<br />
Manufacturer:<br />
Declaration of Conformity<br />
as required by EC Machinery Directive M98/37/EC, Annex II A<br />
EISENHUT-VET <strong>AG</strong><br />
Sandweg 52<br />
CH-4123 Allschwil<br />
We hereby declare that the product specified below complies with the fundamental safety requirements<br />
of the Machinery Directive including all of its amendments applicable at the time this declaration is made<br />
based on the design, construction, and type of the product's model that is placed into circulation.<br />
Product description: Electric horse tooth rasp<br />
Type designation: swissfloat TM slimline<br />
Serial number: XXXX-F3<br />
Application EC<br />
directives:<br />
Applied<br />
harmonized<br />
standards:<br />
EC Machinery Directive 98/37/EC<br />
EC Low Voltage Directive 2006/95/EC<br />
EC Electromagnetic Compatibility Directive 2004/108/EC<br />
DIN EN ISO 12100-1/-2; Safety of machinery – basic concepts, general principles<br />
for design<br />
DIN EN 60204; Safety of machinery – electrical equipment of machines<br />
DIN EN 50081; DIN EN 50082; EMC generic standards<br />
Retrofitting or modifying the product in any way will void this declaration with immediate<br />
effect.<br />
Allschwil, June 19,<br />
2008<br />
50 2010-03-17
11 Index<br />
B<br />
Belt tension, adjust..........................................43<br />
Bleeding .........................................................32<br />
Brief description<br />
C<br />
entire machine.............................................20<br />
fitting ..........................................................22<br />
power unit...................................................21<br />
rasping head................................................21<br />
residual current circuit breaker......................22<br />
CE mark..........................................................50<br />
Cleaning<br />
after use......................................................36<br />
as needed ...................................................37<br />
Components....................................................21<br />
Connected loads..............................................18<br />
Contact............................................................ 9<br />
Copyright......................................................... 8<br />
Customer service.............................................. 9<br />
D<br />
Dangers..........................................................14<br />
Dental treatment..........................................32ff.<br />
canines........................................................35<br />
chewing surface...........................................35<br />
incisors........................................................35<br />
lower jaw ....................................................33<br />
upper jaw....................................................33<br />
Disposal..........................................................46<br />
E<br />
Electric current................................................14<br />
Emissions........................................................18<br />
Environmental protection .................................16<br />
Electric horse tooth rasp<br />
Index<br />
2010-03-17 51<br />
F<br />
Faults<br />
troubleshooting ........................................... 43<br />
Full mouth speculum ....................................... 31<br />
G<br />
General information<br />
I<br />
tooth rasp ................................................... 17<br />
tooth rasp pony ........................................... 17<br />
tooth rasp short........................................... 18<br />
Improper use.................................................. 12<br />
Initial operation .............................................. 26<br />
Intended use .................................................. 12<br />
L<br />
Liability.............................................................8<br />
Locking rotating speed .................................... 29<br />
Lubricants....................................................... 16<br />
M<br />
Machinery Directive......................................... 50<br />
N<br />
Nameplate...................................................... 19<br />
Noise........................................................ 14, 18<br />
O<br />
Operation ....................................................... 29<br />
Order ..........................................................47ff.<br />
Overheating.................................................... 32<br />
Overview<br />
entire machine ............................................ 20<br />
fitting.......................................................... 22<br />
power unit................................................... 21<br />
rasping head ............................................... 21<br />
residual current circuit breaker ..................... 22
P<br />
Electric horse tooth rasp<br />
Index<br />
Packaging ...................................................... 23<br />
Packaging materials ........................................ 24<br />
Personnel<br />
faults .......................................................... 41<br />
qualifications............................................... 11<br />
requirements............................................... 11<br />
Protective equipment ...................................... 13<br />
Q<br />
hearing protection ....................................... 13<br />
operation .................................................... 25<br />
protective gloves, microorganisms ................ 13<br />
safety goggles............................................. 13<br />
shoes, non-slip ............................................ 13<br />
Qualified personnel ......................................... 11<br />
R<br />
Rasp attachment, align ................................... 38<br />
Rasping disk ................................................... 15<br />
Rasping disk, change ...................................... 39<br />
Residual current circuit breaker<br />
function check............................................. 28<br />
mark........................................................... 27<br />
52 2010-03-17<br />
S<br />
Safety.............................................................10<br />
Service............................................................. 9<br />
Setup..............................................................20<br />
Spare parts ................................................. 47ff.<br />
Storage...........................................................24<br />
Surfaces, hot...................................................15<br />
Switching the machine off................................30<br />
Switching the machine on ................................29<br />
Symbols........................................................... 7<br />
T<br />
Technical Specifications .............................17, 18<br />
Trained electrician ...........................................11<br />
Transport........................................................23<br />
Transport inspection ........................................23<br />
Troubleshooting ..............................................41<br />
Troubleshooting table ......................................42<br />
U<br />
Use...........................................................12, 25<br />
User ...............................................................10<br />
W<br />
Work clothes, suitable......................................13