MUM52.. MUM54.. MUM56.. - E96.ru
MUM52.. MUM54.. MUM56.. - E96.ru
MUM52.. MUM54.. MUM56.. - E96.ru

Create successful ePaper yourself
Turn your PDF publications into a flip-book with our unique Google optimized e-Paper software.
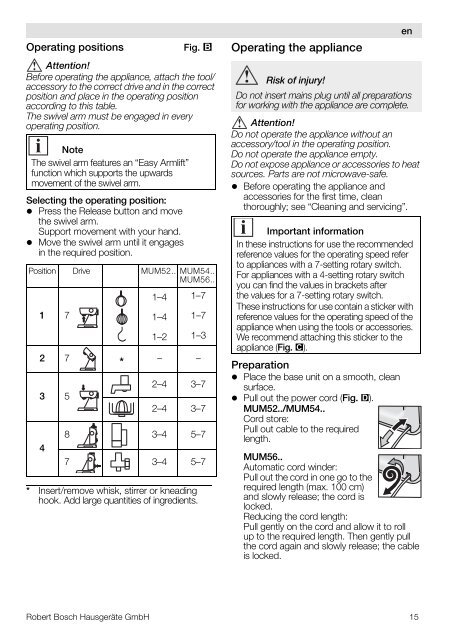
Operating positions<br />
Fig. <br />
^ííÉåíáçå><br />
_ÉÑçêÉ=çéÉê~íáåÖ=íÜÉ=~ééäá~åÅÉI=~íí~ÅÜ=íÜÉ=íççäL<br />
~ÅÅÉëëçêó=íç=íÜÉ=ÅçêêÉÅí=ÇêáîÉ=~åÇ=áå=íÜÉ=ÅçêêÉÅí=<br />
éçëáíáçå=~åÇ=éä~ÅÉ=áå=íÜÉ=çéÉê~íáåÖ=éçëáíáçå=<br />
~ÅÅçêÇáåÖ=íç=íÜáë=í~ÄäÉK<br />
qÜÉ=ëïáîÉä=~êã=ãìëí=ÄÉ=ÉåÖ~ÖÉÇ=áå=ÉîÉêó=<br />
çéÉê~íáåÖ=éçëáíáçåK<br />
Note<br />
The swivel arm features an “Easy Armlift”<br />
function which supports the upwards<br />
movement of the swivel arm.<br />
Selecting the operating position:<br />
• Press the Release button and move<br />
the swivel arm.<br />
Support movement with your hand.<br />
• Move the swivel arm until it engages<br />
in the required position.<br />
Position Drive <strong>MUM52.</strong>. <strong>MUM54.</strong>.<br />
<strong>MUM56.</strong>.<br />
1 7<br />
1–4<br />
1–4<br />
1–2<br />
1–7<br />
1–7<br />
1–3<br />
2 7<br />
*<br />
– –<br />
3 5<br />
4<br />
2–4 3–7<br />
2–4 3–7<br />
8 3–4 5–7<br />
7 3–4 5–7<br />
* Insert/remove whisk, stirrer or kneading<br />
hook. Add large quantities of ingredients.<br />
Operating the appliance<br />
^ííÉåíáçå><br />
aç=åçí=çéÉê~íÉ=íÜÉ=~ééäá~åÅÉ=ïáíÜçìí=~å=<br />
~ÅÅÉëëçêóLíççä=áå=íÜÉ=çéÉê~íáåÖ=éçëáíáçåK<br />
aç=åçí=çéÉê~íÉ=íÜÉ=~ééäá~åÅÉ=ÉãéíóK=<br />
aç=åçí=ÉñéçëÉ=~ééäá~åÅÉ=çê=~ÅÅÉëëçêáÉë=íç=ÜÉ~í=<br />
ëçìêÅÉëK=m~êíë=~êÉ=åçí=ãáÅêçï~îÉJë~ÑÉK<br />
• Before operating the appliance and<br />
accessories for the first time, clean<br />
thoroughly; see “Cleaning and servicing”.<br />
Preparation<br />
• Place the base unit on a smooth, clean<br />
surface.<br />
• Pull out the power cord (Fig. ).<br />
<strong>MUM52.</strong>./<strong>MUM54.</strong>.<br />
Cord store:<br />
Pull out cable to the required<br />
length.<br />
en<br />
oáëâ=çÑ=áåàìêó><br />
aç=åçí=áåëÉêí=ã~áåë=éäìÖ=ìåíáä=~ää=éêÉé~ê~íáçåë=<br />
Ñçê=ïçêâáåÖ=ïáíÜ=íÜÉ=~ééäá~åÅÉ=~êÉ=ÅçãéäÉíÉK<br />
Important information<br />
In these instructions for use the recommended<br />
reference values for the operating speed refer<br />
to appliances with a 7-setting rotary switch.<br />
For appliances with a 4-setting rotary switch<br />
you can find the values in brackets after<br />
the values for a 7-setting rotary switch.<br />
These instructions for use contain a sticker with<br />
reference values for the operating speed of the<br />
appliance when using the tools or accessories.<br />
We recommend attaching this sticker to the<br />
appliance (Fig. ).<br />
<strong>MUM56.</strong>.<br />
Automatic cord winder:<br />
Pull out the cord in one go to the<br />
required length (max. 100 cm)<br />
and slowly release; the cord is<br />
locked.<br />
Reducing the cord length:<br />
Pull gently on the cord and allow it to roll<br />
up to the required length. Then gently pull<br />
the cord again and slowly release; the cable<br />
is locked.<br />
Robert Bosch Hausgeräte GmbH 15