Operating Instructions Manual de instrucciones - Pioneer
Operating Instructions Manual de instrucciones - Pioneer
Operating Instructions Manual de instrucciones - Pioneer

Create successful ePaper yourself
Turn your PDF publications into a flip-book with our unique Google optimized e-Paper software.
BEFORE OPERATING THE PLAYER<br />
INSERT DISCS INTO THE 6-DISC MAGAZINE<br />
Insert any discs which you may have into the supplied<br />
magazine. Up to six discs may be inserted. The numbering of<br />
the discs begins with 1 at the topmost tray, and then increases<br />
in or<strong>de</strong>r downwards to 6 for the lowest tray. The magazine has<br />
a window through which the pulled-out disc tray can be<br />
checked. Even during playback, the number of the disc being<br />
played back can be checked through this window.<br />
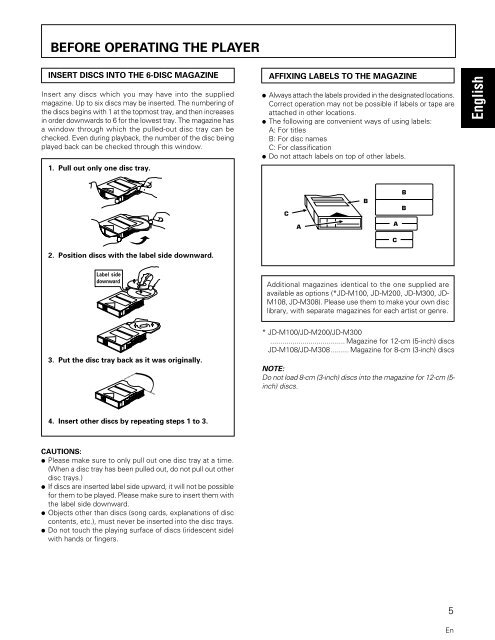
1. Pull out only one disc tray.<br />
AFFIXING LABELS TO THE MAGAZINE<br />
÷ Always attach the labels provi<strong>de</strong>d in the <strong>de</strong>signated locations.<br />
Correct operation may not be possible if labels or tape are<br />
attached in other locations.<br />
÷ The following are convenient ways of using labels:<br />
A: For titles<br />
B: For disc names<br />
C: For classification<br />
÷ Do not attach labels on top of other labels.<br />
English<br />
C<br />
A<br />
B<br />
A<br />
C<br />
B<br />
B<br />
2. Position discs with the label si<strong>de</strong> downward.<br />
Label si<strong>de</strong><br />
downward<br />
Additional magazines i<strong>de</strong>ntical to the one supplied are<br />
available as options (*JD-M100, JD-M200, JD-M300, JD-<br />
M108, JD-M308). Please use them to make your own disc<br />
library, with separate magazines for each artist or genre.<br />
3. Put the disc tray back as it was originally.<br />
* JD-M100/JD-M200/JD-M300<br />
..................................... Magazine for 12-cm (5-inch) discs<br />
JD-M108/JD-M308......... Magazine for 8-cm (3-inch) discs<br />
NOTE:<br />
Do not load 8-cm (3-inch) discs into the magazine for 12-cm (5-<br />
inch) discs.<br />
4. Insert other discs by repeating steps 1 to 3.<br />
CAUTIONS:<br />
÷ Please make sure to only pull out one disc tray at a time.<br />
(When a disc tray has been pulled out, do not pull out other<br />
disc trays.)<br />
÷ If discs are inserted label si<strong>de</strong> upward, it will not be possible<br />
for them to be played. Please make sure to insert them with<br />
the label si<strong>de</strong> downward.<br />
÷ Objects other than discs (song cards, explanations of disc<br />
contents, etc.), must never be inserted into the disc trays.<br />
÷ Do not touch the playing surface of discs (iri<strong>de</strong>scent si<strong>de</strong>)<br />
with hands or fingers.<br />
5<br />
En