Ultrasonic flow sensor - Hachflow
Ultrasonic flow sensor - Hachflow
Ultrasonic flow sensor - Hachflow
You also want an ePaper? Increase the reach of your titles
YUMPU automatically turns print PDFs into web optimized ePapers that Google loves.
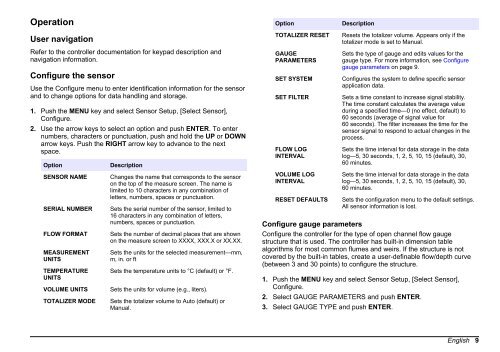
OperationOptionDescriptionUser navigationRefer to the controller documentation for keypad description andnavigation information.Configure the <strong>sensor</strong>Use the Configure menu to enter identification information for the <strong>sensor</strong>and to change options for data handling and storage.1. Push the MENU key and select Sensor Setup, [Select Sensor],Configure.2. Use the arrow keys to select an option and push ENTER. To enternumbers, characters or punctuation, push and hold the UP or DOWNarrow keys. Push the RIGHT arrow key to advance to the nextspace.OptionSENSOR NAMESERIAL NUMBERFLOW FORMATMEASUREMENTUNITSTEMPERATUREUNITSVOLUME UNITSTOTALIZER MODEDescriptionChanges the name that corresponds to the <strong>sensor</strong>on the top of the measure screen. The name islimited to 10 characters in any combination ofletters, numbers, spaces or punctuation.Sets the serial number of the <strong>sensor</strong>, limited to16 characters in any combination of letters,numbers, spaces or punctuation.Sets the number of decimal places that are shownon the measure screen to XXXX, XXX.X or XX.XX.Sets the units for the selected measurement—mm,m, in. or ftSets the temperature units to °C (default) or °F.Sets the units for volume (e.g., liters).Sets the totalizer volume to Auto (default) orManual.TOTALIZER RESETGAUGEPARAMETERSSET SYSTEMSET FILTERFLOW LOGINTERVALVOLUME LOGINTERVALRESET DEFAULTSResets the totalizer volume. Appears only if thetotalizer mode is set to Manual.Sets the type of gauge and edits values for thegauge type. For more information, see Configuregauge parameters on page 9.Configures the system to define specific <strong>sensor</strong>application data.Sets a time constant to increase signal stability.The time constant calculates the average valueduring a specified time—0 (no effect, default) to60 seconds (average of signal value for60 seconds). The filter increases the time for the<strong>sensor</strong> signal to respond to actual changes in theprocess.Sets the time interval for data storage in the datalog—5, 30 seconds, 1, 2, 5, 10, 15 (default), 30,60 minutes.Sets the time interval for data storage in the datalog—5, 30 seconds, 1, 2, 5, 10, 15 (default), 30,60 minutes.Sets the configuration menu to the default settings.All <strong>sensor</strong> information is lost.Configure gauge parametersConfigure the controller for the type of open channel <strong>flow</strong> gaugestructure that is used. The controller has built-in dimension tablealgorithms for most common flumes and weirs. If the structure is notcovered by the built-in tables, create a user-definable <strong>flow</strong>/depth curve(between 3 and 30 points) to configure the structure.1. Push the MENU key and select Sensor Setup, [Select Sensor],Configure.2. Select GAUGE PARAMETERS and push ENTER.3. Select GAUGE TYPE and push ENTER.English 9


