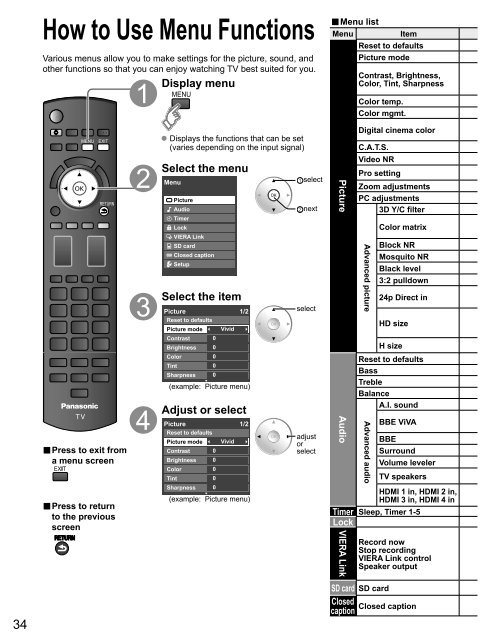
How to Use Menu FunctionsVarious menus allow you to make settings for the picture, sound, andother functions so that you can enjoy watching TV b<strong>es</strong>t suited for you.Display menu■ Menu listMenuItemR<strong>es</strong>et to defaultsPicture modeContrast, Brightn<strong>es</strong>s,Color, Tint, Sharpn<strong>es</strong>sColor temp.Color mgmt.■ Pr<strong>es</strong>s to exit froma menu screen■ Pr<strong>es</strong>s to returnto the previousscreenDisplays the functions that can be set(vari<strong>es</strong> depending on the input signal)Select the menuMenuPictureAudioTimerLockVIERA LinkSD cardClosed captionSetupSelect the itemPicture 1/2R<strong>es</strong>et to defaultsPicture mode VividContrast 0Brightn<strong>es</strong>s 0Color0Tint0Sharpn<strong>es</strong>s 0(example: Picture menu)Adjust or selectPicture 1/2R<strong>es</strong>et to defaultsPicture mode VividContrast 0Brightn<strong>es</strong>s 0Color0Tint0Sharpn<strong>es</strong>s 0(example: Picture menu)selectnextselectadjustorselectPictureAudioDigital cinema colorC.A.T.S.Video NRPro settingZoom adjustmentsPC adjustments3D Y/C filterAdvanced pictureColor matrixBlock NRMosquito NRBlack level3:2 pulldown24p Direct inHD sizeH sizeR<strong>es</strong>et to defaultsBassTrebleBalanceA.I. soundAdvanced audioBBE ViVABBESurroundVolume levelerTV speakersHDMI 1 in, HDMI 2 in,HDMI 3 in, HDMI 4 inTimer Sleep, Timer 1-5LockVIERA LinkRecord nowStop recordingVIERA Link controlSpeaker output34SD card SD cardClosedClosed captioncaption
Adjustments/Configurations (alternativ<strong>es</strong>)R<strong>es</strong>ets all picture adjustments to factory default settings except for “Advanced picture”.R<strong>es</strong>et to defaultsBasic picture mode (Vivid/Standard/Studio ref/THX/Game/Custom) (p. 59) Picture mode VividAdjusts color, brightn<strong>es</strong>s, etc. for each picture mode to suit your tasteContrast +20 Tint 0• Display rangeBrightn<strong>es</strong>s 0Sharpn<strong>es</strong>s 0Contrast/Brightn<strong>es</strong>s/Color/Sharpn<strong>es</strong>s: 0 - 100Tint: -50 - +50Color 0Selects a choice of Cool(blue), Normal, or Warm(red) color. (Cool 2/Cool 1/Normal/Warm 1/Warm 2) Color temp. NormalOn: Enhanc<strong>es</strong> green and blue color reproduction, <strong>es</strong>pecially outdoor scen<strong>es</strong>. (On/Off) Color mgmt. OnAuto: Automatically adjusts the color gamut of the input image to the color gamut of the panel.On: Shows an expanded display of the input image color gamut.Digital cinema color AutoOff: Displays the color gamut of the input image as is. (Auto/On/Off)Adjusts the brightn<strong>es</strong>s and gradation according to the ambient lighting condition. (Off/On) C.A.T.S. OffReduc<strong>es</strong> noise, commonly called snow. Leave it off when receiving a strong signal. (Off/Weak/Medium/Strong) Video NR OffAdjust the “Picture mode” setting in more detail. (p. 59)(This setting can be adjusted only when “Custom” or ”Photo” is selected.)Pro settingAdjusts vertical alignment and size when aspect setting is “ZOOM” (p. 57)Zoom adjustmentsSets PC display (p. 32)PC adjustmentsMinimiz<strong>es</strong> noise and cross-color in the picture. (On/Off) 3D Y/C filter OnSelects image r<strong>es</strong>olution of component-connected devic<strong>es</strong> (HD/SD)SD: Standard Definition HD: High Definition• Only 480p signal accepted; regular TV (NTSC) is not available. Color matrix SDReduc<strong>es</strong> noise of specific digital signals of DVD, STB, etc. (On/Off) Block NR OffReduc<strong>es</strong> HDTV flicker noise in the contoured sections of an image (Off/On) Mosquito NR OffSelects Dark or Light. Valid only for external input signals. (Dark/Light) Black level LightAdjust the picture recorded in 24 fps for optimum quality. (On/Off) 3:2 pulldown Off96Hz/48Hz: Achiev<strong>es</strong> more cinematic playback by reproducing the movie contents at 2 or 4 tim<strong>es</strong> th<strong>es</strong>peed of 24 fram<strong>es</strong> per second. (96Hz/60Hz/48Hz)24p Direct in 60 HzIf flicker is seen using 48Hz, please use 60Hz or 96Hz.Selects between 95 % (Size 1) or 100 % (Size 2) for the scanning area with High-definition signal. (Size 1/ Size 2)Select “Size 1” if noise is generated on the edg<strong>es</strong> of the screen.HD size Size1Size 1: Selected item for “HD size”. Scanning 95%• Size 2: Selected item for “HD size”. Scanning 100% Adjust horizontal display range to reduce noise of both side edg<strong>es</strong> of an image. (Size 1/Size 2)H size Size 1Size 2: Adjust image size according to aspect mode for reducing noise. (p. 60)R<strong>es</strong>ets Bass, Treble and Balance adjustments to factory default settings.R<strong>es</strong>et to defaultsIncreas<strong>es</strong> or decreas<strong>es</strong> the bass r<strong>es</strong>ponse. Bass 0Increas<strong>es</strong> or decreas<strong>es</strong> the treble r<strong>es</strong>ponse. Treble 0Emphasiz<strong>es</strong> the left / right speaker volume. Balance 0Equaliz<strong>es</strong> overall volume levels across all channels and external inputs. (On/Off) A.I. sound OnBBE ViVA HD3D (High-Definition 3D) Sound provid<strong>es</strong> musically accurate natural 3D image with Hi-Fi sound. The clarity of the soundis improved by BBE while the width, depth and height of sound image are expanded by BBE’s proprietary 3D sound proc<strong>es</strong>s. BBE BBE ViVA OnViVA HD3D Sound is compatible with all TV programs including news, music, dramas, movi<strong>es</strong>, sports and electronic gam<strong>es</strong>. (On/Off)BBE High Definition Sound r<strong>es</strong>tor<strong>es</strong> clarity and pr<strong>es</strong>ence for better speech intelligibility and musical realism. (On/Off) BBE OnEnhanc<strong>es</strong> audio r<strong>es</strong>ponse when listening to stereo. (On/Off) Surround OffMinimiz<strong>es</strong> volume disparity after switching to external inputs. Volume leveler 0Switch to “Off” when using external speakers (On/Off)• “A.I. sound”, “BBE ViVA”, “BBE”, “Surround” and “Volume leveler” do not work if “Off” is selected. TV speakers OnThe default setting is “Digital” for HDMI connection. (Digital input signal)HDMI1 in Digital HDMI3 in DigitalSelect audio input terminal when DVI cable is connected. (Analog audio inputsignal) (Digital/Component 1/Component 2/Video 1/Video 2)HDMI2 in Digital HDMI4 in DigitalThe TV can automatically turn On/Off at the d<strong>es</strong>ignated date and time (p. 54)Locks the channels and programs (p. 48)[Record now/Stop recording]Records programs on the recorder immediately with the TV’s remote control (p. 42-43).[VIERA Link control]Selects equipment to acc<strong>es</strong>s and operate. (Recorder/Home theater/Player/Camcorder/LUMIX/Network Camera) (p. 42-43)[Speaker output]Selects an audio output. (Home theater/TV) (p. 42-43)• VIERA Link menu is acc<strong>es</strong>sible directly by pr<strong>es</strong>sing the VIERA Link button on the remote control. (p. 42)[Photo viewer] To view the still picture. (p. 24)SD card[Movie player] To view moving pictur<strong>es</strong> recorded in MPEG 2 or AVCHD format. (p. 22)Displays subtitl<strong>es</strong> (Closed caption) (p. 52)In AV mode, the Audio menu and Setup menu give fewer options.Closed captionHow to Use Menu Functions(picture, sound quality, etc.)Advanced35