

Dynafit TLT Verti F6263 F01 - ImageShack
Dynafit TLT Verti F6263 F01 - ImageShack
Dynafit TLT Verti F6263 F01 - ImageShack

Create successful ePaper yourself
Turn your PDF publications into a flip-book with our unique Google optimized e-Paper software.
ENGLISH<br />
instructions supplied or using a special<br />
assembly gauge obtainable from<br />
DYNAFIT.<br />
The <strong>TLT</strong> <strong>Verti</strong>cal ST Rental can also<br />
only be fitted using the assembly template<br />
supplied or the special Rental<br />
assembly gauge.<br />
Important:<br />
Take particular care with cap skis, soft<br />
touch skis and skis that have angeled<br />
sidewalls.<br />
2.3 Drilling<br />
General information for installation<br />
screws:<br />
The DYNAFIT installation screws are in<br />
accordance with the requirement of the<br />
valid International Standards (DIN/ISO).<br />
Check the location of the reinforced<br />
mounting platform or similar reinforcement<br />
plates which are below the top surface.<br />
These plates must be drilled completely<br />
through to ensure proper screw<br />
penetration and retention. If necessary<br />
use longer screws. But in any case follow<br />
the instructions of the ski manufacturer.<br />
a) Use only drill bits 4,1x9 or 3,6x9 and<br />
re-check the ski manufacturer’s recommendations.<br />
Use only proper drill bits.<br />
b) Always keep the drill bit vertically aligned<br />
with the drill bushings in the<br />
Installation Tool.<br />
c) Drill to the countersunk depth.<br />
d) After drilling is completed remove the<br />
14<br />
Installation Tool from the ski. Shavings<br />
and dust have to be removed from the<br />
surface of the ski and all holes.<br />
2.4 General guidelines for binding<br />
installation<br />
All screws must be firmly seated and not<br />
stripped. If a power driver is used, keep<br />
the torque settings on the clutch as low<br />
as possible to help prevent stripping of<br />
the screws. Final tightening of the screws<br />
should always be done by hand. The<br />
screw head should be flush with the binding<br />
and the binding should be firmly<br />
attached to the ski. Holes should only be<br />
tapped and glued if recommended by the<br />
ski manufacturer.<br />
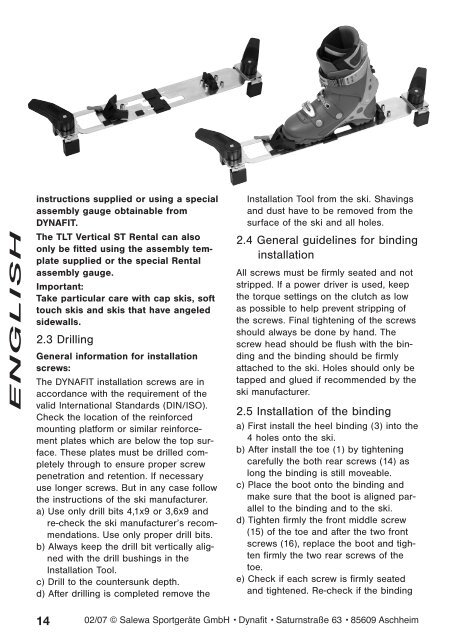
2.5 Installation of the binding<br />
a) First install the heel binding (3) into the<br />
4 holes onto the ski.<br />
b) After install the toe (1) by tightening<br />
carefully the both rear screws (14) as<br />
long the binding is still moveable.<br />
c) Place the boot onto the binding and<br />
make sure that the boot is aligned parallel<br />
to the binding and to the ski.<br />
d) Tighten firmly the front middle screw<br />
(15) of the toe and after the two front<br />
screws (16), replace the boot and tighten<br />
firmly the two rear screws of the<br />
toe.<br />
e) Check if each screw is firmly seated<br />
and tightened. Re-check if the binding<br />
02/07 © Salewa Sportgeräte GmbH • <strong>Dynafit</strong> • Saturnstraße 63 • 85609 Aschheim