KESSEL-Kleinkläranlagen InnoClean PLUS
KESSEL-Kleinkläranlagen InnoClean PLUS
KESSEL-Kleinkläranlagen InnoClean PLUS

Create successful ePaper yourself
Turn your PDF publications into a flip-book with our unique Google optimized e-Paper software.
β nach<br />
DIN 4124<br />
<br />
<br />
≥ 50cm<br />
4.4 Placing<br />
The tank must be placed shock-free into the excavation pit<br />
with the aid of suitable equipment and put down onto the<br />
base bedding (see also chapter "Transport").<br />
Pay attention to direction of flow and direction of flow arrows<br />
on the tank!<br />
4.5 Filling the tank<br />
Fill tanks in both chambers with clear water (approx. 80 cm)<br />
to achieve an improved stability.<br />
4.6 Backfilling the excavation pit<br />
In general, filling the tank and backfilling the excavation pit<br />
should be carried out in parallel. The excavation pit is backfilled<br />
up to the bottom edge of inlet and drain, as well as the<br />
ventilation line and cable conduit line. The tank encasing<br />
must be produced in a width of at least 50 cm. The individual<br />
layers of the backfilling material should not exceed a height<br />
of 30 cm. They must be compacted using light compacting<br />
4. Installation and assembly<br />
<br />
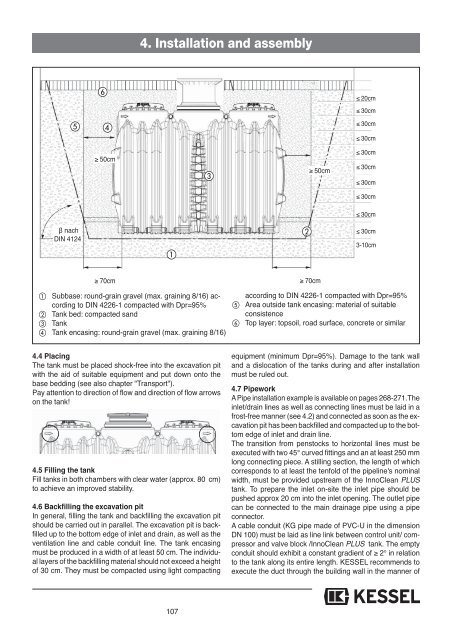
Subbase: round-grain gravel (max. graining 8/16) according<br />
to DIN 4226-1 compacted with Dpr=95%<br />
Tank bed: compacted sand<br />
Tank<br />
Tank encasing: round-grain gravel (max. graining 8/16)<br />
107<br />
<br />
≥ 50cm<br />
≥ 70cm ≥ 70cm<br />
<br />
≤ 20cm<br />
≤ 30cm<br />
≤ 30cm<br />
≤ 30cm<br />
≤ 30cm<br />
≤ 30cm<br />
≤ 30cm<br />
≤ 30cm<br />
≤ 30cm<br />
≤ 30cm<br />
3-10cm<br />
according to DIN 4226-1 compacted with Dpr=95%<br />
Area outside tank encasing: material of suitable<br />
consistence<br />
Top layer: topsoil, road surface, concrete or similar<br />
equipment (minimum Dpr=95%). Damage to the tank wall<br />
and a dislocation of the tanks during and after installation<br />
must be ruled out.<br />
4.7 Pipework<br />
A Pipe installation example is available on pages 268-271.The<br />
inlet/drain lines as well as connecting lines must be laid in a<br />
frost-free manner (see 4.2) and connected as soon as the excavation<br />
pit has been backfilled and compacted up to the bottom<br />
edge of inlet and drain line.<br />
The transition from penstocks to horizontal lines must be<br />
executed with two 45° curved fittings and an at least 250 mm<br />
long connecting piece. A stilling section, the length of which<br />
corresponds to at least the tenfold of the pipeline's nominal<br />
width, must be provided upstream of the <strong>InnoClean</strong> <strong>PLUS</strong><br />
tank. To prepare the inlet on-site the inlet pipe should be<br />
pushed approx 20 cm into the inlet opening. The outlet pipe<br />
can be connected to the main drainage pipe using a pipe<br />
connector.<br />
A cable conduit (KG pipe made of PVC-U in the dimension<br />
DN 100) must be laid as line link between control unit/ compressor<br />
and valve block /<strong>InnoClean</strong> <strong>PLUS</strong> tank. The empty<br />
conduit should exhibit a constant gradient of ≥ 2° in relation<br />
to the tank along its entire length. <strong>KESSEL</strong> recommends to<br />
execute the duct through the building wall in the manner of