RcS3535B/RcS3535cB/RcS4040cB - Plantes et Jardins
RcS3535B/RcS3535cB/RcS4040cB - Plantes et Jardins
RcS3535B/RcS3535cB/RcS4040cB - Plantes et Jardins

Create successful ePaper yourself
Turn your PDF publications into a flip-book with our unique Google optimized e-Paper software.
FR EN DE ES IT PT NL SV DA NO FI HU CS RU RO PL SL HR ET LT LV SK BG<br />
FR EN DE ES IT PT NL SV DA NO FI<br />
DE<br />
FR EN ES IT PT NL SV DA NO FI<br />
ES<br />
HU CS RU RO PL SL HR<br />
English<br />
HU CS RU RO PL SL HR<br />
FR EN DE IT PT NL SV DA NO FI HU CS RU RO PL SL HR ET LT LV SK BG<br />
■ Do not use any type of pre-mixed p<strong>et</strong>rol/lubricant Note: Do not use dirty, used, or otherwise contaminated<br />
FRfrom EN fuel DE service ES ITstations;<br />
PT this NL includes SV DA the NO pre- FI HUlubricants. CS RUDamage RO PLmay SLoccur HRto<br />
ET the lubricant LT LV pump, SK BG bar,<br />
mixed p<strong>et</strong>rol/lubricant intended for use in mopeds, or chain.<br />
FRmotorcycles, EN DE ES <strong>et</strong>c. IT PT NL SV DA NO FI HU CS RU RO PL SL HR ET LT LV SK BG<br />
■ Carefully pour the bar and chain lubricant into the<br />
■ Use a high quality 2-cycle self-mixing lubricant for air-<br />
FR EN DE ES IT PT NL SV DA NO FI HU CS lubricant RU tank.<br />
cooled engines. Do not use automotive lubricant or<br />
RO PL SL HR ET LT LV SK BG<br />
2-cycle outboard lubricant.<br />
■ Fill the lubricant tank every time you fuel the engine.<br />
FR EN DE ES IT PT NL SV DA NO FI HU CS RU RO PL SL HR ET LT LV SK BG<br />
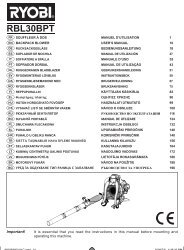
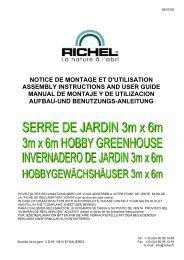
■ Mix 2% lubricant into the p<strong>et</strong>rol. This is a 50:1 ratio.<br />
OPERATINg THE CHAIN BRAkE<br />
■ FRMix ENthe DE fuel thoroughly ES IT PT and each NL SV time before fuelling. DA NO FI HUSee CSFigures RU 7 RO - 8. PL SL HR ET LT LV SK BG<br />
■ Mix in small quantities. Do not mix quantities larger<br />
FRthan EN usable DE ES in a IT 30-day PT period. NL SVA 2-cycle DA NO lubricant FI HUCheck CS the RU operating RO PL condition SL HRof<br />
ET the chain LT LV brake SKprior BGto<br />
containing a fuel stabilizer is recommended.<br />
each use.OPERATION<br />
FR EN DE ES IT PT NL SV DA NO FI HU CS RU RO PL SL HR ET LT LV SK BG<br />
■ Engage the chain brake by rotating your left hand<br />
FR EN DE ES IT PT NL SV DA NO FI HU<br />
around the front handle, allowing the back of your<br />
CS RU RO PL SL HR ET LT LV SK BG<br />
hand to push the chain brake lever/hand guard<br />
FR EN DE ES IT PT NL SV DA NO FI HU toward<br />
CS RU the RObar PL while SLthe HR chain ETis rotating LT LV rapidly. SK BG Be<br />
sure to maintain both hands on the saw handles at all<br />
FR<br />
FR<br />
FR<br />
FR<br />
FR<br />
EN DE<br />
1 litre<br />
EN2 litres DE<br />
EN3 litres DE<br />
4 litres<br />
EN DE<br />
5 litres<br />
EN DE<br />
ES IT<br />
+<br />
ES+ IT<br />
ES+ IT<br />
+<br />
ES IT<br />
+<br />
ES IT<br />
PT NL<br />
20 ml<br />
40 PTml NL<br />
60 PTml NL<br />
80 ml<br />
PT NL<br />
100 ml<br />
PT NL<br />
SV DA NO<br />
=<br />
}<br />
SV = DA NO<br />
SV = DA50: NO 1<br />
=<br />
SV DA NO<br />
=<br />
SV DA NO<br />
FI<br />
FI<br />
FI<br />
FI<br />
FI<br />
HU<br />
HU<br />
HU<br />
HU<br />
HU<br />
CS times. RU RO PL SL HR ET LT LV SK BG<br />
■ Res<strong>et</strong> the chain brake back into the RUN position by<br />
CS grasping RU ROthe<br />
top PLof SL the chain HR ET brake LTlever/hand LV SK guard BG<br />
and pulling toward the front handle until you hear a<br />
CS RU RO PL SL HR ET LT LV SK BG<br />
click.<br />
CS RUWARNINg: RO PL SL HR ET LT LV SK BG<br />
If the chain brake does not stop the chain<br />
CS RUimmediately, RO PL SLor<br />
if HR the chain ET brake LT LVwill SK not stay BG<br />
NOTE:<br />
FR EN<br />
Fuel<br />
DE<br />
system<br />
ES IT<br />
damage<br />
PT<br />
or<br />
NL<br />
performance<br />
SV DA NO<br />
problems<br />
FI HU<br />
resulting from the use of an oxygenated fuel containing<br />
CS<br />
in the run position without assistance, take the<br />
RU RO PL SL HR ET LT LV SK BG<br />
saw to an authorised service centre for repair<br />
more FR EN than DEthe ESpercentages IT PT NLof SV oxygenates DA NO stated FI HU<br />
previously are not covered under warranty.<br />
FR EN DE ES IT PT NL SV DA NO FI HU<br />
FILLINg THE FuEL TANk<br />
See FR Figure EN DE 5. ES IT PT NL SV DA NO FI HU<br />
CS RUprior ROto PL use. SL HR ET LT LV SK BG<br />
starting tHE EnginE<br />
CS RU RO PL SL HR ET LT LV SK BG<br />
See Figures 8 - 13.<br />
Starting CS RU the ROproduct PL SLdiffers HR depending ET LT LV on wh<strong>et</strong>her SK BG the<br />
■ FRClean EN the DE surface ES IT around PT NL the SV fuel DA cap NO to prevent FI HU<br />
contamination.<br />
■ Loosen the fuel cap slowly.<br />
engine is cold or warm.<br />
CS RU RO PL SL<br />
WARNINg:<br />
HR ET LT LV SK BG<br />
■ Carefully pour the fuel mixture into the tank. Avoid<br />
spillage.<br />
■ Prior to replacing the fuel cap, clean and inspect the<br />
gask<strong>et</strong>.<br />
■ Immediately replace the fuel cap and hands tighten it.<br />
Wipe up any fuel spillage.<br />
Note: It is normal for the engine to emit smoke during<br />
and after the first use.<br />
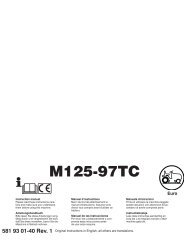
AddINg BAR ANd CHAIN LuBRICANT<br />
See Figure 6.<br />
Use Ryobi Bar and Chain Lubricant. It is designed for<br />
chains and chain oilers, and is formulated to perform over<br />
a wide temperature range with no dilution required. The<br />
chainsaw should use approximately one tank of lubricant<br />
per tank of fuel.<br />
37<br />
ET LT LV SK BG<br />
ET LT LV SK BG<br />
Keep your body to the left of the chain line.<br />
Never straddle the saw or chain, or lean over<br />
past the chain line.<br />
■ Place the chainsaw on level ground and ensure<br />
that no objects or obstructions are in the immediate<br />
vicinity that could come in contact with the bar and<br />
chain.<br />
■ Hold the front handle firmly with your left hand and<br />
put your right foot onto the base of the rear handle.<br />
To start a cold engine:<br />
■ Turn on the ignition switch.<br />
■ Make sure the chain brake is in the run position by<br />
pulling back on the lever/hand guard.<br />
■ Fully press and release the primer bulb at least 7<br />
times.<br />
■ Pull choke lever all the way out to start position.