- Page 1 and 2: Operating Instructions 42”/50”
- Page 3 and 4: Enjoy rich multimedia Contents Plea
- Page 5 and 6: WARNING/CAUTION WARNING Small parts
- Page 7 and 8: Notes Do not display a still pictur
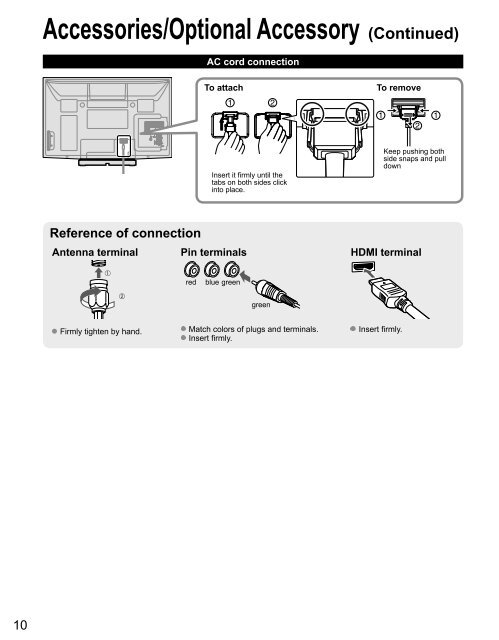
- Page 9: Attaching the pedestal to TV ■Ass
- Page 13 and 14: Example 3 Connecting DVD recorder (
- Page 15 and 16: Identifying Controls Front of the T
- Page 17 and 18: Adjust the clock First time setup L
- Page 19 and 20: Watching TV Connect the TV to a cab
- Page 21 and 22: Using VIERA TOOLS VIERA TOOLS are t
- Page 23 and 24: Insert the card Remove the card Lab
- Page 25 and 26: VIERA Link TM Setting If you connec
- Page 27 and 28: Adjustments/Configurations (alterna
- Page 29 and 30: (Continued) Adjustments/Configurati
- Page 31 and 32: VIERA Link TM Connections Follow th
- Page 33 and 34: (Continued) At the start of the DIG
- Page 35 and 36: (Continued) You can select Home the
- Page 37 and 38: ■ To select the channel or the ra
- Page 39 and 40: Automatically searches and adds ava
- Page 41 and 42: Input Labels Display menu Select
- Page 43 and 44: Recommended AV Connections These di
- Page 45 and 46: Technical Information Closed Captio
- Page 47 and 48: (Continued) VIERA Link TM “HDAVI
- Page 49 and 50: Care and Cleaning First, unplug the
- Page 51 and 52: If there is a problem with your TV,
- Page 53 and 54: Limited Warranty (for U.S.A. and Pu
- Page 55 and 56: Limited Warranty (for Canada) Panas
- Page 57 and 58: Note
- Page 59 and 60: Note
- Page 61 and 62:
Instrucciones en Español Televisi
- Page 63 and 64:
Disfrute de multimedia Índice Aseg
- Page 65 and 66:
ADVERTENCIA/PRECAUCION ADVERTENCIA
- Page 67 and 68:
Notas ■ No muestre una imagen fij
- Page 69 and 70:
■Montaje del pedestal Colocación
- Page 71 and 72:
Conexión básica TV Ejemplo 1 Cone
- Page 73 and 74:
Ejemplo 3 Conexión de una grabador
- Page 75 and 76:
Identificación de los controles Pa
- Page 77 and 78:
Ajuste el reloj. Ajuste inicial Idi
- Page 79 and 80:
Para ver la televisión Conecte el
- Page 81 and 82:
Utilización de VIERA TOOLS VIERA T
- Page 83 and 84:
Inserte la tarjeta Retire la tarjet
- Page 85 and 86:
Ajuste VIERA Link TM Si conecta el
- Page 87 and 88:
Ajustes/Configuraciones (alternativ
- Page 89 and 90:
(Continuación) Ajustes/Configuraci
- Page 91 and 92:
VIERA Link TM Conexiones Siga los d
- Page 93 and 94:
(Continuación) Al empezar la repro
- Page 95 and 96:
(Continuación) Para la salida de a
- Page 97 and 98:
■ Para seleccionar el canal ó la
- Page 99 and 100:
Busca y agrega automáticamente los
- Page 101 and 102:
Títulos de entradas Visualice el m
- Page 103 and 104:
Conexiones AV recomendadas Estos di
- Page 105 and 106:
Información técnica Subtítulos (
- Page 107 and 108:
(Continuación) VIERA Link “HDAVI
- Page 109 and 110:
Preguntas frecuentes, etc. Cuidados
- Page 111 and 112:
Si hay un problema con su televisor
- Page 113 and 114:
Preguntas frecuentes, etc. Nota Esp
- Page 115 and 116:
Nota
- Page 117 and 118:
Manuel d’utilisation Téléviseur
- Page 119 and 120:
Une grande polyvalence multimédia
- Page 121 and 122:
AVERTISSEMENT/MISE EN GARDE AVERTIS
- Page 123 and 124:
Remarques Ne pas afficher une image
- Page 125 and 126:
Fixation du téléviseur sur le pi
- Page 127 and 128:
Connexion de base Exemple 1 Télév
- Page 129 and 130:
Exemple 3 Raccordement d’un enreg
- Page 131 and 132:
Emplacement des commandes Panneau a
- Page 133 and 134:
Réglage de l’horloge Réglage in
- Page 135 and 136:
Visionnement de la télévision Con
- Page 137 and 138:
Utilisation des fonctions VIERA TOO
- Page 139 and 140:
Insertion de la carte Retrait de la
- Page 141 and 142:
Réglage de la fonction VIERA Link
- Page 143 and 144:
Réglages/Paramètres (choix) [Cont
- Page 145 and 146:
(Suite) Réglages/Paramètres (choi
- Page 147 and 148:
Connexions VIERA Link TM Suivez les
- Page 149 and 150:
(Suite) Au début de la lecture ave
- Page 151 and 152:
(Suite) Il est possible de sélecti
- Page 153 and 154:
■ Pour sélectionner le canal ou
- Page 155 and 156:
Recherche et ajout automatiques en
- Page 157 and 158:
Ident. prises Affichez le menu Sél
- Page 159 and 160:
Connexions AV recommandées Ces sch
- Page 161 and 162:
Informations techniques Sous-titres
- Page 163 and 164:
(Suite) VIERA Link TM “HDAVI Cont
- Page 165 and 166:
Entretien et nettoyage Débranchez
- Page 167 and 168:
S’il y a des problèmes de foncti
- Page 169 and 170:
Garantie limitée Panasonic Canada
- Page 171 and 172:
Nota