

MANUAL DE USUARIO TC-P42C1(es) - Panasonic
MANUAL DE USUARIO TC-P42C1(es) - Panasonic
MANUAL DE USUARIO TC-P42C1(es) - Panasonic

You also want an ePaper? Increase the reach of your titles
YUMPU automatically turns print PDFs into web optimized ePapers that Google loves.
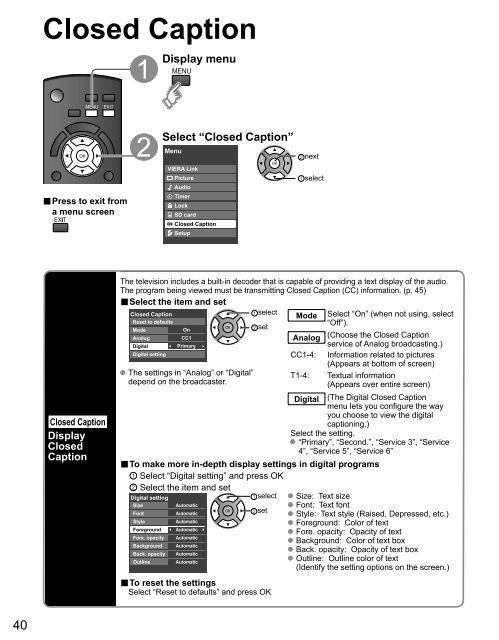
Closed Caption<br />
Display menu<br />
■ Pr<strong>es</strong>s to exit from<br />
a menu screen<br />
Select “Closed Caption”<br />
Menu<br />
VIERA Link<br />
Picture<br />
Audio<br />
Timer<br />
Lock<br />
SD card<br />
Closed Caption<br />
Setup<br />
next<br />
select<br />
Closed Caption<br />
Display<br />
Closed<br />
Caption<br />
The television includ<strong>es</strong> a built-in decoder that is capable of providing a text display of the audio.<br />
The program being viewed must be transmitting Closed Caption (CC) information. (p. 45)<br />
■ Select the item and set<br />
Closed Caption<br />
select<br />
Mode Select “On” (when not using, select<br />
R<strong>es</strong>et to defaults<br />
“Off”).<br />
Mode<br />
Analog<br />
Digital<br />
Digital setting<br />
On<br />
CC1<br />
Primary<br />
The settings in “Analog” or “Digital”<br />
depend on the broadcaster.<br />
set<br />
Analog<br />
CC1-4:<br />
T1-4:<br />
(Choose the Closed Caption<br />
service of Analog broadcasting.)<br />
Information related to pictur<strong>es</strong><br />
(Appears at bottom of screen)<br />
Textual information<br />
(Appears over entire screen)<br />
Digital (The Digital Closed Caption<br />
menu lets you configure the way<br />
you choose to view the digital<br />
captioning.)<br />
Select the setting.<br />
“Primary”, “Second.”, “Service 3”, “Service<br />
4”, “Service 5”, “Service 6”<br />
■ To make more in-depth display settings in digital programs<br />
Select “Digital setting” and pr<strong>es</strong>s OK<br />
Select the item and set<br />
Digital setting<br />
Size<br />
Font<br />
Style<br />
Foreground<br />
Fore. opacity<br />
Background<br />
Back. opacity<br />
Outline<br />
Automatic<br />
Automatic<br />
Automatic<br />
Automatic<br />
Automatic<br />
Automatic<br />
Automatic<br />
Automatic<br />
select<br />
set<br />
■ To r<strong>es</strong>et the settings<br />
Select “R<strong>es</strong>et to defaults” and pr<strong>es</strong>s OK<br />
Size: Text size<br />
Font: Text font<br />
Style: Text style (Raised, Depr<strong>es</strong>sed, etc.)<br />
Foreground: Color of text<br />
Fore. opacity: Opacity of text<br />
Background: Color of text box<br />
Back. opacity: Opacity of text box<br />
Outline: Outline color of text<br />
(Identify the setting options on the screen.)<br />
40


