JUNO TEMA RUS
JUNO TEMA RUS
JUNO TEMA RUS
- No tags were found...

Create successful ePaper yourself
Turn your PDF publications into a flip-book with our unique Google optimized e-Paper software.
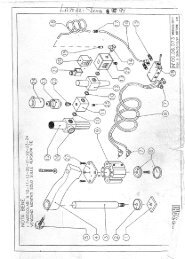
IREGOLAZIONE SQUADRAIN ALLUMINIO (Fig.14-16-17)GBALUMINIUM SQUARE ADJUST-MENT (Fig. 14-16-17)DEINSTELLUNG DESALUWINKELS (Abb.14-16-17)L’esatto posizionamento della squadraè garantito da una battuta (G)fissata al di sotto della squadrastessa(fig.14).Per un corretto posizionamento,questa battuta dovrà essereappoggiata contro:1) il lato (X) garantendo così l’esattamisura della scala2) la vite (Y) garantendo così l’esattoposizionamento a 90° rispettoall’asse di taglioATTENZIONE: SE ANCHE UNADELLE DUE OPERAZIONE SUD-DETTE NON VERRA’ ESEGUITACORRETTAMENTE, L’ESECU-ZIONE DEL TAGLIO SARA’ERRATTA!La squadra in alluminio è stata studiatain modo da poter effettuare tagliinclinati da 90° a 45° (fig16).L’inclinazione può essere effettuataallentando la leva (F) ed orientandola squadra all’angolo desideratoimpiegando il goniometro (L)posto al centro del telaio.Il bloccaggio della squadra all’inclinazionedesiderata avverrà permezzo della rotella (H).La squadra può essere dislocata apiacere su entrambi i lati del telaio.Prima di spostarla sul lato desideratobisognerà allentare la leva e ilpomello (F-I) dopodichè si inseriràil perno (M) nel foro (N). L’operazionesi completerà con il bloccaggiodella leva e del pomello (F-I) dopoaver posto a battuta il perno (G).Qualora fosse necessario verificarela regolazione seguire la seguenteprocedura (fig.17):Usando un pannello da 1mx1meseguire 4 tagli sui lati A-B-C-D.Dopo aver eseguito i 4 tagli,eseguirne un quinto sul lato A delprimo taglio. Per verificare lacorretta regolazione basteràmisurare l'ultima striscia di legnotagliata sulle due estremità H1-H2.Exact positioning of the square isassured by a stop (G) fixedunderneath the square (Fig. 14).For proper positioning this stopmust rest against:1) the side (X), thus guaranteeingexact measurement of the scale2) the screw (Y), thus guaranteeingexact 90º-positioning withrespect to the cutting axis.WARNING: IF EVEN ONLY ONEOF THE ABOVE OPERATIONS ISNOT CARRIED OUTCORRECTLY, EXECUTION OFTHE CUT WILL BE INCORRECT!The aluminium square has beendesigned in such a way that itcan execute inclined cuts from90º to 45º (Fig. 16).The inclination is obtained byreleasing the lever (F) and orientingthe square to the desired angle,using the goniometer (L) located inthe centre of the frame.Lock the square at the desiredinclination with the wheel (H).The square can be displaced at willon both sides of the frame.Before moving it to the desired side,release the lever and the knob (F-I),then insert the pin (M) in the hole(N). The operation is completed bylocking the lever and the knob (F-I)after having fitted the pin (G) intoplace.If the adjustment needs to bechecked, follow the procedurebelow (Fig. 17):Using a 1x1 m panel, execute 4 cutson the sides A-B-C-D.After having made the 4 cuts, makea fifth one on side A of the first cut.To check proper adjustment,measure the last strip of wood cutat the two ends H1-H2.56Die genaue Positionierung desWinkels ist durch einen Anschlag(G) gewährleistet, der auf derUnterseite des Winkels befestigt ist(Abb.14).Zur korrekten Positionierung ist derWinkel folgendermaßenanzusetzen:1) an die Seite (X), damit die genaueSkalen-Messung garantiert ist;2) an die Schraube (Y), damit diegenaue 90°-Lage zur Schnittachsegewährleistet ist.ACHTUNG: WIRD AUCH NUREINER DER VORABB E S C H R I E B E N E NARBEITSSCHRITTE NICHT MITDER GRÖSSTEN GENAUIGKEITAUSGEFÜHRT, LÄUFT DERSCHNITTVORGANGFEHLERHAFT AB!Der Alu-Winkel ist fürSchrägschnitte von 90° bis 45°ausgelegt (Abb. 16).Zur Schrägstellung den Hebel (F)lockern und den Winkel unterVerwendung des in der Mitte desRahmens angebrachtenWinkelmessers (L) in die gewünschteSchrägstellung bringen.In dieser Stellung kann der Winkelnun anhand der Rolle (H) blockiertwerden.Der Winkel kann an beidenRahmenseiten beliebig versetztwerden.Vor der Versetzung sind Hebel undKnauf (F-I) zu lockern, wonach derBolzen (M) in das Bohrloch (N)einzuführen ist. Abschließend,nachdem der Bolzen (G) inAnschlagstellung gebracht wurde,Hebel und Knauf (F-I) arretieren.Die Einstellung nötigenfallsfolgendermaßen überprüfen(Abb.17):An einer Platte mit den Ausmaßen1mx1m vier Schnitte (auf den SeitenA-B-C-D) ausführen.Danach einen weiteren fünftenSchnitt an der Seite A ausführen. Andieser Stelle kann festgestelltwerden, ob die Einstellung korrektvorgenommen wurde. Dazu brauchtnur der zuletzt geschnitteneHolzstreifen an den beiden EndenH1-H2 gemessen zu werden.