30" gas slide-in range installation instructions - AJ Madison
30" gas slide-in range installation instructions - AJ Madison
30" gas slide-in range installation instructions - AJ Madison

Create successful ePaper yourself
Turn your PDF publications into a flip-book with our unique Google optimized e-Paper software.
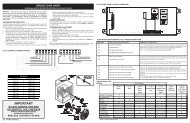
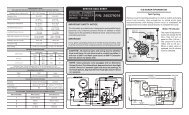
30" GAS SLIDE-IN RANGE INSTALLATION INSTRUCTIONS(Models with Sealed Top Burners)10.5 Operation of Oven Burners and OvenAdjustments10.5.1 Electric Ignition BurnersOperation of electric igniters should be checked after <strong>range</strong>and supply l<strong>in</strong>e connectors have been carefully checked forleaks, and <strong>range</strong> has been connected to electric power.The oven burner is equipped with an electric control systemas well as an electric oven burner igniter. If your model isequipped with a waist-high broil burner igniter, it will alsohave an electric burner igniter. These control systemsrequire no adjustment. When the oven is set to operate,current will flow to the igniter. It will "glow" similar to alight bulb. When the igniter has reached a temperaturesufficient to ignite <strong>gas</strong>, the electrically controlled oven valvewill open and flame will appear at the oven burner. There isa time lapse from 30 to 60 seconds after thermostat isturned ON before the flame appears at the oven burner.When the oven reaches the display sett<strong>in</strong>g, the glow<strong>in</strong>gigniter will go off. The burner flame will go "out" <strong>in</strong> 20 to30 seconds after igniter goes "OFF". To ma<strong>in</strong>ta<strong>in</strong> any givenoven temperature, this cycle will cont<strong>in</strong>ue as long as thedisplay is set to operate.After remov<strong>in</strong>g all pack<strong>in</strong>g materials and literature from theoven:a) Set the oven to BAKE at 300°F. See Use & Care Guidefor operat<strong>in</strong>g <strong>in</strong>structions.b) With<strong>in</strong> 60 seconds the oven burner should ignite. Checkfor proper flame, and allow the burner to cycle once.Reset controls to off.c) If your model is equipped with a high-waist broiler, setoven to broil. See Use & Care Guide for operat<strong>in</strong>g<strong>in</strong>structions.d) With<strong>in</strong> 60 seconds the broil burner should ignite. Checkfor proper flame. Reset controls to off.10.5.2 Air Shutter-Oven BurnerLowerOven Baffle(removable)Waist-High BurnerAir ShutterLower Oven BottomAir Shutter (removable)Figure 11The approximate oven burner flame length is 1 <strong>in</strong>ch(dist<strong>in</strong>ct <strong>in</strong>ner cone of blue flame).To determ<strong>in</strong>e if the oven burner flame is proper,remove the oven bottom and burner baffle and set theoven to bake at 300°F.To remove the oven bottom, remove oven hold downscrews at rear of oven bottom. Pull up at rear,8disengage front of oven bottom from oven frontframe, and pull the oven bottom out of the oven.Remove burner baffle so that burner flame can beobserved.If the flame is yellow, <strong>in</strong>crease air shutter open<strong>in</strong>g size(see "2" <strong>in</strong> Figure 12). If the entire flame is blue,reduce the air shutter open<strong>in</strong>g size.To adjust frame loosen lock screw (see "3" <strong>in</strong> Figure12), reposition air shutter, and tighten lock screw.Replace oven bottom.Oven Burner Tube32Lock ScrewAir ShutterFigure 121Orifice Hood10.5.3 Air Shutter-Broil BurnerThe approximate flame length of the burner is 1 <strong>in</strong>ch(dist<strong>in</strong>ct <strong>in</strong>ner cone of blue flame). To determ<strong>in</strong>e if the broilburner flame is proper, set the oven to broil. If flame isyellow, <strong>in</strong>crease air shutter open<strong>in</strong>g size (see "2" <strong>in</strong> Figure12 ). If the entire flame is blue, reduce the air shutteropen<strong>in</strong>g size. To adjust, loosen lock screw (see "3" <strong>in</strong> Figure12), reposition air shutter, and tighten lock screw.When All Hookups are CompleteMake sure all controls are left <strong>in</strong> the OFF position.Make sure the flow of combustion and ventilation air tothe <strong>range</strong> is unobstructed.Model and Serial Number LocationThe serial plate is located on the oven front framebeh<strong>in</strong>d the oven door (some models) or on the drawerside frame (some models).When order<strong>in</strong>g parts for or mak<strong>in</strong>g <strong>in</strong>quiries about your<strong>range</strong>, always be sure to <strong>in</strong>clude the model and serialnumbers and a lot number or letter from the serial plateon your <strong>range</strong>.Your serial plate also tells you the rat<strong>in</strong>g of the burners,the type of fuel and the pressure the <strong>range</strong> wasadjusted for when it left the factory.Before You Call for ServiceRead the Before You Call Checklist and operat<strong>in</strong>g<strong>in</strong>structions <strong>in</strong> your Use and Care Guide. It may saveyou time and expense. The list <strong>in</strong>cludes commonoccurrences that are not the result of defectiveworkmanship or materials <strong>in</strong> this appliance.Refer to your Use & Care Guide for service phonenumbers.