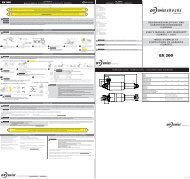
instruction manual and warranty rules instructions d ... - DT Swiss
instruction manual and warranty rules instructions d ... - DT Swiss
instruction manual and warranty rules instructions d ... - DT Swiss

Create successful ePaper yourself
Turn your PDF publications into a flip-book with our unique Google optimized e-Paper software.
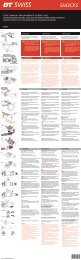
3.6 FRONT WHEEL<br />
3.6.1 TYRE SIZES<br />
CAUTION<br />
After tyre installation, a collision test must be made!<br />
• Inflate tyre up to maximum allowed pressure. The maximum pressure will be defined either by the tyre or by the rim. Authoritative<br />
is the lower pressure of the two parts.<br />
• Deflate fork <strong>and</strong> compress completely .<br />
• Check if the tyre touches either the fork crown or the fork stanchions. If this is the case, the tyre must not be used.<br />
•<br />
12<br />
Model Max. diameter of the wheel Max. tire width<br />
<strong>DT</strong> <strong>Swiss</strong> XRC-Models 686 mm 59 mm<br />
<strong>DT</strong> <strong>Swiss</strong> XRM-Models 26"<br />
<strong>DT</strong> <strong>Swiss</strong> XM-Models 26"<br />
<strong>DT</strong> <strong>Swiss</strong> EX-Models 26"<br />
690 mm 65 mm<br />
<strong>DT</strong> <strong>Swiss</strong> XMM-Models 29" 756 mm 62 mm<br />
3.6.2 INSTALLING THE FRONT WHEEL WITH QUICK RELEASE (QR)<br />
CAUTION<br />
Grinding the security tabs of the fork dropouts away could lead to lose the front wheel during the ride <strong>and</strong> is strongly prohibited.<br />
Any modification leads to the loss of any <strong>warranty</strong> claim.<br />
Install the wheel according to the <strong>instruction</strong>s of the manufacturer.<br />
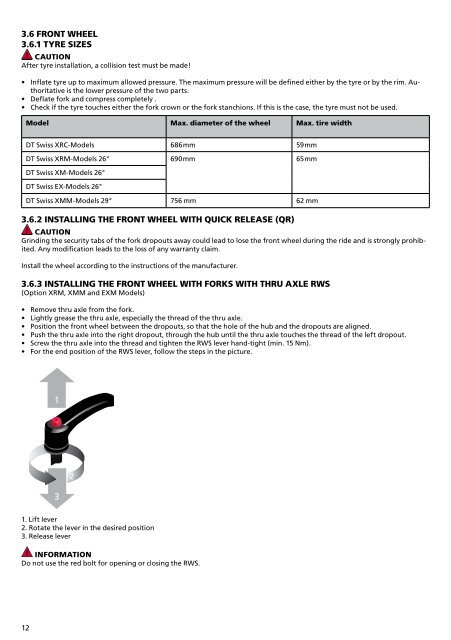
3.6.3 INSTALLING THE FRONT WHEEL WITH FORKS WITH THRU AXLE RWS<br />
(Option XRM, XMM <strong>and</strong> EXM Models)<br />
• Remove thru axle from the fork.<br />
• Lightly grease the thru axle, especially the thread of the thru axle.<br />
• Position the front wheel between the dropouts, so that the hole of the hub <strong>and</strong> the dropouts are aligned.<br />
• Push the thru axle into the right dropout, through the hub until the thru axle touches the thread of the left dropout.<br />
• Screw the thru axle into the thread <strong>and</strong> tighten the RWS lever h<strong>and</strong>-tight (min. 15 Nm).<br />
• For the end position of the RWS lever, follow the steps in the picture.<br />
1<br />
2<br />
1. Lift lever<br />
2. Rotate the lever in the desired position<br />
3. Release lever<br />
INFORMATION<br />
Do not use the red bolt for opening or closing the RWS.