

Sony DSC-TX9 - DSC-TX9 Istruzioni per l'uso Inglese
Sony DSC-TX9 - DSC-TX9 Istruzioni per l'uso Inglese
Sony DSC-TX9 - DSC-TX9 Istruzioni per l'uso Inglese

Create successful ePaper yourself
Turn your PDF publications into a flip-book with our unique Google optimized e-Paper software.
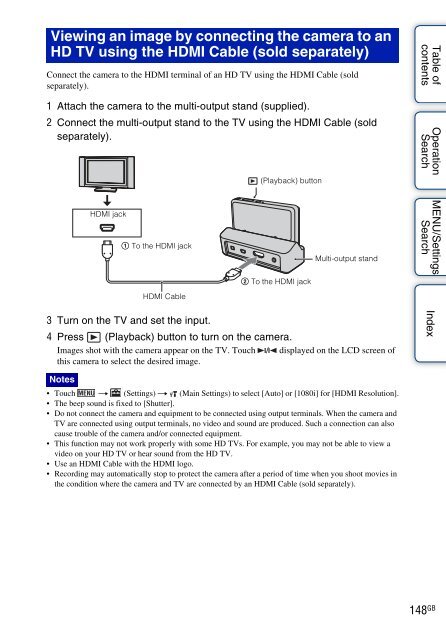
Viewing an image by connecting the camera to an<br />
HD TV using the HDMI Cable (sold separately)<br />
Connect the camera to the HDMI terminal of an HD TV using the HDMI Cable (sold<br />
separately).<br />
1 Attach the camera to the multi-output stand (supplied).<br />
2 Connect the multi-output stand to the TV using the HDMI Cable (sold<br />
separately).<br />
(Playback) button<br />
Table of<br />
contents<br />
O<strong>per</strong>ation<br />
Search<br />
HDMI jack<br />
1 To the HDMI jack<br />
HDMI Cable<br />
2 To the HDMI jack<br />
Multi-output stand<br />
MENU/Settings<br />
Search<br />
3 Turn on the TV and set the input.<br />
4 Press (Playback) button to turn on the camera.<br />
Images shot with the camera appear on the TV. Touch / displayed on the LCD screen of<br />
this camera to select the desired image.<br />
Index<br />
Notes<br />
• Touch t (Settings) t (Main Settings) to select [Auto] or [1080i] for [HDMI Resolution].<br />
• The beep sound is fixed to [Shutter].<br />
• Do not connect the camera and equipment to be connected using output terminals. When the camera and<br />
TV are connected using output terminals, no video and sound are produced. Such a connection can also<br />
cause trouble of the camera and/or connected equipment.<br />
• This function may not work pro<strong>per</strong>ly with some HD TVs. For example, you may not be able to view a<br />
video on your HD TV or hear sound from the HD TV.<br />
• Use an HDMI Cable with the HDMI logo.<br />
• Recording may automatically stop to protect the camera after a <strong>per</strong>iod of time when you shoot movies in<br />
the condition where the camera and TV are connected by an HDMI Cable (sold separately).<br />
148 GB


