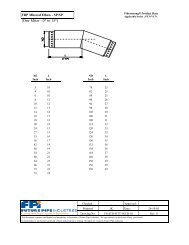
Untitled - Future Pipe Industries
Untitled - Future Pipe Industries
Untitled - Future Pipe Industries

Create successful ePaper yourself
Turn your PDF publications into a flip-book with our unique Google optimized e-Paper software.
Notes: When assembling two flanges, only one flange must have an ‘O’ ring groove. The other mating flange must be<br />
flat faced.<br />
• ‘O’ rings like all rubber products should be stored in a cool shaded area away from sunlight.<br />
• Clean the ‘O’ ring groove with a hard brush to remove all dirt and sand, then wipe clean with a damp cloth.<br />
• Clean the neoprene ‘O’ ring with a damp cloth thoroughly check the ring for cracks by stretching the gasket all around<br />
to about 30% over its normal length. Never use used cracked or otherwise damaged ‘O’ ring gaskets.<br />
• Insert the ‘O’ ring in the flange groove and secure in position using several small strips of double sided adhesive tape<br />
placed between the ‘O’ ring and the groove surface.<br />
• Align the two flanges and insert the bolts, nuts, and washers after cleaning and lubricating in accordance with section ‘a’<br />
of this appendix.<br />
• Tighten the nuts and bolts using a torque wrench following the sequence shown in section ‘c’ of this appendix, to a torque<br />
of 25 lb-ft (35 N.m)<br />
• Re-torque all nuts and bolts in the correct sequence to 48 lb-ft (65 N.m). This torque is normally sufficient to achieve the<br />
required sealing during the hydrostatic test and normal operation. Maximum torques must not exceed 74 lb-ft (100 N.m.).<br />
5. Assembly and disassembly of flanged equipment<br />
When assembling flanged parts (equipment, valves, orifice flanges, etc.) that may need to be disassembled in the future, a<br />
mechanical flange adaptor or a dismantling joint must be placed on one side of the flanged joint, to allows some displacement<br />
in the axial direction.<br />
6. Trouble shooting<br />
If an assembled flanged joint leaks, loosen and remove all bolts, nuts, washers, and gaskets. Check for alignment of assembly<br />
and correct alignment as required. Check the gasket for damage. If damaged, discard and replace with a new gasket.<br />
Check flanges for seal rings. Flanges with damaged inner seal rings must be removed and new, undamaged flanges installed.<br />
If leak occurs as a result of deficiencies in non-fiberglass components of the piping system, consult the manufacturer of the<br />
defective components for recommended corrective procedures.<br />
Clean and lubricate old threads and washers before rejoining. Repeat the rejoining procedure outlined above. After corrective<br />
action has been taken retest the joints to see if a water-tight seal has been made.<br />
53