

Freedom 2100 Motor Control Center Installation and - Eaton Canada
Freedom 2100 Motor Control Center Installation and - Eaton Canada
Freedom 2100 Motor Control Center Installation and - Eaton Canada

You also want an ePaper? Increase the reach of your titles
YUMPU automatically turns print PDFs into web optimized ePapers that Google loves.
Instruction Booklet IM04302004E<br />
Effective October 2010<br />
part 8. inspection prior to energizing<br />
1. Before energizing the motor control center (MCC), conduct a<br />
thorough inspection to make certain that all foreign materials,<br />
such as tools, scraps of wire, <strong>and</strong> other debris, are removed<br />
from all units <strong>and</strong> the structure . Remove any accumulation of<br />
dust <strong>and</strong> dirt with a vacuum cleaner .<br />
2. All circuit connections are tightened at time of assembly<br />
by power-driven tools with controlled torque . However, the<br />
vibrations experienced in transit may loosen some of these<br />
connections . Check at least 10% of the total connections for a<br />
tight connection . Should this spot-check reveal some loose<br />
connections, it will be necessary to check all connection<br />
points. The connections to be checked include bus hardware,<br />
circuit breaker <strong>and</strong> switch terminals, contactor <strong>and</strong> relay<br />
terminals, <strong>and</strong> terminal blocks . Always check the incoming line<br />
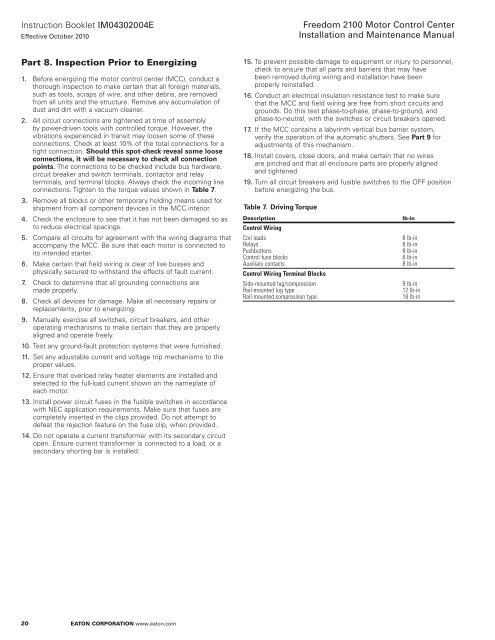
connections . Tighten to the torque values shown in Table 7 .<br />
3. Remove all blocks or other temporary holding means used for<br />
shipment from all component devices in the MCC interior .<br />
4. Check the enclosure to see that it has not been damaged so as<br />
to reduce electrical spacings .<br />
5. Compare all circuits for agreement with the wiring diagrams that<br />
accompany the MCC . Be sure that each motor is connected to<br />
its intended starter .<br />
6. Make certain that field wiring is clear of live busses <strong>and</strong><br />
physically secured to withst<strong>and</strong> the effects of fault current .<br />
7. Check to determine that all grounding connections are<br />
made properly .<br />
8. Check all devices for damage . Make all necessary repairs or<br />
replacements, prior to energizing .<br />
9. Manually exercise all switches, circuit breakers, <strong>and</strong> other<br />
operating mechanisms to make certain that they are properly<br />
aligned <strong>and</strong> operate freely .<br />
10. Test any ground-fault protection systems that were furnished .<br />
11. Set any adjustable current <strong>and</strong> voltage trip mechanisms to the<br />
proper values .<br />
12. Ensure that overload relay heater elements are installed <strong>and</strong><br />
selected to the full-load current shown on the nameplate of<br />
each motor .<br />
13. Install power circuit fuses in the fusible switches in accordance<br />
with NEC application requirements . Make sure that fuses are<br />
completely inserted in the clips provided . Do not attempt to<br />
defeat the rejection feature on the fuse clip, when provided .<br />
14. Do not operate a current transformer with its secondary circuit<br />
open . Ensure current transformer is connected to a load, or a<br />
secondary shorting bar is installed .<br />
20<br />
eaton Corporation www.eaton.com<br />
<strong>Freedom</strong> <strong>2100</strong> <strong>Motor</strong> <strong>Control</strong> <strong>Center</strong><br />
<strong>Installation</strong> <strong>and</strong> Maintenance Manual<br />
15. To prevent possible damage to equipment or injury to personnel,<br />
check to ensure that all parts <strong>and</strong> barriers that may have<br />
been removed during wiring <strong>and</strong> installation have been<br />
properly reinstalled .<br />
16. Conduct an electrical insulation resistance test to make sure<br />
that the MCC <strong>and</strong> field wiring are free from short circuits <strong>and</strong><br />
grounds . Do this test phase-to-phase, phase-to-ground, <strong>and</strong><br />
phase-to-neutral, with the switches or circuit breakers opened .<br />
17. If the MCC contains a labyrinth vertical bus barrier system,<br />
verify the operation of the automatic shutters . See Part 9 for<br />
adjustments of this mechanism .<br />
18. Install covers, close doors, <strong>and</strong> make certain that no wires<br />
are pinched <strong>and</strong> that all enclosure parts are properly aligned<br />
<strong>and</strong> tightened .<br />
19. Turn all circuit breakers <strong>and</strong> fusible switches to the OFF position<br />
before energizing the bus .<br />
Table 7. Driving Torque<br />
Description lb-in<br />
<strong>Control</strong> wiring<br />
Coil leads<br />
Relays<br />
Pushbuttons<br />
<strong>Control</strong> fuse blocks<br />
Auxiliary contacts<br />
<strong>Control</strong> wiring terminal blocks<br />
Side-mounted lug/compression<br />
Rail-mounted lug type<br />
Rail-mounted compression type<br />
8 lb-in<br />
8 lb-in<br />
8 lb-in<br />
8 lb-in<br />
8 lb-in<br />
9 lb-in<br />
12 lb-in<br />
18 lb-in


