evox 5.0 users manual - Zyto
evox 5.0 users manual - Zyto
evox 5.0 users manual - Zyto

You also want an ePaper? Increase the reach of your titles
YUMPU automatically turns print PDFs into web optimized ePapers that Google loves.
User Manual<br />
EVOX
ZYTO EVOX Users Manual<br />
Copyright ©2013 All rights reserved.<br />
02_MAN_EVOX-01en
Subscription Program. For each EVOX <strong>5.0</strong> system ordered, Subscriber agrees to pay ZYTO<br />
Technologies, Inc. (“ZYTO”) an initial set-up fee of $597.00, which includes the purchase of<br />
the ZYTO Hand Cradle. Beginning thirty (30) days after the signature date on this agreement,<br />
for each EVOX <strong>5.0</strong> system ordered, Subscriber also agrees to pay ZYTO a monthly<br />
subscription fee of $97.00 per month for a period of 24 months for a non-exclusive license<br />
to use ZYTO’s EVOX <strong>5.0</strong> System. Upon completion of the 24 month period, subscription<br />
service will convert to month-to-month. Subscriber will provide ZYTO a credit card to be<br />
processed for the initial set-up fee and thereafter each month for the monthly subscription<br />
fee. Provided Subscriber’s monthly subscription account is in good standing at any time<br />
during its monthly subscription service Subscriber may upgrade from the EVOX <strong>5.0</strong> System<br />
to purchase another system within ZYTO’s professional line of products and ZYTO will<br />
credit Subscriber’s prior three (3) monthly subscription payments towards the purchase<br />
price of any such system within ZYTO’s professional line of products.<br />
Cancellation. Subscriber may cancel his/her subscription service at any time during the<br />
first 90 days of purchase by sending written notice to ZYTO at 387 South 520 West, Suite<br />
200, Lindon, Utah 84042, or by e-mail at support@ZYTO.com. Cancellation notices received<br />
after 90 days will be subject to a $200 cancellation fee. No refunds will be given to<br />
Subscriber upon cancellation. Cancellation will take effect at the end of the current period;<br />
no prorated refund of subscription fees already paid will be made.<br />
Warranty. As part of the subscription service, the EVOX <strong>5.0</strong> System is warranted to<br />
conform to the applicable specifications for a period of one (1) year for all ZYTO branded<br />
electronic components and one (1) year for all ZYTO branded mechanical parts from the<br />
date of shipment from ZYTO’s facility in Lindon, Utah. The warranty will continue for all<br />
active installations based on a current and continuous subscription. All ZYTO software updates<br />
will be available at no charge based on a current and continuous subscription. In the<br />
event subscription becomes non-continuous for any reason the hardware and electronic<br />
components will not be eligible for a continued monthly extension of warranty. In addition,<br />
ZYTO will not provide software updates without a current and continuous subscription.<br />
Non-continuous or inactive installations may replace any broken or damaged parts at<br />
current retail cost, FOB ZYTO.<br />
ZYTO shall, at its own expense and as its sole obligation and Subscriber’s exclusive remedy<br />
for any breach of the foregoing warranty, repair or replace any defective component, part<br />
or system returned (return authorization required) to ZYTO within the applicable warranty<br />
period. This warranty does not apply to any damage resulting from misuse, abuse or<br />
neglect. Parts broken due to misuse, abuse or neglect will be replaced at retail cost. THE<br />
FOREGOING WRITTEN WARRANTIES ARE IN LIEU OF ANY OTHER WARRANTY WHATSOEVER.<br />
EXCEPT AS EXPRESSLY PROVIDED HEREIN, ZYTO EXPRESSLY DISCLAIMS ALL WARRANTIES,<br />
EXPRESS, IMPLIED OR STATUTORY, INCLUDING, BUT NOT LIMITED TO, ANY WARRANTY OF<br />
FITNESS FOR A PARTICULAR PURPOSE OR USE, ANY WARRANTY OF MERCHANTABILITY,<br />
ANY WARRANTY OF NONINFRINGEMENT OR TITLE, AND ANY WARRANTIES ARISING FROM<br />
A COURSE OF DEALING, USAGE OR TRADE PRACTICE, IN EACH CASE WITH RESPECT TO ALL<br />
SERVICES, EQUIPMENT AND PRODUCTS FURNISHED HEREUNDER.<br />
Warranties - Accessory Products. Accessory Products are warranted in accordance with<br />
the manufactures original warranties. Typically these warranties conform to the applicable<br />
specifications for a period of ninety (90) days for all electronic components and ninety<br />
(90) days for all mechanical parts from the date of shipment from ZYTO’s facility in Lindon,<br />
Utah. Upon expiration of the original manufactures warranties, Accessory Products may be<br />
purchased at retail cost plus shipping. All cables are considered Accessory Products.<br />
Delivery. Delivery shall be made F.O.B. (EXW under INCOTERMS 2000) ZYTO in Lindon,<br />
Utah, USA with shipping charges to be paid by Subscriber. Adequate insurance will be<br />
arranged by ZYTO for protecting goods while in transit. In the absence of specific instructions,<br />
ZYTO will select the carrier, and will assume responsibility for follow-up of any claims<br />
of loss or damage in shipment with the carrier. Subscriber understands that he/she will be<br />
responsible for (if applicable) all shipping fees, duties, taxes, port handling fees and other<br />
customs charges. Subscriber shall inspect each item of equipment delivered pursuant to<br />
this Agreement and shall immediately notify ZYTO of any missing or damages items. If<br />
Subscriber fails to provide such notice in writing within three (3) days after the delivery of<br />
the equipment, Subscriber will be conclusively presumed to have accepted the equipment<br />
and any subsequent claim that the equipment was not provided in fully functional order<br />
will not be considered.<br />
Return of the Equipment. At the end of the subscription service, the Subscriber shall not<br />
be obligated to return the ZYTO Hand Cradle and or any Accessory Products to ZYTO.<br />
Certain Acknowledgements. Subscriber is a qualified, licensed or certified healthcare<br />
professional. Subscriber is aware that the EVOX <strong>5.0</strong> System is not used to diagnose, treat,<br />
or cure health conditions or diseases. Subscriber further acknowledges that learning to<br />
use and market the equipment is the responsibility of the Subscriber, and that ZYTO is not<br />
responsible for Subscriber’s ability/inability to master the necessary skills to utilize and<br />
market the technology.<br />
Indemnification. Subscriber will indemnify, defend and hold ZYTO and its officers, directors,<br />
employees, agents, affiliates and representatives (collectively “Affiliates”) harmless<br />
from and against any and all losses, damages, costs, liabilities, claims, actions and expenses<br />
TERMS AND CONDITIONS<br />
(including, without limitation, reasonable attorneys’ fees, litigation costs, court costs and<br />
amounts paid in investigation, defense or settlement of any of the foregoing, whether<br />
incurred at the arbitration, trial, appellate or administrative levels) (collectively, “Damages”),<br />
(whether or not arising out of third-party claims and whether arising in contract,<br />
tort or otherwise) arising out of or related to (i) Subscriber’s possession, use or resale of the<br />
equipment or any other goods delivered by ZYTO to Subscriber hereunder; (ii) the use of<br />
any services provided by ZYTO; or (iii) Subscriber’s breach of any term of this Agreement.<br />
Prohibition on Reverse Engineering, Decompilation, and Disassembly. Subscriber<br />
may not reverse engineer, decompile, or disassemble the EVOX <strong>5.0</strong> software or hardware,<br />
except and only to the extent that such activity is expressly permitted by applicable law<br />
notwithstanding this limitation.<br />
Copyright. All title, including but not limited to copyrights, in and to the EVOX <strong>5.0</strong> System<br />
and any copies thereof are owned by ZYTO. All title and intellectual property rights in and<br />
to the content which may be accessed through use of the EVOX <strong>5.0</strong> System is the property<br />
of ZYTO. This Agreement grants you no rights to use such content. All rights not expressly<br />
granted are reserved by ZYTO.<br />
Disclaimer/Limitation of Liability. IN NO EVENT SHALL ZYTO BE LIABLE TO ANYONE FOR<br />
SPECIAL, COLLATERAL, INCIDENTAL OR CONSEQUENTIAL DAMAGES ARISING OUT OF OR<br />
IN CONNECTION WITH THIS AGREEMENT OR THE USE OR PERFORMANCE OF ZYTO’S PROD-<br />
UCTS, WHETHER IN AN ACTION BASED IN CONTRACT, TORT (INCLUDING NEGLIGENCE),<br />
STRICT LIABILITY, OR OTHERWISE, EVEN IF ZYTO OR ANY OTHER PARTY HAS BEEN ADVISED<br />
OF THE POSSIBILITY OF SUCH DAMAGES. SUCH EXCLUDED DAMAGES INCLUDE, BUT ARE<br />
NOT LIMITED TO, COSTS OF REMOVAL AND REINSTALLATION OF ITEMS, LOSS OF GOOD-<br />
WILL, LOSS OF PROFITS, LOSS OF USE, AND INTERRUPTION OF BUSINESS. EXCEPT FOR<br />
PERSONAL INJURY CAUSED BY ZYTO’S GROSS NEGLIGENCE OR WILLFUL MISCONDUCT,<br />
THE ENTIRE LIABILITY OF ZYTO AND ITS OFFICERS, DIRECTORS, EMPLOYEES, AGENTS AND<br />
SUPPLIERS FOR ANY DAMAGE OR EXPENSE FROM ANY CAUSE WHATSOEVER WILL IN NO<br />
EVENT EXCEED THE CONTRACT PRICE FOR THE PARTICULAR GOODS INVOLVED. Actions,<br />
however asserted, arising out of this Agreement, shall be commenced within one (1) year<br />
from the date the cause of action accrues. Subscriber will not pursue any claims against<br />
ZYTO for any liability ZYTO may have under or relating to this Agreement until Subscriber<br />
first makes claims against Subscriber’s insurance provider(s) and such insurance provider(s)<br />
finally resolve(s) such claims.<br />
Return Policy. Subscriber acknowledges that there is a no return policy and all sales are<br />
final. Subscriber further acknowledges that any warranty issues will be handled within the<br />
terms stated under this Agreement.<br />
Collection Fees. Should collection become necessary, Subscriber hereby expressly agrees<br />
to pay all costs of collection including an additional collection of 35% whether or not the<br />
account is turned to an outside collection agency. Subscriber further agrees to pay all<br />
court costs and attorney’s fees should legal action become necessary.<br />
Excusable Delays. In the event of a delay in the performance of any obligation of ZYTO<br />
due to causes beyond the control and without the fault or negligence of ZYTO, the deliveries<br />
and performance required of ZYTO under this Agreement shall be extended by a period<br />
of time no greater than the time lost because of any such delay, and ZYTO shall make every<br />
effort to minimize the delay. Such causes include, but are not restricted to, acts of God or of<br />
the public enemy, acts of the government, acts of Subscriber, fires, floods, epidemics, quarantine<br />
restrictions, freight embargoes, trade or technology transfer restrictions, unforeseen<br />
circumstances, unusually severe weather and defaults of subcontractors or vendors (unless<br />
the contract work to be furnished by the subcontractor or vendors was attainable from<br />
other sources in sufficient time to permit ZYTO to meet the required delivery schedule).<br />
Miscellaneous. This Agreement constitutes the entire agreement between the parties.<br />
No modification or amendment of this Agreement shall be effective unless in writing and<br />
signed by both parties. This Agreement replaces any and all prior agreements between<br />
the parties pertaining to the EVOX <strong>5.0</strong> system. This Agreement shall be construed in accordance<br />
with the laws of the State of Utah. If any portion of this Agreement shall be held<br />
to be invalid or unenforceable for any reason, the remaining provisions shall continue to<br />
be valid and enforceable. If a court finds that any provision of this Agreement is invalid or<br />
unenforceable, but that by limiting such provision, it would become valid and enforceable,<br />
then such provision shall be deemed to be written, construed, and enforced as so limited.<br />
The failure of ZYTO to enforce any provision of this Agreement shall not be construed as a<br />
waiver or limitation of ZYTO’s right to subsequently enforce and compel strict compliance<br />
with every provision of this Agreement.<br />
Compliance with Laws. Each party will comply with all laws, rules and regulations applicable<br />
to the performance of its obligations under this Agreement.<br />
Software Installation. Subscriber is granted one license per system purchased. Subscriber<br />
may install the software on no more than two computers with the license active on only<br />
one computer at a time. Subscriber is required to sync software at least every twenty-one<br />
(21) days, at which time installation database is encrypted and backed up to a secured<br />
server and software is updated if updates are available.<br />
Software is not Mac compatible.<br />
iii
Contents<br />
Table of Contents<br />
Getting Started . . . . . . . . . . . . . . . . . . . . . . . . . . . 1<br />
Client management features . . . . . . . . . . . . . . . . . . . . . 3<br />
Library and inventory management . . . . . . . . . . . . . . . . . 6<br />
Running an EVOX session . . . . . . . . . . . . . . . . . . . . . . 9<br />
Additional options in an EVOX session . . . . . . . . . . . . . . . 13<br />
Setting up and running a Remote Session . . . . . . . . . . . . . 17<br />
EVOX Settings . . . . . . . . . . . . . . . . . . . . . . . . . . . 21<br />
Specifications . . . . . . . . . . . . . . . . . . . . . . . . . . . 27<br />
iv
Getting Started 1<br />
This chapter includes the following topics:<br />
• About the EVOX<br />
• Installing the EVOX<br />
• About installing the EVOX on multiple computers<br />
• About starting the EVOX<br />
About the EVOX<br />
The EVOX system is designed to work directly with a client’s personal perceptions. Perception is the way we feel<br />
and think about something. In many cases, we are not even consciously aware of everything that we perceive or<br />
how those perceptions affect us.<br />
Through a process known as Perception Reframing, the EVOX system helps clients discover new ways of seeing<br />
things.<br />
The EVOX uses the voice (VOX is Latin for voice) to create visual maps of a client’s perceptions about specific topics<br />
like health, relationships, work or athletic performance; really any aspect of life.<br />
The client speaks about any topic and the EVOX records the energy of the voice. The voice energy is then plotted<br />
into what is called a Perception Index or PI. The PI gives the client a visual image of their perception as it pertains<br />
to the topic discussed.<br />
The EVOX then uses the PI to determine frequency signals that will facilitate a shift in perception. These signals<br />
are sent to the Hand Cradle as the client listens to relaxing music and thinks about the topic spoken of.<br />
Users of the EVOX System have reported positive impacts on various aspects of their life, including:<br />
• Personal Health<br />
• Interpersonal Relationships<br />
• Personal Performance<br />
With the EVOX System it is possible to quickly and painlessly shift, or reframe, perception at a conscious and<br />
subconscious level. Perception Reframing allows for a more mature or functional reality, and is used to improve<br />
any aspect of human performance<br />
Installing the EVOX<br />
The ZYTO 5 software is downloaded through the internet. You will not receive an installation CD.<br />
Refer to the email you received from ZYTO when you first purchased your EVOX. That email contains a download<br />
link (www.ZYTO.com/ZYTO5install) that you can click to access the installation website. The email also<br />
contains a unique username and password that you will need the first time you log in to your software.<br />
To download the ZYTO software:<br />
1. At the download website, click Run in the upper right of the screen.<br />
2. You will be prompted to run the setup.exe file. Click Run to start the installation process.<br />
3. Next you are prompted to run the file. Click Run to continue.<br />
4. Then you are prompted to install the ZYTO 5 Software. Click Install to continue.<br />
You will see a progress bar as your computer installs the software.<br />
1
Chapter 4<br />
5. At the end of the installation process there will be a moment or two when all icons disappear and it seems<br />
nothing is happening. Wait for that moment to pass and then a new window will pop up, requesting your<br />
User Name and Password. Fill in these fields and click Log In.<br />
NOTE: You can find your username and password in the installation email ZYTO sent you at the time of your purchase. If you can’t find that<br />
email, call ZYTO Customer support at 801-224-7199.<br />
6. If you have more than one license you will see the Select a License window. Choose the license you wish to<br />
use by clicking on it, and then clicking OK. If you only have one license you will automatically be taken to<br />
the software’s Main Menu screen.<br />
About installing the EVOX on multiple computers<br />
Your software license allows you to install the software on two different computers. You will use the same download<br />
process to install the software onto the second computer.<br />
However, you may only open and operate the software on one computer at a time. In order to use the installed<br />
program you must have the software license claimed on that computer. Before you can claim your license on<br />
a different computer you must first release it from the computer where it is currently being used, or currently<br />
claimed.<br />
About starting the EVOX<br />
After the software has been installed, there will be a ZYTO 5 icon on your desktop and a ZYTO folder in your<br />
Windows Start Menu. Post installation, you can use either of these options to open the software.<br />
Each time the software opens it attempts to sync with ZYTO’s secured server. In order to sync you must be connected<br />
to the internet. During the sync your computer will encrypt your session files and copy them to ZYTO’s<br />
secured server as a backup, and your computer will download any updates to the software, including updates to<br />
libraries you have loaded. This ensures that your information from clients and sessions is available if you open<br />
your software on another computer, or if you have a computer crash this backup will allow you to restore your<br />
data.<br />
Getting Started<br />
Note that you do not need to be connected to the internet to use your ZYTO software. If you aren’t connected to<br />
the internet your ZYTO program will recognize there is no internet and will go straight to the login page. However,<br />
the software does need to sync at least once every twenty-one days in order to verify that your subscription<br />
is active.<br />
After the sync, you will be prompted to login with your username and password.<br />
2
Client management features 2<br />
This chapter includes the following topics:<br />
About clients<br />
• About clients<br />
• Adding a new client<br />
• Opening an existing client<br />
• Viewing a client’s session history<br />
• Editing client information<br />
• Viewing clinic session history<br />
• Exporting client information<br />
• Archiving a client<br />
• Using the archive manager<br />
The Clients tab can be found under the EVOX Main Menu.<br />
Here, you have the ability to create a new client or open an existing client, view session histories, and use the<br />
archive manager.<br />
In order to run a client session in the EVOX, you must first use the Clients tab to either create a new client or<br />
open an existing client.<br />
Adding a new client<br />
The first time you see a client, you will need to create a new client profile and enter their information.<br />
To add a new client:<br />
1. In the EVOX Main Menu, click Clients > My Clients and on the My Clients page click New Client.<br />
2. On the New Client page, enter the client’s information into the appropriate fields. First Name, Last Name,<br />
and Gender are required. It is also recommended that you enter in an email address for the client and their<br />
date of birth.<br />
3. Once the information has been input, click Save. The client tab for the new client automatically opens.<br />
Opening an existing client<br />
After you have initially created a client’s profile, use My Clients to open the existing client’s profile.<br />
To open an existing client:<br />
1. In the EVOX Main Menu, click Clients > My Clients.<br />
2. On the My Clients page, enter the client name in the search field.<br />
NOTE: The search function looks for letter sequence. This means you don’t have to type the first or last name from the beginning; you can type<br />
any letter sequence in the client’s name.<br />
3. In the search results, click anywhere on the desired client’s line to open a client tab for that client.<br />
3
Chapter 5<br />
Viewing a client’s session history<br />
Client management features<br />
The EVOX allows you to open an existing client and then view their session history. You can see the date and<br />
time of all sessions. You can also open those sessions to view the session data and report.<br />
To view a client’s session history:<br />
1. In the EVOX Main Menu, click Clients > My Clients.<br />
2. On the My Clients page, enter the client name in the search field.<br />
3. In the search results, click anywhere on the desired client’s line to open a client tab for that client.<br />
4. In the left column are listed the date and time of all past sessions. The session name will also appear if one<br />
was created.<br />
5. To view the session data and report, click the desired past session.<br />
NOTE: Past sessions are locked, indicated by the padlock on the session tab. This means the session record is viewable, but cannot be edited. In<br />
your EVOX, the only viewable items are the individual PI (perception index) charts and the report.<br />
Editing a client’s information<br />
At any time, you can edit the client information for an existing client. For example, if the client moves, you can<br />
update their profile with the new address. To do so, you must first open the client.<br />
To edit a client’s information:<br />
1. In the EVOX Main Menu, click Clients > My Clients.<br />
2. On the My Clients page, enter the client name in the search field.<br />
3. In the search results, click anywhere on the desired client’s line to open a client tab for that client.<br />
4. In the center column you can see the client information. Click Edit Info to make any changes.<br />
5. On the Client Information page, enter any edits or additions in the appropriate fields.<br />
6. Click Save to return to the client tab.<br />
Viewing clinic session history<br />
In addition to viewing a specific client’s history from within the client tab, you can also view and access all<br />
session histories for that license.<br />
To view clinic session history:<br />
1. In the EVOX Main Menu, click Clients > Session History.<br />
The session history page displays each session run in the software, organized by month and day. Notice that<br />
the total number of sessions for each month or day is shown on the right.<br />
2. Click the desired month to expand your view and see each day. Click again to close the expanded view.<br />
3. Click on any day displayed to expand your view and see the time of each session and the client’s name. If<br />
the session was named, the session name will appear to the right of the client name.<br />
4. Click the name or time to view that particular session history, which will open in a Session Tab.<br />
NOTE: Past sessions are locked, indicated by the padlock on the session tab. This means the session record is viewable, but cannot be edited. In<br />
your EVOX, the only viewable items are the individual PI (perception index) charts and the report.<br />
4
Chapter 5<br />
Exporting client information<br />
Client management features<br />
The client features allow you to export your client list along with client information as a CSV file, which can be<br />
used in spreadsheet programs like Microsoft Excel.<br />
To export client information:<br />
1. In the EVOX Main Menu, click Clients > Export Clients.<br />
2. On the Export Clients page you can see a list of your clients.<br />
3. (optional) Enter a date range to view only the clients with sessions during that timeframe.<br />
4. Click Export List. Name and save the CSV file in the desired location.<br />
The CSV file displays the client information that has been entered into their client profile along with the client<br />
notes you have created.<br />
Archiving a client<br />
There may be times that you wish to archive a client file. For example, if you accidentally have client duplicates or<br />
have clients that you are no longer seeing.<br />
To archive a client:<br />
1. In the EVOX Main Menu, click Clients > My Clients.<br />
2. On the My Clients page, enter the client name in the search field.<br />
3. In the search results, click anywhere on the desired client’s line to open a client tab for that client.<br />
4. In the lower right corner of the client tab, click Archive Client.<br />
5. Confirm that you wish to archive this client and click Yes.<br />
Archiving the client does not delete the profile or session history; instead it removes the client from the client<br />
search list.<br />
You may still wish to show archived clients in the client search.<br />
To show archived clients in the client search:<br />
1. In the EVOX Main Menu, click Clients > My Clients.<br />
2. On the My Clients page, click the Show Archive option.<br />
When this is selected, archived clients will appear with the word “Archived” next to their name.<br />
Using the archive manager to restore a client<br />
Once you have archived a client, use the archive manager to later bring a client out of the archive.<br />
To use the archive manager to restore a client:<br />
1. In the EVOX Main Menu, click Clients > My Clients.<br />
2. On the My Clients page, click Archive Manager.<br />
Archived clients appear with a check in the box next to their name and with the word “Archived” next to<br />
their name.<br />
3. Click the client to remove the checkmark.<br />
4. Click Save to remove the client from the archive.<br />
5
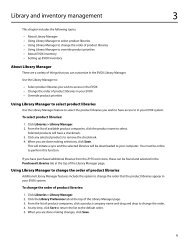
Library and inventory management 3<br />
This chapter includes the following topics:<br />
• About Library Manager<br />
• Using Library Manager to select product libraries<br />
• Using Library Manager to change the order of product libraries<br />
• Using Library Manager to override product priorities<br />
• About EVOX Inventory<br />
• Setting up EVOX Inventory<br />
About Library Manager<br />
There are a variety of things that you can customize in the EVOX Library Manager.<br />
Use the Library Manager to:<br />
• Select product libraries you wish to access in the EVOX<br />
• Change the order of product libraries in your EVOX<br />
• Override product priorities<br />
Using Library Manager to select product libraries<br />
Use the Library Manager feature to select the product libraries you wish to have access to in your EVOX system.<br />
To select product libraries:<br />
1. Click Libraries > Library Manager.<br />
2. From the list of available product companies, click the product name to select.<br />
Selected products will have a checkmark.<br />
3. Click any selected products to remove the checkmark.<br />
4. When you are done making selections, click Save.<br />
This will initiate a sync and the selected libraries will be downloaded to your computer. You must be online<br />
to perform this function.<br />
If you have purchased additional libraries from the ZYTO.com store, these can be found and selected in the<br />
Purchased Libraries tab at the top of the Library Manager page.<br />
Using Library Manager to change the order of product libraries<br />
Additional Library Manager features include the option to change the order that the product libraries appear in<br />
your EVOX system.<br />
To change the order of product libraries:<br />
1. Click Libraries > Library Manager.<br />
2. Click the Library Preference tab at the top of the Library Manager page.<br />
3. From the list of product companies, click a product company name and drag and drop to change the order.<br />
4. At any time, click Sort to return the list to the default order.<br />
5. When you are done making changes, click Save.<br />
6
Chapter 6<br />
Using Library Manager to override product priorities<br />
Library and inventory management<br />
Sometimes library authors create descriptions or dose parameters that are different from the original. These<br />
changes are referred to as overrides.<br />
For example, Library A uses products from the ZYTO library but changes the dosing parameters. To use the edited<br />
parameters you must give Library A product priority over the ZYTO library.<br />
To override product priorities:<br />
1. Click Libraries > Library Manager.<br />
2. Click the Override Preference tab at the top of the Library Manager page.<br />
3. From the list of product companies, click the product company name and drag and drop to change the<br />
order (top gets first priority).<br />
4. At any time, click Sort to return the list to the default order.<br />
5. When you are done making changes, click Save.<br />
About EVOX Inventory<br />
The EVOX biosurveys includes the option of scanning only products included in your inventory collection. To use<br />
this feature you must first configure your inventory collection.<br />
Perhaps most commonly, <strong>users</strong> think of inventory as products that they stock. If this is the case, you would include<br />
in your inventory collection the products you stock as your inventory. Then, when you select the option to<br />
scan inventory only, the final report includes only the products that you can immediately send your client home<br />
with.<br />
However, inventory can mean other things. For example, there may be specific products that you are most<br />
familiar with or products that are your personal favorites. You can put these products into your inventory collection<br />
and then, when you select the option to scan inventory only, only those products will show on the final<br />
report. In other words, products do not necessarily need to be on your shelves to be included in your Inventory<br />
collection.<br />
NOTE: Before you create your inventory, you will first want to select the product libraries that you wish to have access to in your EVOX system.<br />
Setting up EVOX Inventory<br />
Once you have added libraries to your EVOX System, you are ready to set up your inventory.<br />
To set up your EVOX Inventory:<br />
1. Click Libraries > EVOX Inventory.<br />
On the inventory page, the left column is your inventory collection. The right column is your library, or libraries<br />
from which you select products.<br />
2. In the right column, click the name of the library collection to open it, then click the block to the left of each<br />
product to select all products you wish to move into your inventory. Click again to deselect.<br />
3. You have the following options to find and learn more about products:<br />
• Click the product name to view a product description.<br />
• Use the back arrow to navigate back to the library product lists.<br />
• From the drop down, select to view All Libraries or one or more specific libraries.<br />
• Search for products by typing their name in the Search field.<br />
7
Chapter 6<br />
Library and inventory management<br />
• Refine your search using the drop down menus at the top of the right column to select various search<br />
criteria.<br />
• Search for words in a description by selecting the search parameter Search Description from the drop<br />
down menu.<br />
4. Once you have selected a product or products, click the blue vertical Copy Bar to copy the selected products<br />
into the left column.<br />
5. To remove products from your inventory, in the left column click on the product name to select it and then<br />
click Remove.<br />
Note: The EVOX Inventory page does not have a save button. Once you have moved items into the left column they are automatically saved in your<br />
inventory collection.<br />
8
Running an EVOX session 4<br />
This chapter includes the following topics:<br />
• About an EVOX session<br />
• Starting an EVOX session<br />
• Opening a new EVOX Chart<br />
• Recording a new PI<br />
• About the Perception Index<br />
• About the comparator<br />
• Exploring the recorded PI<br />
• Performing a timed output<br />
• Identifying a shift<br />
• Performing a burst output<br />
• Creating a report<br />
About an EVOX session<br />
These are the principal steps of a standard EVOX session.<br />
A standard EVOX session begins by:<br />
1. Starting a session<br />
2. Opening a new EVOX Chart<br />
This is followed by performing an EVOX round. A single EVOX round consists of:<br />
3. Recording a new PI<br />
4. Performing a timed output<br />
Rounds are repeated until the last recorded Perception Index displays a shift. The session is finalized by:<br />
5. Performing a burst output<br />
6. Creating a report<br />
Starting an EVOX session<br />
In order to start an EVOX session you must first open a client and begin an EVOX session.<br />
To start an EVOX session:<br />
1. In the EVOX Main Menu, click Clients > My Clients.<br />
2. On the My Clients page, enter the client name in the search field.<br />
3. In the search results, click anywhere on the desired client’s line to open a client tab for that client.<br />
4. On the client tab, click New Session.<br />
5. On the session tab, click Name Session on the session toolbar. Give the session a name, and click Save.<br />
The session name now appears on the session toolbar.<br />
NOTE: Naming a session makes it easier to later find specific past sessions. It’s helpful to include the word EVOX in the session name, especially if<br />
your EVOX license is attached to another ZYTO product. This makes it easier to identify sessions where you ran an EVOX session.<br />
9
Chapter 7<br />
Opening a new EVOX chart<br />
Running an EVOX session<br />
The first step of an EVOX session is to open a new EVOX chart. You must choose to run either a Topic Specific<br />
Chart or a Transgenerational Perception Reframing Chart. A Transgenerational Perception Reframing session is a<br />
highly specialized EVOX session that will be discussed in the next chapter.<br />
In most EVOX sessions, you will want to run a standard Topic Specific Chart.<br />
To open a new EVOX chart:<br />
1. On the session page in the upper left corner click New Chart > Topic Specific Chart.<br />
2. Name the chart and add any relevant notes. Both the chart name and notes can be edited at any time during<br />
a session.<br />
3. Click Save.<br />
Recording a new PI<br />
On the EVOX Charts page, your first step will usually be to Record a New Perception Index (PI).<br />
To record a new PI:<br />
1. On the chart toolbar, click Record New PI.<br />
2. Make sure that the client microphone is connected to the computer.<br />
3. The blue vertical bars, which will most likely be moving, represent the detected audio. If no one is talking<br />
into the microphone then they represent the ambient or background noise.<br />
To ensure that ambient noise is not measured in the recording, use your mouse to slide the arrows outside<br />
the ambient noise levels.<br />
NOTE: This ensures that the EVOX system only reads sounds above that level, or in other words, above the level of ambient noise. Once calibrated<br />
properly, the EVOX will only capture audio when the client is speaking.<br />
4. You can also click Auto Adjust to have the EVOX system automatically calibrate the ambient noise level.<br />
5. When the client is ready to speak about the topic, click Start Recording to record the PI.<br />
The recording will last for 10 seconds and will only record sounds above the ambient noise filters.<br />
The progress of the recording can be seen in the red line as it moves across the middle pane.<br />
When the EVOX has recorded 10 seconds of audio it will automatically stop and return to the chart page where<br />
you will see a graphic of the PI.<br />
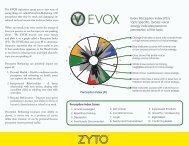
About the Perception Index<br />
The Perception Index (PI) is the visual representation of the voice recording and allows you to identify the excess<br />
energy in the voice.<br />
The PI is composed of 12 zones, each of which corresponds to a specific musical note, and each note corresponds<br />
to a perception state.<br />
The gray area on the PI represents the total voice energy in a given zone. The imbalances or excess in the voice<br />
is represented by the color black that emanates from the center of the PI chart. The zones are color coded to aid<br />
you in identifying the zones that require the most attention. From lowest to highest the colors are white, blue,<br />
green, yellow, and red. Typically only red and yellow zones are of concern.<br />
10
Chapter 7<br />
About the Comparator chart<br />
Running an EVOX session<br />
The center PI on the charts page is the Comparator chart. The PI in the center position is called the Comparator<br />
because all other PIs will be compared to it and assigned a percentage comparison. If desired, click Change View<br />
to put the comparator PI image at the top of the pane.<br />
By default, the Comparator chart is the ideal PI. This PI is called ideal because it is completely symmetrical or balanced.<br />
You can also set any recorded PI to be the comparator. To do so, hover over the recorded PI and click the Set as<br />
Comparator icon. All the percentages of the other PIs will update to reflect their comparison to the new comparator<br />
PI.<br />
To reset the Ideal PI as the comparator, hover over it and click the Set as Comparator icon.<br />
Exploring the recorded PI<br />
After a PI has been recorded, hover your mouse over the PI graphic to access additional options and information.<br />
Click X to delete the PI. You cannot undo deletes so only perform this action when necessary.<br />
Click the Create new Chart from PI icon to create a brand new chart with only the selected PI.<br />
Click the Set as Comparator icon to make the selected PI the comparator. All the percentages of the other PI’s<br />
will update to reflect their comparison to the new comparator PI.<br />
To reset the ideal PI as the comparator hover over it and click the Set as Comparator icon.<br />
Click the PI graphic to access the PI output page. Here you can access additional information on the PI and also<br />
the output features.<br />
On the PI graphic, click any zone to open the Zone Info tab on the right. The zone info includes additional information<br />
about the zones and what an imbalance may mean.<br />
Click the chart name to return to the chart page.<br />
Performing a timed output<br />
The next step in the EVOX session process is to perform a timed output using the newly recorded PI.<br />
To perform a timed output:<br />
1. Click the newly recorded PI to access the output page.<br />
2. By default, the Optimize option is selected.<br />
When optimize is selected (indicated by the green checkmark) the first step of the timed output is to scan<br />
each of the blue signals to determine the client’s biological preferences, and then only those with a positive<br />
preference will be used. If optimize is not selected than all of the computer selected signals will be included<br />
in the timed output. If desired, click Optimize to deselect.<br />
3. Use the duration slider to set the duration time for the timed output. The most common duration time is<br />
between 30 seconds and 2 ½ minutes.<br />
4. Instruct your client to put their hand on the cradle and click Start to begin the timed output. The music, if<br />
configured in the EVOX sessions, will automatically begin in conjunction with the output. You may also wish<br />
to use the optional light frames.<br />
11
Chapter 7<br />
Once the output is complete the session returns to the chart page.<br />
Identifying a shift<br />
The sequence of recording a PI and running a timed output is called a Round.<br />
Repeat additional Rounds until a shift occurs.<br />
There are different types of shifts. The most common are the dynamic shift and the releasing pattern.<br />
Running an EVOX session<br />
As you record subsequent rounds you’ll start to see that the reds and yellows get stuck in the same zones. In order<br />
to achieve a dynamic shift, the most recent Perception Index will not display any reds or yellows in the stuck<br />
area, or the two adjacent zones. For example, if the stuck area was red or yellow in zones 3 and 4, a dynamic<br />
shift occurs when the most recent PI is not red or yellow in zones 2, 3, 4, and 5. .<br />
A releasing pattern is measured using the percentage in the bottom left of each PI. The percentage is based on<br />
the PI’s comparison to the comparator PI, which is usually the ideal PI. A releasing pattern occurs when three PIs<br />
have a consecutive increase in percentage, or in other words, consecutively get closer to the ideal. When this occurs,<br />
the words “Releasing Pattern” will appear in red in the top right corner of the chart page.<br />
NOTE: the first recorded PI is not taken into account when calculating a shift.<br />
Performing a burst output<br />
Once a shift has occurred, the next step is to perform a burst output.<br />
To perform a burst output:<br />
1. Click the last PI (which should have indicated a shift) to access the output page.<br />
2. On the output page, click the Burst Output tab.<br />
3. Either instruct the client to place their hand on the cradle or place a carrier, such as a water bottle, in front of<br />
the left side of the cradle and click Start.<br />
The carrier is usually consumed within the first 24 hours following the session.<br />
The burst output concludes a standard EVOX session.<br />
Creating a report<br />
At the end of an EVOX session you can create a report and also print and email the report.<br />
To create a report:<br />
1. On the chart toolbar, click View Chart Report.<br />
A PDF report is generated that contains the images of the recorded PIs and the comparator.<br />
2. To add the zone descriptions and the chart notes to the report, click Report Options<br />
3. On the options window, select Chart Notes, All Zones, or the individual zones whose descriptions you wish<br />
to include on the report. Click OK.<br />
Ending a session<br />
Click the x on the session tab to end an EVOX session.<br />
12
Additional options in an EVOX session 5<br />
This chapter includes the following topics:<br />
• About the Transgenerational Reframing session<br />
• Running a Transgenerational Reframing session (1st appointment)<br />
• Running a Transgenerational Reframing session (follow up appointments)<br />
• About biosurveys<br />
• Running a biosurvey<br />
About the Transgenerational Reframing session<br />
The Transgenerational Perception Reframing chart has a very specific and preset purpose and is usually only<br />
used once per client, and requires multiple appointments to complete.<br />
In order to run a Transgenerational Reframing session, you need to be familiarized with the standard EVOX session<br />
features: voice recording, PIs, and outputting.<br />
Please review Chapter 4: Running an EVOX session to learn about these features.<br />
On the first Transgenerational Reframing session appointment you will record a Self 1 and Self 2 PI, record a family<br />
chart, and then focus on reframing the lowest percentage parent from the family chart.<br />
Use the following table to determine which PI’s you will reframe at each appointment:<br />
First Session (record Self 1 and Self 2 and create family chart) Lowest % parent<br />
Second Session Highest % parent<br />
Third Session Spouse/significant other<br />
Fourth Session Highest % grandparent<br />
Fifth Session Self 2<br />
The objective of Transgenerational Perception Reframing is to reframe Self 2. The reason the Self 2 reframe is preceded<br />
by reframing other family members is to break the genetic inertia that holds your client in a static pattern.<br />
Running a Transgenerational Reframing Session (1st appointment)<br />
At the first appointment of a Transgenerational Reframing Session you will open a client and start the session,<br />
record Self 1 and Self 2 PIs, record the family chart, and then work on the lowest percentage parent from the<br />
family chart.<br />
To open a client and start the session:<br />
1. In the EVOX Main Menu, click Clients > My Clients.<br />
2. On the My Clients page, enter the client name in the search field.<br />
3. In the search results, click anywhere on the desired client’s line to open a client tab for that client.<br />
4. On the client tab, click New Session.<br />
5. On the session page, click New Chart > Transgenerational Perception Reframing.<br />
To record Self 1 and Self 2 PIs:<br />
1. The Transgenerational Perception Reframing session comes preloaded with charts for Self and Family.<br />
2. In the left column click the Self chart.<br />
3. The Self chart is preloaded with empty Self 1 and Self 2 PIs. Do not use the option to record New PIs.<br />
13
Chapter 8<br />
Additional options in an EVOX session<br />
4. Click the blank Self 1 PI to access the recording page. Follow the instructions on the right and instruct your<br />
client to speak about themselves in descriptive or objective terms; avoid subjective terms such as feelings<br />
or opinions.<br />
5. Click Start Recording to record the PI. Once the recording is complete, roughly 10 seconds, the system<br />
returns to the chart page.<br />
6. Click the recorded Self 1 PI to access the output page. If necessary, change the duration slider, and click<br />
Start to perform a timed output. When the timed output is complete the program automatically return to<br />
the charts page.<br />
7. Click the blank Self 2 PI and once again click Start Recording to record the PI.<br />
Do not perform a timed output on the Self 2 PI. You are now completely done working with the self charts.<br />
To record the Family Chart:<br />
1. In the left column click the Family chart.<br />
Notice that the Self 2 PI is automatically set as the comparator for the family chart.<br />
2. Click on each blank family member PI to access the recording page.<br />
3. Click Start Recording to create a PI for each person. At this time do not perform a timed output on any<br />
family member.<br />
4. Once you have recorded the entire preset PIs, you have the option to click Record New PI to create a PI for<br />
any additional individuals such as ex-spouses, someone you grew up with besides parents, significant past<br />
relationship, etc.<br />
To work on the lowest percentage parent:<br />
1. In the lower left hand corner of the recorded PI’s is a percentage based on the comparator PI (which in this<br />
case is the Self 2 PI). Hover over the lowest percentage parent PI and click Create New Chart from PI.<br />
2. On the new chart page, which is automatically named for that parent, and has the ideal PI set as the comparator)<br />
click the previously recorded parent PI to access the output page. If necessary, change the duration<br />
slider, and click Start to perform a timed output. When the timed output is complete the program automatically<br />
returns to the chart page.<br />
3. On the chart page, click Record New PI.<br />
4. On the recording page, click Start Recording to record a new PI.<br />
Once the recording is complete, roughly 10 seconds, the system returns to the chart page.<br />
5. Click the newly recorded PI to access the output page. If necessary, change the duration slider, and click to<br />
perform a timed output. When the timed output is complete the program automatically returns to the chart<br />
page.<br />
6. Repeat the process of recording a new PI and performing an output (steps 3-5) until you see a releasing<br />
pattern (as explained in Chapter 4: Running an EVOX session).<br />
This concludes the first session of the Transgenerational Perception Reframing process.<br />
Before closing this session, click Name Session to name the session. The recommend name would include EVOX<br />
– family chart – and the person whose PI was reframed.<br />
Schedule a series of appointments, each a minimum of 3 days apart, and each focusing on a different PI from the<br />
family chart.<br />
14
Chapter 8<br />
Running a Transgenerational Reframing Session (follow up appointments)<br />
Additional options in an EVOX session<br />
At the next appointment, and subsequent Transgenerational Reframing Session appointments, you will need to<br />
open the client, copy the previous session, and then focus on the appropriate family PI.<br />
To open a client and start the session:<br />
1. In the EVOX Main Menu, click Clients > My Clients.<br />
2. On the My Clients page, enter the client name in the search field.<br />
3. In the search results, click anywhere on the desired client’s line to open a client tab for that client.<br />
4. On the left column of the client tab, click the session where you recorded the family chart.<br />
To copy the previous session:<br />
1. On the previous session page in the left column, click the Family chart.<br />
Do not create new PI’s.<br />
2. On the session toolbar, click copy session to create a new active session with the origin family chart.<br />
3. Referring to the follow up visit table, hover over the appropriate PI, in this case, the highest percentage<br />
parent, and click Create New Chart from PI.<br />
4. You now have a new chart that can be used explicitly to work on that family member. For tracking purposes,<br />
it is recommended that you click and then name this session after the family member you are focusing on.<br />
To work on the appropriate PI:<br />
1. Referring to the follow up visit table, hover over the appropriate PI and click Create New Chart from PI.<br />
2. You now have a new chart that can be used explicitly to work on that family member. For tracking purposes,<br />
it is recommended that you click Name Session and then name this session after the family member you<br />
are focusing on.<br />
3. On the new chart page, click Record New PI.<br />
4. On the recording page, click Start Recording to record the PI.<br />
Once the recording is complete, roughly 10 seconds, the system returns to the chart page.<br />
5. Click the newly recorded PI to access the output page. If necessary, change the duration slider, and click<br />
Start to perform a timed output.<br />
When the timed output is complete the program automatically returns to the chart page.<br />
6. Repeat the process of recording a new PI and performing an output (steps 3-5) until you see a releasing pattern<br />
(as explained in Chapter 4: Running an EVOX session).<br />
This concludes the follow up sessions of the Transgenerational Perception Reframing process.<br />
About biosurveys<br />
Running a biosurvey is an optional step in the EVOX session. The biosurveys are meant to complement the EVOX<br />
session and can be run at anytime.<br />
The most commonly used biosurveys are in the EVOX library: The EVOX Inventory Scan and the EVOX Scan –<br />
Bach and Australian Remedies.<br />
The EVOX Inventory Scan biosurvey scans the products in your EVOX inventory and then displays the results in<br />
a report. If no products have been added to your EVOX inventory then the report will be empty. To learn how to<br />
set up your EVOX inventory, please see Chapter 3.<br />
15
Chapter 8<br />
Additional options in an EVOX session<br />
The EVOX Scan – Bach and Australian Remedies biosurvey scans on the preloaded Bach and/or Australian<br />
flower essences and remedies.<br />
If you have additional libraries or have purchased additional biosurveys from the ZYTO store, these will appear in<br />
their own library.<br />
Running a biosurvey<br />
To run a biosurvey you must have a client open and be in an active EVOX session.<br />
To run a biosurvey:<br />
1. On the session toolbar click Biosurveys.<br />
2. On the biosurveys page, click the biosurvey you wish to run.<br />
Depending on how many libraries you have, you may have to first click any library names (such as EVOX<br />
Library) to expand and view the available biosurveys.<br />
3. There may be additional options depending on which biosurvey you select.<br />
4. At the end of the biosurvey, the Reports option appears on the session toolbar. Click Reports to view, email<br />
or print the report.<br />
5. You can return to the standard EVOX session at any time by clicking EVOX on the session toolbar.<br />
16
Setting up and running a Remote Session 6<br />
This chapter includes the following topics:<br />
• About the Remote Session<br />
• Setting up your Clinic Account<br />
• Setting a Remote Session Appointment<br />
• Launching your Remote Clinic<br />
• About running a Remote Session<br />
• Recording a PI in a Remote Session<br />
• Performing a timed output in a Remote Session<br />
• Adding and deleting music in a Remote Session<br />
• Ending a Remote Session<br />
About the Remote Session<br />
Using the Remote Session feature allows you to perform an EVOX session remotely over the internet with your<br />
clients.<br />
In order to use the Remote Session feature you must first set up your clinic account, set a remote session appointment<br />
with your client, launch your remote clinic from within the EVOX software, and then begin a remote<br />
session.<br />
Setting up your Remote Clinic Account<br />
Before you can do any remote scanning on your EVOX software, you must first set up your Remote Clinic Account<br />
on ZYTO.com<br />
You can set this up by logging into your account at ZYTO.com or you can also access the remote scanning account<br />
setup from within your software.<br />
To set up your clinic account:<br />
1. Click ZYTO.COM > Remote Clinic.<br />
This will take you to the remote clinic setup on the ZYTO.com webpage.<br />
2. On the Remote Clinic Information section, enter your clinic information in the appropriate fields. This is the<br />
information that will be displayed to your clients when they log into their ZYTO Dashboard Account for a<br />
remote session. The required information appears red. Click Next.<br />
3. On the Billing Information section, enter your billing information in the appropriate fields. You are asked<br />
for your credit card information because there is a small fee associated with remote scanning. You will be<br />
charged 7.5¢ per minute (that’s $4.50 per hour) for the actual time you’re connected to your client.<br />
4. Most likely, ZYTO already has a credit card on file for you; the card used to pay your monthly subscription<br />
fee. To use this card, select the last four digits of the card from the Cards on File drop down menu.<br />
5. To enter a new card, select New Card and then enter the required credit card information. Click Next.<br />
6. On the Profile Image section, you have the option to add a photo or logo that will appear on your remote<br />
clinic storefront and will be visible when your clients log into their remote sessions. To add a photo or logo<br />
image, click Browse and select the photo you wish to include. The image file can be no larger than 4 megabytes.<br />
Click Next.<br />
7. On the Clinic Message section, you have the option to add a clinic message that will appear on your remote<br />
clinic storefront. This can be edited at any time. Click Next.<br />
8. Click Terms and Conditions to review the terms of the ZYTO Remote Clinic. Click to indicate your agreement<br />
and then click Register.<br />
17
Chapter 9<br />
Setting up and running a Remote Session<br />
Now that you’ve created a Remote Scanning Account you need to sync your ZYTO software. The program will<br />
automatically sync when you launch it. Or, you can sync <strong>manual</strong>ly.<br />
Once the software has been synched, the Remote Lobby button will appear under Clients in the Main Menu.<br />
Setting a remote session appointment<br />
Before conducting a remote EVOX session you must first set a remote session appointment with your client. This<br />
is important not only to communicate appointment information with your client, but also because the automatically<br />
generated email includes the link for them to setup up their own account which allows them access to your<br />
remote clinic.<br />
To set a remote session appointment:<br />
1. In the EVOX Main Menu, click Clients > My Clients.<br />
2. On the My Clients page, enter the client name in the search field.<br />
3. In the search results, click anywhere on the desired client’s line to open a client tab for that client.<br />
4. On the client tab, click Send Remote Invitation in the lower right corner of the screen.<br />
WARNING: You will get an error message if your client’s profile does not include an email, or the email address is invalid. To add an email, click<br />
Edit Info on the client tab.<br />
5. Type any information you wish to include in your invitation, such as the date and time. Click Invite.<br />
This invitation is sent from ‘noreply@zytoservices.com’ and may be filtered by your Client’s email service as junk<br />
mail. If your client says they did not receive the email, remind them to check their Junk Email folder.<br />
The invitation sent to your client includes the link ‘CLICK HERE TO REGISTER’. They must click the link to access<br />
ZYTO.com and set up their own account. This account will automatically be linked to your Remote Clinic provided<br />
they use the ‘CLICK HERE TO REGISTER’ link in the invitation email.<br />
For a first time remote client, it’s a good idea to send your client an invitation at least one or two business days<br />
prior to your appointment. Instruct them to set up their ZYTO account at the time they receive the invitation and<br />
to proceed through the initial connection which may require installation of the ZYTO Touch software. Once they<br />
view the message ‘Waiting for Clinician’ they can exit their ZYTO account.<br />
Setting up their account a few days before gives your clients time to contact ZYTO if they run into any technical<br />
difficulties.<br />
Launching your Remote Clinic<br />
On the day of the remote session appointment, your client must log into their account at ZYTO.com and once<br />
there access your Remote Clinic.<br />
From within the EVOX software you must also access and launch your Remote Clinic.<br />
To launch your Remote Clinic:<br />
1. Click Clients < Remote Lobby.<br />
2. On the Remote Lobby page, click Connect.<br />
3. You will see the name of any clients that have accessed your remote clinic online. Click Start to begin a<br />
remote session.<br />
When you click start, the session begins and you will be charged seven and a half cents per minute.<br />
18
Chapter 9<br />
About running a Remote Session<br />
Setting up and running a Remote Session<br />
Clicking Start opens a new Session tab with the chat window open on the right. Click the Remote Session bar<br />
on the right of the screen to open and close the chat window.<br />
The length of time you have been connected to the client is indicated at the bottom of the chat window.<br />
Note the icon on the Session tab, indicating that this is a remote session.<br />
For the most part, running an EVOX session as a Remote Session is done as if the patient were sitting next to you.<br />
However, there are a few unique differences that you should be aware of which can be found in the following<br />
sections:<br />
• Recording a PI in a Remote Session<br />
• Performing a timed output in a Remote Session<br />
• Adding and deleting music in a Remote Session<br />
Recording a PI in a Remote Session<br />
There are a few unique differences when recording a PI during a Remote Session.<br />
To record a PI in a Remote Session:<br />
1. On the charts page click Record New PI, just as you would if the client were sitting next to you.<br />
2. To share the recording screen with your client, click Start Recording.<br />
The client can now see the recording screen on their computer.<br />
3. Click Auto Adjust on your EVOX system to calibrate the ambient noise levels on the client’s computer.<br />
4. The client will see a pop up window instructing them that you are trying to adjust their microphone<br />
volume. Instruct the client to click OK and to remain quiet while the Remote Clinic adjusts their<br />
microphone recording levels to ignore any background noise<br />
Note: the client can also initiate this process by clicking Auto Adjust on their Remote Clinic.<br />
5. When the auto adjust is complete and you are ready to record, instruct the client to click Start Recording<br />
on their Remote Clinic and to begin speaking about the topic or person.<br />
Performing a timed output in a Remote Session<br />
There are a few unique differences when performing a timed output during a Remote Session.<br />
To perform a timed output in a Remote Session:<br />
1. Click the recorded PI as you normally would to access the output page.<br />
2. On their Remote Clinic, the client will see the Music Manager above the chat box on the right side of the<br />
screen. Instruct the client to select a song from the dropdown music list before beginning the output.<br />
Otherwise, the next song will automatically play by default once the output begins.<br />
3. To begin the output, click Start just as you would if the client was with you in the office.<br />
4. During the output the patient can pause the music and also adjust the volume using the controls on the<br />
Music Manager.<br />
Adding and deleting music in a Remote Session<br />
Additionally, the client has the option to add or delete their own music to their Remote Clinic Music Manager.<br />
19
Chapter 9<br />
Only mp3 music files can be uploaded.<br />
These are all steps that the client must perform on their computer.<br />
To add music in a Remote Session:<br />
Setting up and running a Remote Session<br />
1. Click the gear icon in the Music Manager to access the Remote Clinic playlist.<br />
The blue musical notes next to the song names indicate that the song is streamed from ZYTO’s server and cannot be<br />
deleted. Music that has been <strong>manual</strong>ly added by the client has a green musical note next to the song name.<br />
2. Click the green Add button to add music.<br />
3. The first time the Add button is clicked you will receive a notification from Silverlight asking permission to increase<br />
the available storage. Click Yes.<br />
4. Once storage has been allocated click OK. Once again click the Add button to continue.<br />
5. Browse to the mp3 file that you wish to add and click Open. The selected songs will now appear in the client’s playlist.<br />
Note: Added songs are stored locally on the client computer. In other words, if the client logs into a remote session on a different computer the added<br />
music files will not be available unless they are once again added.<br />
To delete music in a Remote Session:<br />
1. Click the gear icon in the Music Manager to access the Remote Clinic playlist.<br />
The blue musical notes next to the song names indicate that the song is streamed from ZYTO’s server and cannot be<br />
deleted.<br />
Music that has been <strong>manual</strong>ly added by the client has a green musical note next to the song name.<br />
2. In the playlist, highlight the song you wish to delete by clicking on it.<br />
3. Click the red Delete button to remove the song.<br />
Ending a Remote Session<br />
When you have finished your remote client session, you must disconnect from the client (which will end the per-minute<br />
charge) and also disconnect from your Remote Lobby (which has no charge associated with it).<br />
To end a remote session:<br />
1. When the session is finished, click Disconnect on the chat window.<br />
Your client will be informed that you have ended the session. This also terminates the per-minute charge for the<br />
session.<br />
2. Disconnect from the remote lobby by clicking Clients < Remote Lobby<br />
3. On the Remote Lobby page click Disconnect.<br />
20
EVOX Settings 7<br />
This chapter includes the following topics:<br />
• Testing the Hand Cradle connection<br />
• Putting the Hand Cradle into simulated mode<br />
• Releasing the EVOX license<br />
• Synching the software<br />
• Setting up Email<br />
• Customizing the EVOX Report<br />
• Setting up your EVOX Playlist<br />
• About the ZYTO.com features<br />
• Editing your Account Information<br />
• Submitting a referral<br />
• Changing your password<br />
• Accessing the ZYTO store<br />
• About ZYTO Help<br />
Testing the Hand Cradle connection<br />
Testing the Hand Cradle connection allows you to test your hardware at any time.<br />
Note that it is not necessary to test the hardware every time you wish to use the Hand Cradle; whenever you<br />
initiate your first scan you will be prompted to connect the Hand Cradle, and you can do so from that point in<br />
the program.<br />
To test the Hand Cradle:<br />
1. Click Settings > Hardware.<br />
2. On the Hardware page, verify that the Hand Cradle has been selected and has a checkmark. If necessary,<br />
click the box next to Hand Cradle to select that option.<br />
3. Plug the Hand Cradle into the USB port on your computer.<br />
4. Place your hand, or have your client place their hand, on the Hand Cradle.<br />
5. Press Connect.<br />
Finger contacts on the Hand Cradle graphic will turn gold, indicating contact is made.<br />
Putting the Hand Cradle into simulated mode<br />
You can also put the Hand Cradle into simulated or demo mode.<br />
Simulated mode is helpful if you want to do demo or practice sessions. In simulated mode scans go much faster<br />
than a live scan.<br />
Remember to go to Settings > Hardware to disconnect from simulated mode and select the Hand Cradle if you<br />
are going to do a live scan on a real client. In simulated mode the software internally generates arbitrary data<br />
that is helpful for practice, but meaningless for a real client.<br />
To put the Hand Cradle into simulated mode:<br />
1. Click Settings > Hardware.<br />
2. On the Hardware page, click the box next to Simulated to select that option.<br />
3. Use the drop down menu to select the simulation speed.<br />
WARNING: Be sure to disconnect from simulated mode before running live scans on clients.<br />
21
Chapter 10<br />
Releasing the EVOX license<br />
You are permitted to install your ZYTO program on two different computers. However, you may only open<br />
and operate the software on one computer at a time. In order to use the installed program you must have the<br />
software license claimed on that computer. Before you can claim your license on a different computer you must<br />
first release it from the computer where it is currently being used, or currently claimed. You have to be online to<br />
release and claim your license.<br />
You can release the license either from within the software or on the ZYTO.com website.<br />
To release the EVOX license from within the software:<br />
1. Click Settings > Release License.<br />
2. On the Release License page, click Release License.<br />
3. When you open the software on another computer the newly released license will be available to claim.<br />
To release the EVOX license on ZYTO.com:<br />
1. Open a web browser and navigate to www.ZYTO.com<br />
2. In the top right corner of the website, click Account Login.<br />
3. Enter your username and password. This is the same username and password that you use to access your<br />
software.<br />
Click Login.<br />
4. Under the My Accounts tab, click the Licenses sub-tab.<br />
5. Find the specific license you wish to release and click Release License.<br />
6. When you open the software on another computer the newly released license will be available to claim.<br />
Synching the software<br />
Use the sync feature to <strong>manual</strong>ly initiate synchronization between your computer and ZYTO’s secured server.<br />
During the sync your local data is encrypted and backed up on the ZYTO servers, your software license is renewed,<br />
and any updates to your software are downloaded to you; this includes updates to Libraries.<br />
It is not necessary that you regularly initiate a <strong>manual</strong> sync of your software. Whenever you are online and open<br />
or close the software or release your software license, a sync is automatically initiated. However, you may want<br />
to initiate a <strong>manual</strong> sync to receive new updates without restarting the software.<br />
To <strong>manual</strong>ly sync the software:<br />
1. Click Settings > Sync.<br />
2. On the Sync page, click Sync.<br />
Setting up Email<br />
The EVOX report includes the option to email a PDF of the report directly to the client. In order to use this feature,<br />
you must first input your email account information into the software.<br />
You EVOX has been optimized to use email accounts on the local email clients Outlook and Live Mail, and also<br />
the Web Email Clients: Yahoo Mail, Gmail, and Hotmail.<br />
If you use a different email service, you can also configure that in the software.<br />
EVOX Settings<br />
22
Chapter 10<br />
To setup email:<br />
1. Click Settings > Email.<br />
On the Email Settings page, No Email is selected by default.<br />
2. From the list, click to select the appropriate Email Client.<br />
If you use a Local Email Client, select that option.<br />
For Web Email Clients, select Yahoo Mail, Gmail, HotMail, or Other.<br />
3. If you select one of the standard Web Email Clients (Yahoo Mail, Gmail, HotMail) then enter the email and<br />
password for that email account.<br />
4. If you select Other, you have to enter other configuration information for the email account.<br />
5. Click Save.<br />
Customizing the EVOX Report<br />
The EVOX System allows you to create a customized cover page for the EVOX reports. This is done using report<br />
templates that consist of different customizable blocks that include text, images, images and text, columns, and<br />
image banners.<br />
You have the option to create a new report template, select existing report templates, or to edit existing report<br />
templates.<br />
To customize the EVOX Report:<br />
1. Click Settings > Report Setup.<br />
2. To access existing templates, click Select Report Block and from the drop down menu select Default Cover<br />
Page or any of the other Templates.<br />
3. To select that as your default cover page click Cover Page.<br />
4. To edit the report block, click Edit.<br />
At the top of the page are the blocks that can be added to the report. In the left column are the blocks that<br />
have been added to the report. The right column displays the properties of the selected block.<br />
5. Click the blocks at the top to add them to the report.<br />
6. Once added, click the blocks in the left column. In the right column you can edit or add any information to<br />
the selected block.<br />
7. Change the order that the blocks will appear on the report through drag and drop in the left column.<br />
8. When you are finished making changes, click Save.<br />
NOTE: You can also create a brand new report with no preexisting blocks or information by clicking New Report Block on the main Report<br />
Setup page.<br />
Setting up your EVOX Playlist<br />
EVOX music is used during an EVOX session to relax and focus the client.<br />
A set of 12 instrumental songs are automatically included with the EVOX software. However, to access the songs<br />
in a session, you must first add them to your EVOX Playlist.<br />
You also have the ability to add your own music MP3 files.<br />
To set up your EVOX Playlist:<br />
1. Click Settings > EVOX Playlist.<br />
2. Click ZYTO Music to view the 12 preloaded songs.<br />
EVOX Settings<br />
23
Chapter 10<br />
3. Click individual songs to select or click All 12 ZYTO Songs to select all.<br />
4. Once you have made your selections, click anywhere on the screen to close the drop down menu.<br />
The selected songs now appear in your playlist.<br />
5. Click the green Add Button to add your own music files. Music files must be in MP3 format.<br />
NOTE: There is no Save button. Once you have moved items into the playlist they are automatically saved.<br />
Additional options in the EVOX include:<br />
• To remove songs from your playlist, click the song title to remove (the song will become highlighted) and<br />
then click the red Delete Button.<br />
• To change the order of the songs in your music library, click a song file and then click the Up or Down arrows<br />
to reorder.<br />
• To set the music to shuffle, click Shuffle music during output.<br />
• To set the EVOX to play a new song every time you push play, click Play new song for each output. If you<br />
don’t make this selection, the EVOX will remember where it left off at the end of each round, and will begin<br />
at that point when the next output in the session is started.<br />
About the ZYTO.com features<br />
The ZYTO.com features include:<br />
• Account Information<br />
• Submit a Referral<br />
• Change your Password<br />
• ZYTO Store<br />
All of these features redirect you to the ZYTO.com website and thus require an internet connection. The<br />
ZYTO.com features can be accessed directly from the website but require login.<br />
If you access the features from the software then you are automatically logged into your dashboard and taken<br />
directly to the appropriate page to complete the action.<br />
Editing your Account Information<br />
When you purchase your ZYTO system an account was created for your clinic using your purchasing information.<br />
The Client Report, that you give each patient who is scanned, may include this information, such as your account<br />
name, address, office phone number, and website (if you have one). At any time, you can edit this information.<br />
To edit your account information:<br />
1. Click ZYTO.COM > Account Information.<br />
2. In your web browser, you will be taken to the Account Info sub-tab on your ZYTO.com dashboard.<br />
Your account name is shown at the top of the Account Info pane. This is the account name under which the<br />
license is registered. If you need to change this name, and you are the administrator on this account, call<br />
ZYTO and we will change the name for you.<br />
All other information can be edited directly on the website.<br />
3. In the box labeled My Account Information, click Edit to change any of this information.<br />
4. When you are done, click Save Changes.<br />
5. To upload the new information to your EVOX, you will have to sync your software.<br />
EVOX Settings<br />
24
Chapter 10<br />
Submitting a Referral<br />
ZYTO.com includes a referral program, where you can earn bonus payments for referring fellow practitioners<br />
who purchase ZYTO products. ZYTO professional products are only sold to qualified healthcare practitioners.<br />
It is recommended that you have a prior conversation with the person you are referring, telling them about<br />
ZYTO technology or showing them your ZYTO system.<br />
To submit a referral:<br />
1. Click ZYTO.COM > Submit a Referral.<br />
2. Verify that your name appears at the top right area of the page; this means you are logged in.<br />
3. Type the name, phone number, and email address of the person you are referring into the appropriate fields.<br />
4. Click Submit.<br />
Your referral is forwarded to ZYTO. You will receive a confirmation email acknowledging its receipt.<br />
NOTE: In order to receive referral bonuses ZYTO needs certain information about you; this information is required to prepare referral bonus tax<br />
returns at the end of the year.<br />
To submit your tax information:<br />
1. On the ZYTO dashboard website click the My Account tab and then the Billing Info sub-tab.<br />
2. Click Tax Information.<br />
3. Provide the appropriate details.<br />
4. Click Save.<br />
You will then be registered to receive payments from ZYTO. If you don’t provide this information someone from<br />
ZYTO will contact you before any referral bonuses can be paid.<br />
Changing your password<br />
At any time you can change your login password. You can also change your username.<br />
Keep in mind that this does not just change your EVOX username and password, but your ZYTO Universal Username<br />
and Password. As a result, any changes you make will also change the password for other ZYTO software<br />
you may own or have access to, and for your ZYTO.com Dashboard login.<br />
To change your username and/or password:<br />
1. Click ZYTO.COM > Change Password.<br />
2. Click Edit next to the Password field in the Change Username/Password box.<br />
When changing your password you will have to enter your current password and then your new one.<br />
3. Confirm the new password and click Save Changes.<br />
Accessing the ZYTO Store<br />
Use the ZYTO Store to purchase marketing material and other assets to help you in your practice.<br />
You can also purchase additional biosurveys that have been created by ZYTO practitioners. Some of these biosurveys<br />
have been specifically designed for the EVOX system.<br />
EVOX Settings<br />
25
Chapter 10<br />
To access the ZYTO Store:<br />
1. Click ZYTO.COM > Shop Now.<br />
Your web browser will open the ZYTO online store.<br />
2. Click either I would like to purchase marketing material or I would like to purchase ZYTO Libraries<br />
(biosurveys).<br />
About ZYTO Help<br />
Click Help to access all of the ZYTO Help features. Under Help, the following menu options are available:<br />
• Tech Support<br />
• Training<br />
• and Diagnostics<br />
Use these options to find various ways to contact technical support (including online chat), access training materials,<br />
and to find your computer’s diagnostic information.<br />
EVOX Settings<br />
26
Windows Vista or Windows 7<br />
System Requirements<br />
• 1.0 Gigahertz CPU<br />
• 1 GB RAM<br />
• 40 GB hard Drive w/1 GB available for ZYTO software<br />
• USB 2<br />
• High Speed Internet Connection (DSL or Cable Modem, Satellite Internet Service is not recommended<br />
• Video Resolution of 1024 x 768 recommended<br />
• Video Card with Minimum of 60MB of RAM, Supporting DirectX 9.0 or higher<br />
In order to have the best experience with the software, the following hardware is recommended:<br />
• 2GHz Pentium 4 or Athlon or 1.5GHz Pentium M, Core, Core 2, or Turion processor or higher<br />
• 1.5GB of physical Memory<br />
• 5GB space on hard drive<br />
• No FAT32 partition on hard drive<br />
Not Macintosh compatible<br />
27