

TRITON Extreme Operation Guide - Platinum Audiolab
TRITON Extreme Operation Guide - Platinum Audiolab
TRITON Extreme Operation Guide - Platinum Audiolab

You also want an ePaper? Increase the reach of your titles
YUMPU automatically turns print PDFs into web optimized ePapers that Google loves.
36<br />
● Adjusting the BPM of multisamples or samples created<br />
in Sampling mode<br />
If a timbre’s program uses multisamples or samples that<br />
you created in Sampling mode (or loaded in Media mode)<br />
at a specific BPM value, you can use the page menu command<br />
“Detune BPM Adjust” to call up a new BPM value.<br />
This changes the BPM by adjusting the playback pitch.<br />
(☞PG p.44)<br />
Other page<br />
Delay [ms]<br />
Specifies the amount of time before the program assigned<br />
to each timbre will sound. Specifies the time from when<br />
you play the keyboard until the program will sound.<br />
If you select KeyOff for this parameter, the timbre will<br />
sound when the note is released.<br />
Use Program’s Scale, Scale<br />
Specifies the scale for each timbre. If you check “Use Program’s<br />
Scale,” the scale specified by the program will be<br />
used. Timbres for which this is not checked will use the<br />
Scale setting.<br />
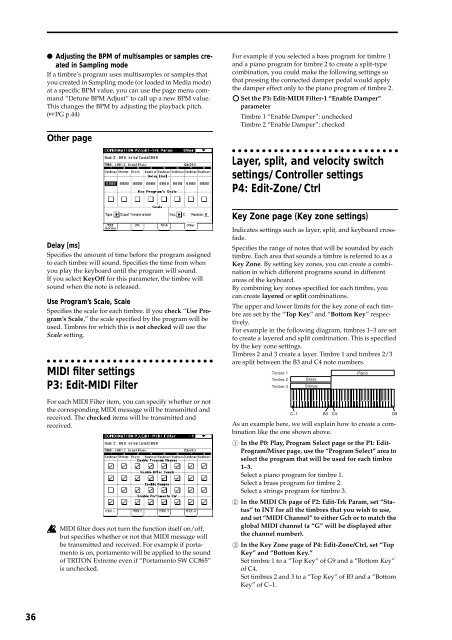
MIDI filter settings<br />
P3: Edit-MIDI Filter<br />
For each MIDI Filter item, you can specify whether or not<br />
the corresponding MIDI message will be transmitted and<br />
received. The checked items will be transmitted and<br />
received.<br />
MIDI filter does not turn the function itself on/off,<br />
but specifies whether or not that MIDI message will<br />
be transmitted and received. For example if portamento<br />
is on, portamento will be applied to the sound<br />
of <strong>TRITON</strong> <strong>Extreme</strong> even if “Portamento SW CC#65”<br />
is unchecked.<br />
For example if you selected a bass program for timbre 1<br />
and a piano program for timbre 2 to create a split-type<br />
combination, you could make the following settings so<br />
that pressing the connected damper pedal would apply<br />
the damper effect only to the piano program of timbre 2.<br />
Set the P3: Edit-MIDI Filter-1 “Enable Damper”<br />
parameter<br />
Timbre 1 “Enable Damper”: unchecked<br />
Timbre 2 “Enable Damper”: checked<br />
Layer, split, and velocity switch<br />
settings/Controller settings<br />
P4: Edit-Zone/Ctrl<br />
Key Zone page (Key zone settings)<br />
Indicates settings such as layer, split, and keyboard crossfade.<br />
Specifies the range of notes that will be sounded by each<br />
timbre. Each area that sounds a timbre is referred to as a<br />
Key Zone. By setting key zones, you can create a combination<br />
in which different programs sound in different<br />
areas of the keyboard.<br />
By combining key zones specified for each timbre, you<br />
can create layered or split combinations.<br />
The upper and lower limits for the key zone of each timbre<br />
are set by the “Top Key” and “Bottom Key” respectively.<br />
For example in the following diagram, timbres 1–3 are set<br />
to create a layered and split combination. This is specified<br />
by the key zone settings.<br />
Timbres 2 and 3 create a layer. Timbre 1 and timbres 2/3<br />
are split between the B3 and C4 note numbers.<br />
Timbre 1<br />
Timbre 2<br />
Timbre 3<br />
Brass<br />
Strings<br />
Piano<br />
C–1 B3<br />
C4 G9<br />
As an example here, we will explain how to create a combination<br />
like the one shown above.<br />
1 In the P0: Play, Program Select page or the P1: Edit-<br />
Program/Mixer page, use the “Program Select” area to<br />
select the program that will be used for each timbre<br />
1–3.<br />
Select a piano program for timbre 1.<br />
Select a brass program for timbre 2.<br />
Select a strings program for timbre 3.<br />
2 In the MIDI Ch page of P2: Edit-Trk Param, set “Status”<br />
to INT for all the timbres that you wish to use,<br />
and set “MIDI Channel” to either Gch or to match the<br />
global MIDI channel (a “G” will be displayed after<br />
the channel number).<br />
3 In the Key Zone page of P4: Edit-Zone/Ctrl, set “Top<br />
Key” and “Bottom Key.”<br />
Set timbre 1 to a “Top Key” of G9 and a “Bottom Key”<br />
of C4.<br />
Set timbres 2 and 3 to a “Top Key” of B3 and a “Bottom<br />
Key” of C–1.


