

TRITON Extreme Operation Guide - Platinum Audiolab
TRITON Extreme Operation Guide - Platinum Audiolab
TRITON Extreme Operation Guide - Platinum Audiolab

Create successful ePaper yourself
Turn your PDF publications into a flip-book with our unique Google optimized e-Paper software.
64<br />
Preparations for sampling<br />
The multisample and sample data in the sample<br />
memory (RAM) is not backed up when the power is<br />
turned off. If you wish to keep this data, you must<br />
save it onto a media before turning off the power.<br />
When the power is first turned on, memory will not<br />
contain any multisample or sample data. You must<br />
first load previously-saved data before you can playback<br />
or edit any sample data (☞p.121).<br />
1. Connecting an input device and making<br />
Input settings<br />
Connecting an input device<br />
Here’s how to connect an external audio source. On the<br />
<strong>TRITON</strong> <strong>Extreme</strong> you can input audio signals to the<br />
AUDIO INPUT 1 and 2 jacks, or the S/P DIF IN jack.<br />
1 Connect the audio source that you want to input.<br />
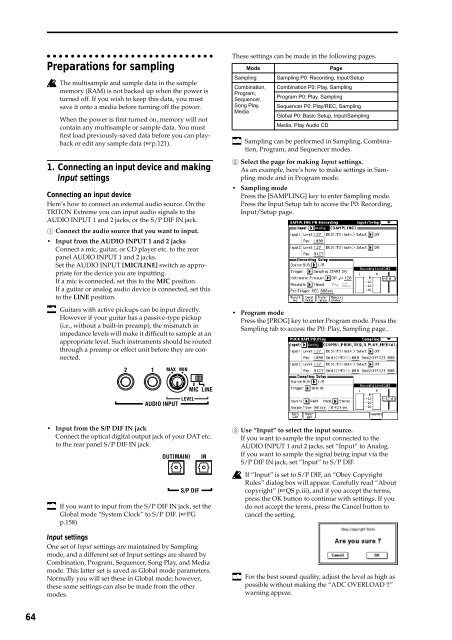
• Input from the AUDIO INPUT 1 and 2 jacks<br />
Connect a mic, guitar, or CD player etc. to the rear<br />
panel AUDIO INPUT 1 and 2 jacks.<br />
Set the AUDIO INPUT [MIC/LINE] switch as appropriate<br />
for the device you are inputting.<br />
If a mic is connected, set this to the MIC position.<br />
If a guitar or analog audio device is connected, set this<br />
to the LINE position.<br />
Guitars with active pickups can be input directly.<br />
However if your guitar has a passive-type pickup<br />
(i.e., without a built-in preamp), the mismatch in<br />
impedance levels will make it difficult to sample at an<br />
appropriate level. Such instruments should be routed<br />
through a preamp or effect unit before they are connected.<br />
• Input from the S/P DIF IN jack<br />
Connect the optical digital output jack of your DAT etc.<br />
to the rear panel S/P DIF IN jack.<br />
If you want to input from the S/P DIF IN jack, set the<br />
Global mode “System Clock” to S/P DIF. (☞PG<br />
p.158)<br />
Input settings<br />
One set of Input settings are maintained by Sampling<br />
mode, and a different set of Input settings are shared by<br />
Combination, Program, Sequencer, Song Play, and Media<br />
mode. This latter set is saved as Global mode parameters.<br />
Normally you will set these in Global mode; however,<br />
these same settings can also be made from the other<br />
modes.<br />
These settings can be made in the following pages.<br />
Mode Page<br />
Sampling Sampling P0: Recording, Input/Setup<br />
Combination, Combination P0: Play, Sampling<br />
Program,<br />
Sequencer,<br />
Program P0: Play, Sampling<br />
Song Play, Sequencer P0: Play/REC, Sampling<br />
Media<br />
Global P0: Basic Setup, Input/Sampling<br />
Media, Play Audio CD<br />
Sampling can be performed in Sampling, Combination,<br />
Program, and Sequencer modes.<br />
2 Select the page for making Input settings.<br />
As an example, here’s how to make settings in Sampling<br />
mode and in Program mode.<br />
• Sampling mode<br />
Press the [SAMPLING] key to enter Sampling mode.<br />
Press the Input Setup tab to access the P0: Recording,<br />
Input/Setup page.<br />
• Program mode<br />
Press the [PROG] key to enter Program mode. Press the<br />
Sampling tab to access the P0: Play, Sampling page.<br />
3 Use “Input” to select the input source.<br />
If you want to sample the input connected to the<br />
AUDIO INPUT 1 and 2 jacks, set “Input” to Analog.<br />
If you want to sample the signal being input via the<br />
S/P DIF IN jack, set “Input” to S/P DIF.<br />
If “Input” is set to S/P DIF, an “Obey Copyright<br />
Rules” dialog box will appear. Carefully read “About<br />
copyright” (☞QS p.iii), and if you accept the terms,<br />
press the OK button to continue with settings. If you<br />
do not accept the terms, press the Cancel button to<br />
cancel the setting.<br />
For the best sound quality, adjust the level as high as<br />
possible without making the “ADC OVERLOAD !!”<br />
warning appear.


