

Operating Instructions And Parts Manual 8-inch Jointer
Operating Instructions And Parts Manual 8-inch Jointer
Operating Instructions And Parts Manual 8-inch Jointer

You also want an ePaper? Increase the reach of your titles
YUMPU automatically turns print PDFs into web optimized ePapers that Google loves.
Three-Phase Test Run<br />
On the three-phase unit, after wiring has been<br />
completed, you should check that the incoming<br />
leads have been connected properly:<br />
1. Connect machine to power source and<br />
press the start button. Make sure cutterhead<br />
is clear of all obstructions! (See page 21 for<br />
more detailed instructions on the switch.)<br />
2. The cutterhead should rotate clockwise as<br />
viewed from the front of the machine. If the<br />
cutterhead rotation is incorrect, press the<br />
stop button and disconnect machine from<br />
power.<br />
3. Switch any two of the three leads to the<br />
motor, then re-connect to power.<br />
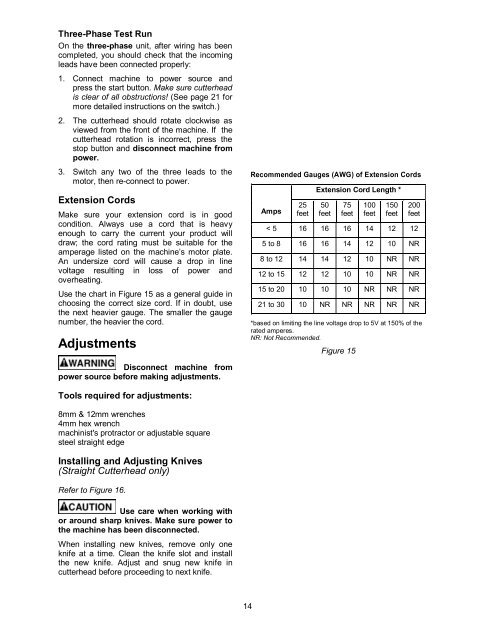
Extension Cords<br />
Make sure your extension cord is in good<br />
condition. Always use a cord that is heavy<br />
enough to carry the current your product will<br />
draw; the cord rating must be suitable for the<br />
amperage listed on the machine’s motor plate.<br />
An undersize cord will cause a drop in line<br />
voltage resulting in loss of power and<br />
overheating.<br />
Use the chart in Figure 15 as a general guide in<br />
choosing the correct size cord. If in doubt, use<br />
the next heavier gauge. The smaller the gauge<br />
number, the heavier the cord.<br />
Adjustments<br />
Disconnect machine from<br />
power source before making adjustments.<br />
Tools required for adjustments:<br />
8mm & 12mm wrenches<br />
4mm hex wrench<br />
machinist's protractor or adjustable square<br />
steel straight edge<br />
Installing and Adjusting Knives<br />
(Straight Cutterhead only)<br />
Refer to Figure 16.<br />
Use care when working with<br />
or around sharp knives. Make sure power to<br />
the machine has been disconnected.<br />
When installing new knives, remove only one<br />
knife at a time. Clean the knife slot and install<br />
the new knife. Adjust and snug new knife in<br />
cutterhead before proceeding to next knife.<br />
14<br />
Recommended Gauges (AWG) of Extension Cords<br />
Amps<br />
25<br />
feet<br />
Extension Cord Length *<br />
50<br />
feet<br />
75<br />
feet<br />
100<br />
feet<br />
150<br />
feet<br />
200<br />
feet<br />
< 5 16 16 16 14 12 12<br />
5 to 8 16 16 14 12 10 NR<br />
8 to 12 14 14 12 10 NR NR<br />
12 to 15 12 12 10 10 NR NR<br />
15 to 20 10 10 10 NR NR NR<br />
21 to 30 10 NR NR NR NR NR<br />
*based on limiting the line voltage drop to 5V at 150% of the<br />
rated amperes.<br />
NR: Not Recommended.<br />
Figure 15


