

Operating Instructions And Parts Manual 8-inch Jointer
Operating Instructions And Parts Manual 8-inch Jointer
Operating Instructions And Parts Manual 8-inch Jointer

You also want an ePaper? Increase the reach of your titles
YUMPU automatically turns print PDFs into web optimized ePapers that Google loves.
Skewing (Shear Cutting)<br />
When edging or facing burl or birds-eye maple,<br />
it is not unusual to deface or mar the surface<br />
being finished. This is caused by the cutterhead<br />
knives occasionally cutting against the grain. In<br />
order to prevent the defacing or marring of this<br />
type wood, it is necessary to skew, or angle<br />
finish, the material being worked.<br />
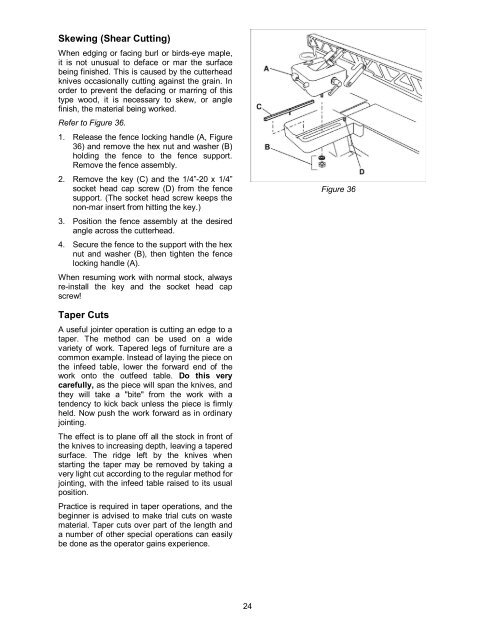
Refer to Figure 36.<br />
1. Release the fence locking handle (A, Figure<br />
36) and remove the hex nut and washer (B)<br />
holding the fence to the fence support.<br />
Remove the fence assembly.<br />
2. Remove the key (C) and the 1/4”-20 x 1/4”<br />
socket head cap screw (D) from the fence<br />
support. (The socket head screw keeps the<br />
non-mar insert from hitting the key.)<br />
3. Position the fence assembly at the desired<br />
angle across the cutterhead.<br />
4. Secure the fence to the support with the hex<br />
nut and washer (B), then tighten the fence<br />
locking handle (A).<br />
When resuming work with normal stock, always<br />
re-install the key and the socket head cap<br />
screw!<br />
Taper Cuts<br />
A useful jointer operation is cutting an edge to a<br />
taper. The method can be used on a wide<br />
variety of work. Tapered legs of furniture are a<br />
common example. Instead of laying the piece on<br />
the infeed table, lower the forward end of the<br />
work onto the outfeed table. Do this very<br />
carefully, as the piece will span the knives, and<br />
they will take a "bite" from the work with a<br />
tendency to kick back unless the piece is firmly<br />
held. Now push the work forward as in ordinary<br />
jointing.<br />
The effect is to plane off all the stock in front of<br />
the knives to increasing depth, leaving a tapered<br />
surface. The ridge left by the knives when<br />
starting the taper may be removed by taking a<br />
very light cut according to the regular method for<br />
jointing, with the infeed table raised to its usual<br />
position.<br />
Practice is required in taper operations, and the<br />
beginner is advised to make trial cuts on waste<br />
material. Taper cuts over part of the length and<br />
a number of other special operations can easily<br />
be done as the operator gains experience.<br />
24<br />
Figure 36


