

Operating Instructions And Parts Manual 8-inch Jointer
Operating Instructions And Parts Manual 8-inch Jointer
Operating Instructions And Parts Manual 8-inch Jointer

Create successful ePaper yourself
Turn your PDF publications into a flip-book with our unique Google optimized e-Paper software.
1. Disconnect machine from power source.<br />
2. Remove the belt guard so that you can<br />
rotate the cutterhead by turning the motor<br />
pulley or by moving the drive belt. Do not<br />
grab the cutterhead itself to rotate it.<br />
3. Remove the old knives by loosening gib<br />
screws with an 8mm wrench, and allowing<br />
the springs to push the knife upward.<br />
Remove knife and gib.<br />
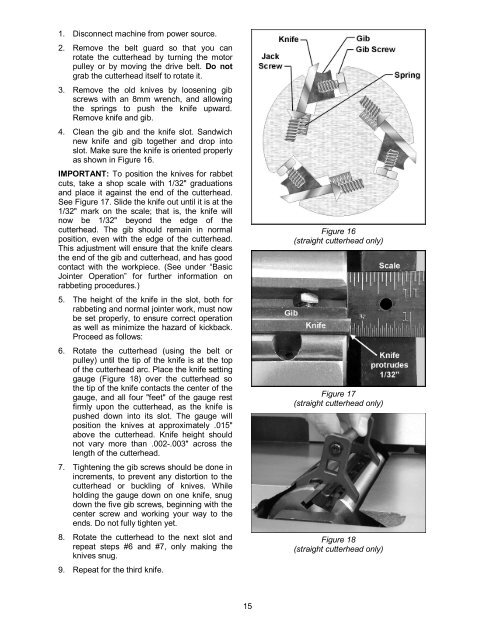
4. Clean the gib and the knife slot. Sandwich<br />
new knife and gib together and drop into<br />
slot. Make sure the knife is oriented properly<br />
as shown in Figure 16.<br />
IMPORTANT: To position the knives for rabbet<br />
cuts, take a shop scale with 1/32" graduations<br />
and place it against the end of the cutterhead.<br />
See Figure 17. Slide the knife out until it is at the<br />
1/32" mark on the scale; that is, the knife will<br />
now be 1/32" beyond the edge of the<br />
cutterhead. The gib should remain in normal<br />
position, even with the edge of the cutterhead.<br />
This adjustment will ensure that the knife clears<br />
the end of the gib and cutterhead, and has good<br />
contact with the workpiece. (See under “Basic<br />
<strong>Jointer</strong> Operation” for further information on<br />
rabbeting procedures.)<br />
5. The height of the knife in the slot, both for<br />
rabbeting and normal jointer work, must now<br />
be set properly, to ensure correct operation<br />
as well as minimize the hazard of kickback.<br />
Proceed as follows:<br />
6. Rotate the cutterhead (using the belt or<br />
pulley) until the tip of the knife is at the top<br />
of the cutterhead arc. Place the knife setting<br />
gauge (Figure 18) over the cutterhead so<br />
the tip of the knife contacts the center of the<br />
gauge, and all four "feet" of the gauge rest<br />
firmly upon the cutterhead, as the knife is<br />
pushed down into its slot. The gauge will<br />
position the knives at approximately .015"<br />
above the cutterhead. Knife height should<br />
not vary more than .002-.003" across the<br />
length of the cutterhead.<br />
7. Tightening the gib screws should be done in<br />
increments, to prevent any distortion to the<br />
cutterhead or buckling of knives. While<br />
holding the gauge down on one knife, snug<br />
down the five gib screws, beginning with the<br />
center screw and working your way to the<br />
ends. Do not fully tighten yet.<br />
8. Rotate the cutterhead to the next slot and<br />
repeat steps #6 and #7, only making the<br />
knives snug.<br />
9. Repeat for the third knife.<br />
15<br />
Figure 16<br />
(straight cutterhead only)<br />
Figure 17<br />
(straight cutterhead only)<br />
Figure 18<br />
(straight cutterhead only)


