Operating Instructions And Parts Manual 8-inch Jointer
Operating Instructions And Parts Manual 8-inch Jointer
Operating Instructions And Parts Manual 8-inch Jointer
Create successful ePaper yourself
Turn your PDF publications into a flip-book with our unique Google optimized e-Paper software.
Sharpening Knives (model 60C only)<br />
Knives should be kept sharp. This will contribute<br />
to better stock finish, longer machine life, and<br />
safer operation.<br />
A jointer knife hone provides a simple way to<br />
sharpen straight knives. Hones are available<br />
from many woodworking supply stores. Carefully<br />
read any instructions that accompany the hone.<br />
Use caution and proceed<br />
slowly when sharpening knives. Disconnect<br />
jointer from power source, and wear<br />
approved eye protection.<br />
When finished sharpening knives, they should<br />
be re-set level to the outfeed table. See the<br />
“Installing and Adjusting Knives” section in this<br />
manual.<br />
Knives can usually be whetted several times in<br />
the cutterhead before having to be removed and<br />
re-ground.<br />
TIP: If the jointer is used frequently, keeping a<br />
spare set of knives on hand is recommended.<br />
Extra knives (stock no. 6296046, set of 3) may<br />
be obtained from your Powermatic distributor, or<br />
by calling WMH Tool Group at 1-800-274-6848.<br />
Cutterhead Maintenance<br />
The entire cutterhead assembly may be<br />
removed for bearing replacement or other<br />
maintenance procedures.<br />
1. Disconnect jointer from power source.<br />
2. Remove fence assembly from jointer (see<br />
Figure 36 and accompanying instructions).<br />
3. Loosen motor mounting and push up on<br />
motor to create slack in belt (see page 10)<br />
4. Remove drive belt from cutterhead pulley.<br />
5. Lower both infeed and outfeed tables.<br />
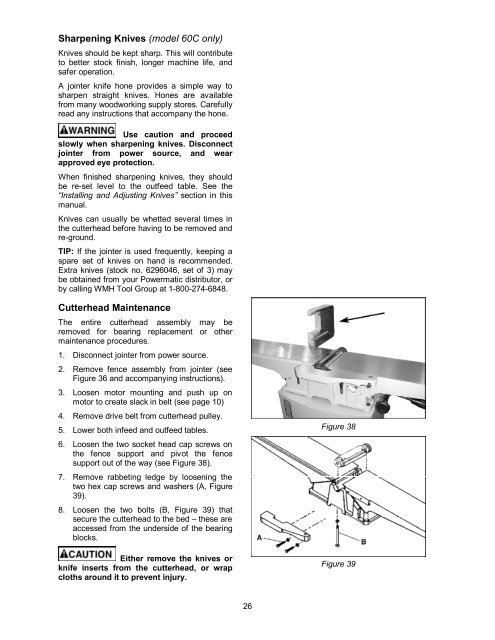
6. Loosen the two socket head cap screws on<br />
the fence support and pivot the fence<br />
support out of the way (see Figure 38).<br />
7. Remove rabbeting ledge by loosening the<br />
two hex cap screws and washers (A, Figure<br />
39).<br />
8. Loosen the two bolts (B, Figure 39) that<br />
secure the cutterhead to the bed – these are<br />
accessed from the underside of the bearing<br />
blocks.<br />
Either remove the knives or<br />
knife inserts from the cutterhead, or wrap<br />
cloths around it to prevent injury.<br />
26<br />
Figure 38<br />
Figure 39


