

Operating Instructions And Parts Manual 8-inch Jointer
Operating Instructions And Parts Manual 8-inch Jointer
Operating Instructions And Parts Manual 8-inch Jointer

Create successful ePaper yourself
Turn your PDF publications into a flip-book with our unique Google optimized e-Paper software.
<strong>Operating</strong> Controls<br />
Start/Stop<br />
Power Indicator Light – The start switch has a<br />
power indicator lamp which is on whenever<br />
there is power connected to the <strong>Jointer</strong>, not<br />
just when the <strong>Jointer</strong> is running. Do not assume<br />
that no light means there is no power to the<br />
machine. If the bulb is bad, there will be no<br />
indication. Always check before use.<br />
Do not rely that no light<br />
means no power to the machine. Always<br />
check for power first. Failure to comply may<br />
cause serious injury!<br />
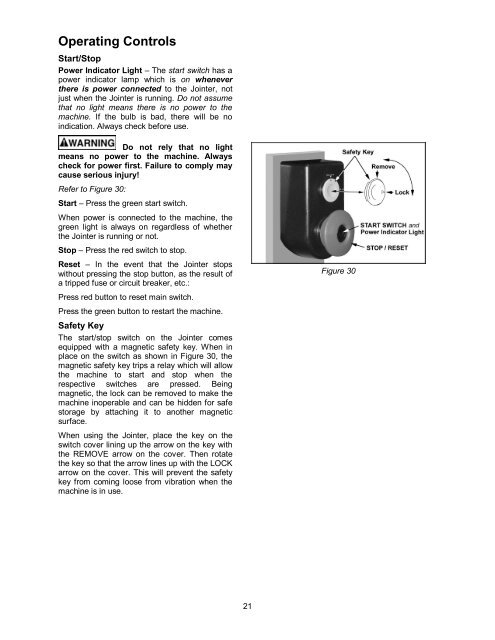
Refer to Figure 30:<br />
Start – Press the green start switch.<br />
When power is connected to the machine, the<br />
green light is always on regardless of whether<br />
the <strong>Jointer</strong> is running or not.<br />
Stop – Press the red switch to stop.<br />
Reset – In the event that the <strong>Jointer</strong> stops<br />
without pressing the stop button, as the result of<br />
a tripped fuse or circuit breaker, etc.:<br />
Press red button to reset main switch.<br />
Press the green button to restart the machine.<br />
Safety Key<br />
The start/stop switch on the <strong>Jointer</strong> comes<br />
equipped with a magnetic safety key. When in<br />
place on the switch as shown in Figure 30, the<br />
magnetic safety key trips a relay which will allow<br />
the machine to start and stop when the<br />
respective switches are pressed. Being<br />
magnetic, the lock can be removed to make the<br />
machine inoperable and can be hidden for safe<br />
storage by attaching it to another magnetic<br />
surface.<br />
When using the <strong>Jointer</strong>, place the key on the<br />
switch cover lining up the arrow on the key with<br />
the REMOVE arrow on the cover. Then rotate<br />
the key so that the arrow lines up with the LOCK<br />
arrow on the cover. This will prevent the safety<br />
key from coming loose from vibration when the<br />
machine is in use.<br />
21<br />
Figure 30


