the Compact Smart Oven™ - Yardley Hospitality
the Compact Smart Oven™ - Yardley Hospitality
the Compact Smart Oven™ - Yardley Hospitality
You also want an ePaper? Increase the reach of your titles
YUMPU automatically turns print PDFs into web optimized ePapers that Google loves.
Quick Start Guide<br />
This Quick Start Guide is designed for first time use.<br />
For safety and more information, refer to rest of <strong>the</strong> Instruction Booklet.<br />
PREPARING THE OVEN<br />
(A ONE-TIME PROCESS)<br />
In order to remove any protective<br />
substances on <strong>the</strong> heating elements, it is<br />
necessary to run <strong>the</strong> oven empty for 15<br />
minutes. Ensure <strong>the</strong> area is well ventilated<br />
as <strong>the</strong> oven may emit vapors. These are safe<br />
and not detrimental to <strong>the</strong> performance of<br />
<strong>the</strong> oven.<br />
1. Place <strong>the</strong> oven on a flat, dry surface.<br />
Ensure <strong>the</strong>re is 10cm of clear space on<br />
both sides of <strong>the</strong> appliance, <strong>the</strong>re are<br />
no items on top, and <strong>the</strong> crumb tray has<br />
been inserted.<br />
2. Unwind <strong>the</strong> power cord and insert <strong>the</strong><br />
power plug into a power outlet.<br />
3. The oven alert will sound and <strong>the</strong> LCD<br />
screen will illuminate.<br />
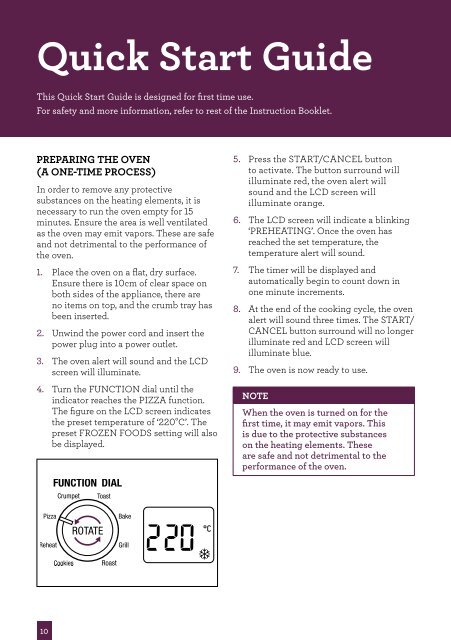
4. Turn <strong>the</strong> FUNCTION dial until <strong>the</strong><br />
indicator reaches <strong>the</strong> PIZZA function.<br />
The figure on <strong>the</strong> LCD screen indicates<br />
<strong>the</strong> preset temperature of ‘220°C’. The<br />
preset FROZEN FOODS setting will also<br />
be displayed.<br />
10<br />
5. Press <strong>the</strong> START/CANCEL button<br />
to activate. The button surround will<br />
illuminate red, <strong>the</strong> oven alert will<br />
sound and <strong>the</strong> LCD screen will<br />
illuminate orange.<br />
6. The LCD screen will indicate a blinking<br />
‘PREHEATING’. Once <strong>the</strong> oven has<br />
reached <strong>the</strong> set temperature, <strong>the</strong><br />
temperature alert will sound.<br />
7. The timer will be displayed and<br />
automatically begin to count down in<br />
one minute increments.<br />
8. At <strong>the</strong> end of <strong>the</strong> cooking cycle, <strong>the</strong> oven<br />
alert will sound three times. The START/<br />
CANCEL button surround will no longer<br />
illuminate red and LCD screen will<br />
illuminate blue.<br />
9. The oven is now ready to use.<br />
NOTE<br />
When <strong>the</strong> oven is turned on for <strong>the</strong><br />
first time, it may emit vapors. This<br />
is due to <strong>the</strong> protective substances<br />
on <strong>the</strong> heating elements. These<br />
are safe and not detrimental to <strong>the</strong><br />
performance of <strong>the</strong> oven.


