From Slip Dress to Top - My Label 3D Fashion Pattern Software
From Slip Dress to Top - My Label 3D Fashion Pattern Software
From Slip Dress to Top - My Label 3D Fashion Pattern Software

You also want an ePaper? Increase the reach of your titles
YUMPU automatically turns print PDFs into web optimized ePapers that Google loves.
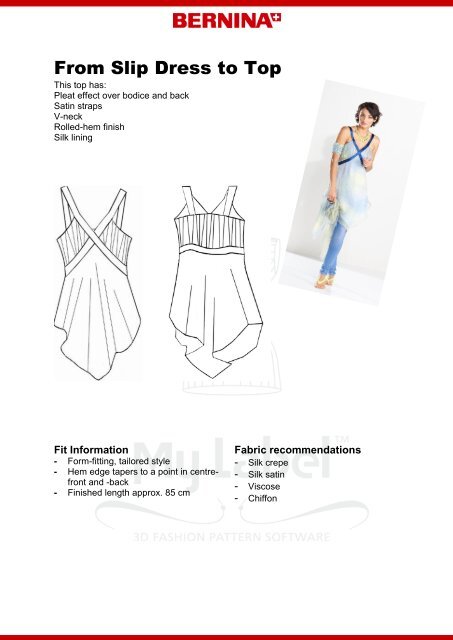
<strong>From</strong> <strong>Slip</strong> <strong>Dress</strong> <strong>to</strong> <strong>Top</strong><br />
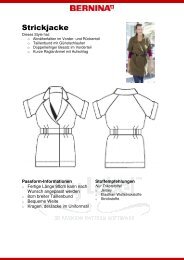
This <strong>to</strong>p has:<br />
Pleat effect over bodice and back<br />
Satin straps<br />
V-neck<br />
Rolled-hem finish<br />
Silk lining<br />
Fit Information<br />
- Form-fitting, tailored style<br />
- Hem edge tapers <strong>to</strong> a point in centre-<br />
front and -back<br />
- Finished length approx. 85 cm<br />
Fabric recommendations<br />
- Silk crepe<br />
- Silk satin<br />
- Viscose<br />
- Chiffon
Style variant<br />
<strong>From</strong> <strong>Slip</strong> <strong>Dress</strong> <strong>to</strong> <strong>Top</strong><br />
Select model<br />
Open <strong>My</strong> <strong>Label</strong> software and open or recreate the desired model in the models drawer.<br />
Select style<br />
In the styles drawer, under the heading ‘<strong>Dress</strong>es’, select the <strong>Slip</strong> <strong>Dress</strong>.<br />
- Open style<br />
- Open <strong>Slip</strong> <strong>Dress</strong><br />
- Reduce underbust circumference by 4cm<br />
- Desired finished length approx. 85cm<br />
<strong>Pattern</strong> alteration via stitch placement<br />
Detailed instructions for this can be found in the Appendix.<br />
Tip: Stitch lines cannot be placed over darts.<br />
Bot<strong>to</strong>m front<br />
Drag the hemline 8cm below the hip marking diagonally up <strong>to</strong> the hemline of the centre<br />
of the pattern piece.<br />
Draw in new underbust line with a slightly rounded shape, beginning at the waist<br />
marking and s<strong>to</strong>pping 5cm short of the centre-front of the bodice section.<br />
Mark in one vertical line per pattern-piece half (cutting line for additional width).<br />
Copy and position the new markings on the opposite pattern-piece half.<br />
Bodice section<br />
Drag slightly rounded cutting line from side seam up <strong>to</strong> neckline.
Complete the new underbust line of the lower front section: beginning about 5cm before<br />
the centre-front, mark up <strong>to</strong> 2cm below the V-neck point.<br />
Back<br />
Copy and position the hemline of the front section on the back. For the back yoke, draw<br />
in a cross-line matching the front section in height, starting at the waist marking. Take<br />
the height of the underbust line from the front section and mark it parallel over the back<br />
section, in a slightly rounded shape.<br />
Extend the dart ends up <strong>to</strong> the new hemline (cutting lines for additional widths).<br />
Tip: If wished, strap markings can be drawn in as an aid. These generally need <strong>to</strong> be<br />
corrected after trying on the garment.
Print pattern pieces<br />
Position, save and print out pattern pieces.<br />
Only the lower front and back sections as well as the bodice section are needed.<br />
Cut out pattern pieces and make alterations by hand<br />
Before cutting out, check fit and cutting lines of redesigned front and back sections, and<br />
correct height and shape if necessary.<br />
Bodice and front<br />
Before cutting out the bodice, widen the shoulder seam <strong>to</strong>wards the neckline by 5cm.<br />
Mark in the new neckline and extend the bodice line <strong>to</strong> the newly defined neckline (Fig.<br />
1).<br />
Fig.1<br />
Cut out front bodice section without seam allowances.<br />
Cut out lower front section, then glue both pattern pieces <strong>to</strong>gether on the underbust line<br />
of the front section (Fig. 2).<br />
Fig. 2<br />
Draw a vertical line from the bust-point marking up <strong>to</strong> the underbust line.<br />
Place tissue paper underneath the bodice up <strong>to</strong> waist marking and cut bodice off from<br />
lower section.
Correct underbust line (Fig. 3)<br />
Fig.3<br />
Slash the dart line on the bot<strong>to</strong>m edge of the pattern piece up <strong>to</strong> the old underbust line.<br />
This creates a gap corresponding <strong>to</strong> the dart depth.<br />
Draw in the dart in the centre (Fig.4).<br />
Fig. 4<br />
Even out new underbust line; add on 1.6cm seam allowance all around and cut out<br />
(Figs. 5 and 6).<br />
Fig. 5 Fig.6
Lower-front section<br />
Cut out front section without seam allowances. Cut apart along the vertical marking line<br />
up <strong>to</strong> the underbust line.<br />
Place paper underneath the pattern.<br />
Insert 4cm additional width at each underbust line and 9cm additional width at each<br />
hem edge (left and right part of front section). Glue pattern pieces.<br />
Even out hem and side seams so as <strong>to</strong> yield a harmonious line.<br />
Even out underbust line if necessary and draw in a crossways marking for the zip.<br />
Add on 1.6cm seam allowance all around and cut out (Fig. 7).<br />
Lower-back section<br />
Cut out back yoke and lower-back section at forearm height and in the waist without<br />
seam allowances.<br />
Cut lengthways markings apart up <strong>to</strong> the waist.<br />
An addition width of 4cm in each case (2.5cm dart depth plus 1.5cm additional width) is<br />
added on<strong>to</strong> the lower section in the waist.<br />
9cm are added at the hem in each case. The pattern pieces are then glued according <strong>to</strong><br />
the indicated additional width (Fig. 8).<br />
Even out waist line and adjust hem curve <strong>to</strong> the front section. Add on 1.6cm seam<br />
allowance all around.<br />
Take the zip marking from the front section (Fig.9).<br />
Fig.7 Fig.8 Fig.9<br />
Back yoke<br />
Slash the yoke on both sides along the darts up <strong>to</strong> the <strong>to</strong>p edge.<br />
Slide <strong>to</strong>gether and glue the pattern pieces in dart width (Fig.10).<br />
Fig.10 Fig.11<br />
Even out waist line and <strong>to</strong>p edge. Add on 1.6cm seam allowance all around (Fig. 11).
Fabric requirement<br />
Fabric Key<br />
Fabric, right Fabric, wrong<br />
side<br />
side<br />
Symbols and Markings Key<br />
CF<br />
CB<br />
Centre Front<br />
Marking<br />
points on<br />
front sections<br />
Centre Back<br />
Marking points<br />
on back<br />
sections<br />
B9<br />
Lining, right<br />
side<br />
Sheet<br />
numbering<br />
Pleating in<br />
direction of<br />
arrow<br />
Lining, wrong<br />
side<br />
Reference points – help<br />
in combining the<br />
individual sheets<br />
Marking of dart ends<br />
(1cm before the dart<br />
point in each case)<br />
Interfacing<br />
Grain<br />
But<strong>to</strong>n<br />
marking<br />
The illustration shows one way the pattern pieces can be laid out on a folded length of<br />
fabric. Since the pattern pieces are created according <strong>to</strong> your own personal<br />
measurements and preferences, they may differ from the sizes and shapes of the<br />
pattern layout.<br />
<strong>Pattern</strong>-layout illustration<br />
Outer fabric 140cm wide <strong>to</strong> fabric fold, approx. 2.5m<br />
Lining fabric approx. 2.0m
Materials and miscellaneous<br />
Zip, approx. 30cm<br />
Satin ribbon, approx. 3.5m (max. 3cm wide) for edging<br />
Stay tape, if wished<br />
Tip: Use right half of pattern piece for outer fabric, left half for lining.<br />
Cutting out<br />
Outer fabric Lining<br />
1 x bodice <strong>to</strong> fabric fold 1 x lower front section <strong>to</strong> fabric fold<br />
1 x lower front section <strong>to</strong> fabric fold 1 x back yoke <strong>to</strong> fabric fold<br />
1 x back yoke <strong>to</strong> fabric fold 1 x lower back section <strong>to</strong> fabric fold<br />
1 x lower back section <strong>to</strong> fabric fold 1 x bodice <strong>to</strong> fabric fold<br />
Preparation<br />
Arrange the paper-pattern pieces on the fabric according <strong>to</strong> the pattern-layout<br />
illustration. Cut out pieces, then transfer all markings <strong>to</strong> the fabric. Mark delicate fabrics<br />
with darning thread.<br />
Make irregular pleats in the bodice fabric; press, and staystitch the pleats from the<br />
wrong side (Fig.12).<br />
Fig.12<br />
The pleats should run from the centre <strong>to</strong> the selvedge or <strong>to</strong> the side seam, as<br />
applicable.<br />
Depending on the size of the pattern pieces, you’ll need 30-40cm fabric for the pleats.<br />
Pin or baste the pleats in place before pressing if necessary. After pressing, arrange<br />
and cut out the pattern pieces.<br />
Tip: Pin gently draping fabrics such as chiffon or silk on<strong>to</strong> paper, then cut out.<br />
When cutting out, make sure that the pleats on the outer fabric run from the centre of<br />
the fabric <strong>to</strong>wards the side seams.<br />
Ironing spray makes it easier <strong>to</strong> press the pleats.<br />
Sewing instructions<br />
Work outer fabric and lining in the same way<br />
Back yoke and back section<br />
Outer fabric<br />
Sew back yoke and back section <strong>to</strong>gether with right sides facing, gathering the<br />
additional width of the back section and adjusting it <strong>to</strong> the yoke width. Trim seam<br />
allowance, neaten if necessary, and iron <strong>to</strong>wards the yoke.<br />
Sew <strong>to</strong>gether back sections of lining as for the outer fabric.
Sew <strong>to</strong>gether back lining and outer-fabric section along the <strong>to</strong>p edge. Trim and neaten<br />
seam allowance. Understitch the seam allowance <strong>to</strong>wards the lining and press (Figs.13<br />
and 14).<br />
Fig.13 Fig.14<br />
Join bodice with front section<br />
Close darts on lining and on outer fabric (Fig.15). If necessary, <strong>to</strong>pstitch the darts on the<br />
outer fabric so that the pleats don’t stick out.<br />
Mark the points of the bodice and lower-front section according <strong>to</strong> Fig. 16.<br />
Sew <strong>to</strong>gether lower-front section and bodice such that the additional widths are<br />
gathered, or adjusted <strong>to</strong> the underbust seam by means of gathering threads.<br />
Fig.15 Fig.16 Fig.17<br />
Tip: When sewing <strong>to</strong>gether the sections, begin at a side<br />
seam and sew up <strong>to</strong> the point marking in the centre-front (Fig. 17).<br />
Snip the point on the bodice up <strong>to</strong> 1mm short of the marking, then sew the second side.<br />
Trim and neaten seam allowances and press <strong>to</strong> the lining or outer fabric.<br />
Baste or understitch edges if necessary.<br />
Sew lining- and outer-fabric sections <strong>to</strong>gether along the neckline edge.<br />
Trim seam allowances; snip in the neckline point, neaten if necessary, and iron <strong>to</strong> the<br />
bodice.<br />
Side seam<br />
Close left side of <strong>to</strong>p in one go; trim and press seam allowance.<br />
Tip: With very delicate fabrics, the seam can be sewn with an overlock rolled seam.<br />
Alternatively, neaten the seam allowances individually.
Satin ribbon<br />
Arrange the satin ribbon along the underbust edging and pin in place.<br />
Beginning at the zip opening, stitch the satin ribbon on<strong>to</strong> the centre of the underbust<br />
seam for about 10cm (<strong>to</strong> the outer fabric only). Make sure that the ribbon is cut<br />
according <strong>to</strong> the strap length.<br />
Stitch the satin ribbon <strong>to</strong> the front, again for 10cm, and only <strong>to</strong> the outer fabric (Fig.18).<br />
Fig.18<br />
Sew in zip<br />
Neaten seam allowances individually. Sew zip in<strong>to</strong> outer fabric.<br />
With right lining side <strong>to</strong> wrong zip side, sew lining <strong>to</strong> zip.<br />
Finish sewing on satin ribbon<br />
Secure outer fabric and lining <strong>to</strong>gether along the underbust seam. Pin on and stitch<br />
satin ribbon in centre, along the underbust seam up <strong>to</strong> the beginning of the strap.<br />
Hem edges<br />
For hemming the edges, a narrow strip of interfacing can be ironed on. This makes it<br />
easier <strong>to</strong> iron a narrow-edge hem in and over.<br />
Alternatively, hem with an overlocker.<br />
Tip: Additional hem-treatment options:<br />
- Secure hem edge 1cm in from the edge with just a straight-stitched seam and allow <strong>to</strong><br />
fray.<br />
- Sew on cords, beads or sequins with the Bernina Bulky overlock foot no. 12.<br />
- Hem the edge with the Bernina Roll and shell hemmer foot no. 68 / 69.<br />
Further detailed information can be found in your <strong>My</strong> <strong>Label</strong> program at<br />
Help> Sewing Techniques. This option offers detailed instructions on the proper way <strong>to</strong><br />
sew belt loops, collars, pockets, linings and much more. It also deals with basic sewing<br />
techniques for newcomers.