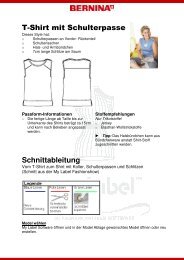
From Slip Dress to Top - My Label 3D Fashion Pattern Software
From Slip Dress to Top - My Label 3D Fashion Pattern Software
From Slip Dress to Top - My Label 3D Fashion Pattern Software

Create successful ePaper yourself
Turn your PDF publications into a flip-book with our unique Google optimized e-Paper software.
Materials and miscellaneous<br />
Zip, approx. 30cm<br />
Satin ribbon, approx. 3.5m (max. 3cm wide) for edging<br />
Stay tape, if wished<br />
Tip: Use right half of pattern piece for outer fabric, left half for lining.<br />
Cutting out<br />
Outer fabric Lining<br />
1 x bodice <strong>to</strong> fabric fold 1 x lower front section <strong>to</strong> fabric fold<br />
1 x lower front section <strong>to</strong> fabric fold 1 x back yoke <strong>to</strong> fabric fold<br />
1 x back yoke <strong>to</strong> fabric fold 1 x lower back section <strong>to</strong> fabric fold<br />
1 x lower back section <strong>to</strong> fabric fold 1 x bodice <strong>to</strong> fabric fold<br />
Preparation<br />
Arrange the paper-pattern pieces on the fabric according <strong>to</strong> the pattern-layout<br />
illustration. Cut out pieces, then transfer all markings <strong>to</strong> the fabric. Mark delicate fabrics<br />
with darning thread.<br />
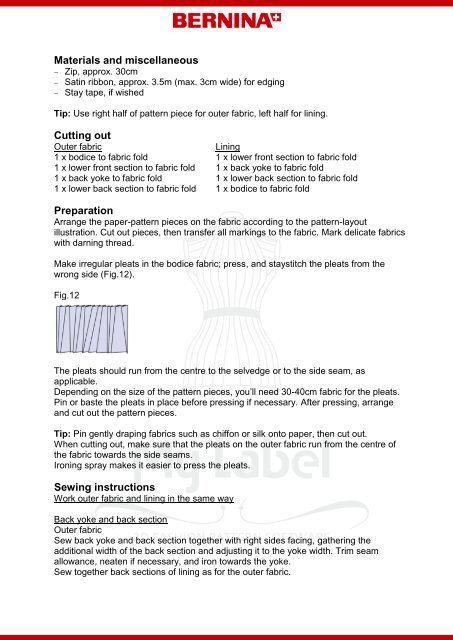
Make irregular pleats in the bodice fabric; press, and staystitch the pleats from the<br />
wrong side (Fig.12).<br />
Fig.12<br />
The pleats should run from the centre <strong>to</strong> the selvedge or <strong>to</strong> the side seam, as<br />
applicable.<br />
Depending on the size of the pattern pieces, you’ll need 30-40cm fabric for the pleats.<br />
Pin or baste the pleats in place before pressing if necessary. After pressing, arrange<br />
and cut out the pattern pieces.<br />
Tip: Pin gently draping fabrics such as chiffon or silk on<strong>to</strong> paper, then cut out.<br />
When cutting out, make sure that the pleats on the outer fabric run from the centre of<br />
the fabric <strong>to</strong>wards the side seams.<br />
Ironing spray makes it easier <strong>to</strong> press the pleats.<br />
Sewing instructions<br />
Work outer fabric and lining in the same way<br />
Back yoke and back section<br />
Outer fabric<br />
Sew back yoke and back section <strong>to</strong>gether with right sides facing, gathering the<br />
additional width of the back section and adjusting it <strong>to</strong> the yoke width. Trim seam<br />
allowance, neaten if necessary, and iron <strong>to</strong>wards the yoke.<br />
Sew <strong>to</strong>gether back sections of lining as for the outer fabric.