Introduction to Stata 8
Introduction to Stata 8
Introduction to Stata 8

You also want an ePaper? Increase the reach of your titles
YUMPU automatically turns print PDFs into web optimized ePapers that Google loves.
Variable names can have up <strong>to</strong> 8 characters a-z (but not æøå) and 0-9; they must start<br />
with a letter. Avoid special characters, also avoid _ (underscore). If you use <strong>Stata</strong> for<br />
analysis remember that <strong>Stata</strong> is case-sensitive (always use lowercase variable names).<br />
[Make Datafile]: Save the empty data file first.rec.<br />
[Add checks]: You do not have <strong>to</strong> write the actual code yourself, but may use the menu<br />
system. The information is s<strong>to</strong>red in a checkfile (first.chk) which is structured as below.<br />
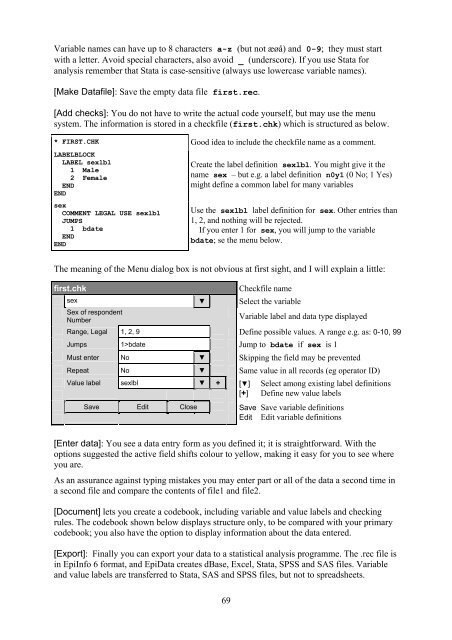
* FIRST.CHK Good idea <strong>to</strong> include the checkfile name as a comment.<br />
LABELBLOCK<br />
LABEL sexlbl<br />
1 Male<br />
2 Female<br />
END<br />
END<br />
sex<br />
COMMENT LEGAL USE sexlbl<br />
JUMPS<br />
1 bdate<br />
END<br />
END<br />
Create the label definition sexlbl. You might give it the<br />
name sex – but e.g. a label definition n0y1 (0 No; 1 Yes)<br />
might define a common label for many variables<br />
Use the sexlbl label definition for sex. Other entries than<br />
1, 2, and nothing will be rejected.<br />
If you enter 1 for sex, you will jump <strong>to</strong> the variable<br />
bdate; se the menu below.<br />
The meaning of the Menu dialog box is not obvious at first sight, and I will explain a little:<br />
first.chk Checkfile name<br />
sex ▼ Select the variable<br />
Sex of respondent<br />
Number<br />
69<br />
Variable label and data type displayed<br />
Range, Legal 1, 2, 9 Define possible values. A range e.g. as: 0-10, 99<br />
Jumps 1>bdate Jump <strong>to</strong> bdate if sex is 1<br />
Must enter No ▼ Skipping the field may be prevented<br />
Repeat No ▼ Same value in all records (eg opera<strong>to</strong>r ID)<br />
Value label sexlbl ▼ +<br />
Save Edit Close<br />
[▼] Select among existing label definitions<br />
[+] Define new value labels<br />
Save Save variable definitions<br />
Edit Edit variable definitions<br />
[Enter data]: You see a data entry form as you defined it; it is straightforward. With the<br />
options suggested the active field shifts colour <strong>to</strong> yellow, making it easy for you <strong>to</strong> see where<br />
you are.<br />
As an assurance against typing mistakes you may enter part or all of the data a second time in<br />
a second file and compare the contents of file1 and file2.<br />
[Document] lets you create a codebook, including variable and value labels and checking<br />
rules. The codebook shown below displays structure only, <strong>to</strong> be compared with your primary<br />
codebook; you also have the option <strong>to</strong> display information about the data entered.<br />
[Export]: Finally you can export your data <strong>to</strong> a statistical analysis programme. The .rec file is<br />
in EpiInfo 6 format, and EpiData creates dBase, Excel, <strong>Stata</strong>, SPSS and SAS files. Variable<br />
and value labels are transferred <strong>to</strong> <strong>Stata</strong>, SAS and SPSS files, but not <strong>to</strong> spreadsheets.