Basic Operations and Setups - Sharp & Casio Cash Registers
Basic Operations and Setups - Sharp & Casio Cash Registers
Basic Operations and Setups - Sharp & Casio Cash Registers

Create successful ePaper yourself
Turn your PDF publications into a flip-book with our unique Google optimized e-Paper software.
Getting Started<br />
8<br />
OP<br />
A-A08<br />
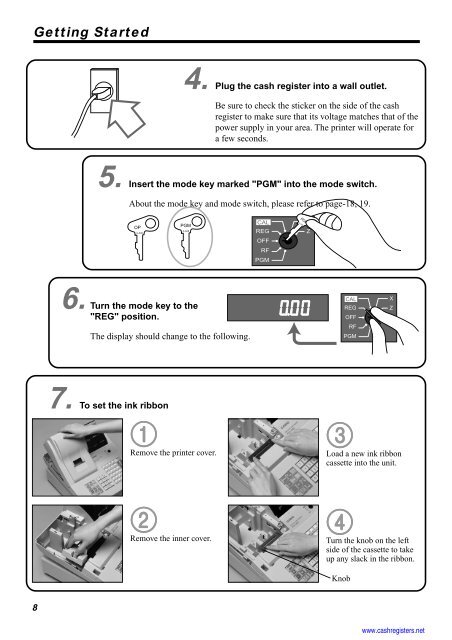
4. Plug the cash register into a wall outlet.<br />
PGM<br />
A-A08<br />
Be sure to check the sticker on the side of the cash<br />
register to make sure that its voltage matches that of the<br />
power supply in your area. The printer will operate for<br />
a few seconds.<br />
5. Insert the mode key marked "PGM" into the mode switch.<br />
6. Turn the mode key to the<br />
"REG" position.<br />
About the mode key <strong>and</strong> mode switch, please refer to page-18, 19.<br />
The display should change to the following.<br />
7. To set the ink ribbon<br />
1<br />
Remove the printer cover.<br />
2<br />
Remove the inner cover.<br />
CAL<br />
REG<br />
OFF<br />
RF<br />
PGM<br />
PGM<br />
A-A08<br />
ZX<br />
Z<br />
CAL<br />
REG<br />
OFF<br />
RF<br />
PGM<br />
X<br />
Z<br />
3<br />
Load a new ink ribbon<br />
cassette into the unit.<br />
4<br />
Turn the knob on the left<br />
side of the cassette to take<br />
up any slack in the ribbon.<br />
Knob<br />
www.cashregisters.net