Hydronic M-II (Water Heater) - Espar
Hydronic M-II (Water Heater) - Espar
Hydronic M-II (Water Heater) - Espar

You also want an ePaper? Increase the reach of your titles
YUMPU automatically turns print PDFs into web optimized ePapers that Google loves.
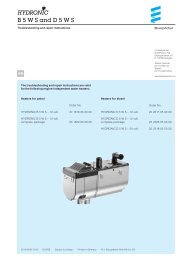
Installation Procedures<br />
Electrical Connections<br />
Caution: To avoid potential short circuit damage during installation,<br />
insert main fuse into the power harness after<br />
all electrical connections are complete.<br />
A) Power Harness...................................................................<br />
Note: Wire must be inserted into fuse holder prior to<br />
terminating.<br />
B) Switch Harness..................................................................<br />
C) Fuel Metering Pump Harness...........................................<br />
14<br />
-<br />
7 Day Timer<br />
+<br />
A<br />
• 2 core harness (red, brown).<br />
• Connect red wire to fuse link and terminal.<br />
• Attach ring terminal to vehicle battery (+).<br />
• Connect brown wire to vehicle battery (-) using ring<br />
terminal provided.<br />
• Insert fuse. (15A-24V, 20A-12V)<br />
• 4 core harness (red, brown, yellow, blue/white)<br />
• Run to location of switch. Make terminal connections at<br />
switch. <strong>Espar</strong> has different available switches.<br />
See switch instructions for more information.<br />
• 2 core harness (green, green).<br />
• Fuel Metering Pump Harness is pre-connected when<br />
box is provided with pump pre-mounted.<br />
• If mounted externally, connect wires to fuel metering<br />
pump using connector and terminals supplied, with the<br />
heater - (no polarity required).<br />
B C<br />
7 Day Timer<br />
switch harness<br />
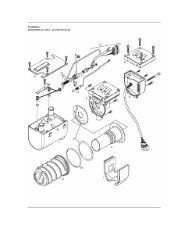
Shown is a <strong>Hydronic</strong> M<strong>II</strong> boxed version, 12 volt with<br />
Standard - Power, Switch, Fuel Metering Pump harnesses<br />
and optional 7 day timer.<br />
Other timers or switch options are available.<br />
Easy Start Mini Timer<br />
Programable Push and<br />
Timer Pull Switch<br />
I AUTO O RUN P<br />
P M<br />
1 2 3 4 5 6 7<br />
P 1...7 h m<br />
R<br />
Note: All harnesses should be cut to length.<br />
All exposed electrical connections should be coated<br />
with protective grease.