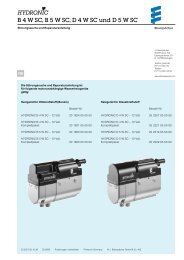
Hydronic M-II (Water Heater) - Espar
Hydronic M-II (Water Heater) - Espar
Hydronic M-II (Water Heater) - Espar

Create successful ePaper yourself
Turn your PDF publications into a flip-book with our unique Google optimized e-Paper software.
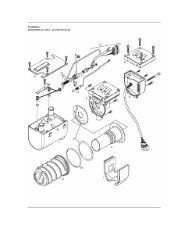
Installation Procedures<br />
Operating Switches<br />
A 7 Day Timer, a Push/Pull switch, a Programmable Timer or an<br />
easy start timer are available for the heater.<br />
7 Day Timer Instructions<br />
The 7 Day Timer has been designed to provide a simple means<br />
to control the operation of the heater system and to include the<br />
capability for diagnostics. This timer connects to the diagnostic<br />
circuit of the heater. The timer then displays any heater fault<br />
codes in three digit number form automatically. The timer allows<br />
for pre-selection of turn on time, up to 7 days in advance, as well<br />
as an option for run times up to 2 hours before automatically turning<br />
off. In addition, there is an on/off switch for manual operation.<br />
By default the timer is pre-set by <strong>Espar</strong> to operate for two hours.<br />
Refer to instructions provided with timer for setting options.<br />
• Mount bezel into dash and insert timer or use <strong>Espar</strong>ʼs optional<br />
mounting bracket and secure to dash.<br />
• Use hardware supplied for connections.<br />
• Connect the switch harness to the connector at the heater and<br />
run harness to switch location. (Harness should be neatly<br />
routed and secured under dashboard).<br />
• Cut harness to length and terminate wires. Attach using connectors<br />
provided.<br />
• Refer to timer instructions for other wiring options.<br />
Note: If installing a remote starter, refer to remote starter<br />
instructions before terminating wires.<br />
Option #1: Dash lights to timer - connect wire between dash<br />
lights circuit and timer at terminal #1.<br />
Note: The timer display is automatically illuminated while the<br />
heater is operating. Connecting pin 1 to the vehicle<br />
dim- mer switch will allow the timer display to illuminate with<br />
the vehicles dash lights.<br />
16<br />
Bezel<br />
Mounting Bracket & Bezel<br />
P/N 25 1482 70 01 00<br />
Mounting Bracket<br />
I AUTO O RUN P<br />
P M<br />
1 2 3 4 5 6 7<br />
P 1...7 h m<br />
R<br />
a4)<br />
a3)<br />
a5)<br />
a2)<br />
Red<br />
Yellow<br />
Brown<br />
Blue<br />
Option #2<br />
Option #1<br />
Yellow<br />
Blue<br />
Red<br />
Brown<br />
12 11 10 9 8 7 6 5 4 3 2 1<br />
TRS<br />
DIAG<br />
Option #2: Operate heater continuously - connect wire from<br />
ignition circuit to terminal #10.<br />
Note: An alternative to connecting pin 10 to the vehicle<br />
ignition accessories “On” circuit may also be considered<br />
for some applications where extended run<br />
times are desired. Connecting pin 10 with the red<br />
wire will enable the heater to run continuously on<br />
manual mode.<br />
Operating Instructions<br />
Setting Time and Weekday<br />
Push button once 12:00 will begin to flash (this will occur<br />
upon initial hook up to power).<br />
Using or set the present time of day (24 hour clock).<br />
When the time stops flashing the time has been stored.<br />
The weekday will now begin to flash.<br />
Use or to set the present weekday.<br />
When the weekday stops flashing the weekday has been stored.<br />
When the vehicle ignition is turned “on” the time display will<br />
appear, if optional connection on pin 10 is insatlled.<br />
When the vehicle ignition is turned “off” the timer display will go<br />
off after 15 seconds.<br />
Changing the Time or Day<br />
Push and hold button until the time display begins to flash.<br />
Continue to set the time as listed in setting time and weekday.<br />
Using the Timer with the Vehicle Ignition “Off”<br />
Push button.<br />
will appear on the display as well as the operation countdown<br />
timer.<br />
The running time is factory set to maximum of 120 minutes.<br />
This running time can be reset once or permanently as desired.<br />
Adjusting Preheat Time Once<br />
Press button.<br />
The will appear in the display and the preselected run<br />
time will appear in the display (maximum time of 120 minutes).<br />
Use the or to adjust the desired run time.<br />
Adjusting the <strong>Heater</strong> Preheat Time Permanently<br />
(Maximum Preheat Time of 120 minutes)<br />
Push and hold (about 3 seconds) until the display lights up<br />
and flashes. Release button.<br />
Use or to set the new fixed preheat time.<br />
When the display goes off the new preheat time is set.<br />
Note: At the end of a preheat cycle the timer will turn the<br />
heater off. The heater will complete a cool down<br />
cycle and turn itself off.<br />
P