Hydronic M-II (Water Heater) - Espar
Hydronic M-II (Water Heater) - Espar
Hydronic M-II (Water Heater) - Espar

You also want an ePaper? Increase the reach of your titles
YUMPU automatically turns print PDFs into web optimized ePapers that Google loves.
Maintenance, Troubleshooting & Repairs<br />
Repair step 2<br />
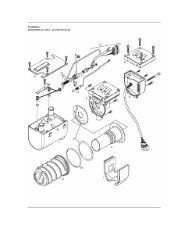
Control box/blower unit and jacket<br />
Lay water pump lead harness<br />
Figure 29<br />
• Insert the water pump lead harness into the holder on the<br />
jacket, lay up to the water pump and connect.<br />
Install overheating and temperature sensor<br />
Figure 30 and 31<br />
• Insert the overheating (17) and temperature sensor (18)<br />
40<br />
into the holders on the jacket.<br />
Insert the sensor cable loom (19) into the holders on the<br />
jacket.<br />
Use 2 screws (15) M4 x 12 to fasten both springs (16) on the<br />
overheating (17) and temperature sensor (18). (See page<br />
31)<br />
Note: Insert the temperature sensor as shown in the figure<br />
to avoid pinching the cable loom.