

Pro 501st Airless Paint Sprayer - Graco Inc.
Pro 501st Airless Paint Sprayer - Graco Inc.
Pro 501st Airless Paint Sprayer - Graco Inc.

Create successful ePaper yourself
Turn your PDF publications into a flip-book with our unique Google optimized e-Paper software.
Flushing<br />
When to Flush<br />
WARNING<br />
INJECTION HAZARD<br />
To reduce the risk of serious injury,<br />
whenever you are instructed to relieve<br />
pressure, follow the Pressure Relief<br />
<strong>Pro</strong>cedure on page 9.<br />
1. Before using a new sprayer: flush out the oil<br />
which was left in to protect pump parts.<br />
Before using water-base paint: flush with mineral<br />
spirits followed by soapy water, and then a clean<br />
water flush.<br />
Before using oil-base paint: flush with mineral<br />
spirits only.<br />
2. Changing colors: flush with compatible solvent<br />
such as mineral spirits or water.<br />
3. Changing from water-base to oil-base paint:<br />
flush with warm, soapy water, and then mineral<br />
spirits.<br />
4. Changing from oil-base to water-base paint:<br />
flush with warm, soapy water, and then a clean<br />
water flush.<br />
5. Storage after using water-base paint: flush with<br />
water and then mineral spirits. Leave the system<br />
filled with mineral spirits. Relieve the pressure.<br />
Leave the drain valve open.<br />
CAUTION<br />
Never leave water or water-based fluids in the<br />
sprayer if there is a chance is could freeze. Push<br />
the water out with mineral spirits. Frozen fluids in<br />
the sprayer prevents it from being started and may<br />
cause serious damage.<br />
6. Startup after storage. Before using water-base<br />
paint, flush out the mineral spirits with soapy water<br />
and then clean water. When using oil-base paint,<br />
flush out the mineral spirits with the paint.<br />
How to Flush<br />
1. Relieve the pressure.<br />
2. Remove the spray tip and clean it separately.<br />
Remove the filter screen and reinstall the bowl,<br />
hand tight, without the screen. Clean the screen<br />
separately. See Fig. 10.<br />
3. Pour one-half gallon (2 liters) of compatible solvent<br />
into a grounded metal flushing pail. Put the suction<br />
hose in the pail.<br />
4. Open the pressure drain valve. See Fig. 3, page 7.<br />
5. To save the paint still in the pump and hose, follow<br />
Step 6, except put the drain hose in the paint pail.<br />
When solvent appears, close the drain valve. Put<br />
the drain hose in the flushing pail. Trigger the gun<br />
into the paint pail. When solvent appears, release<br />
the trigger. Continue with step 6.<br />
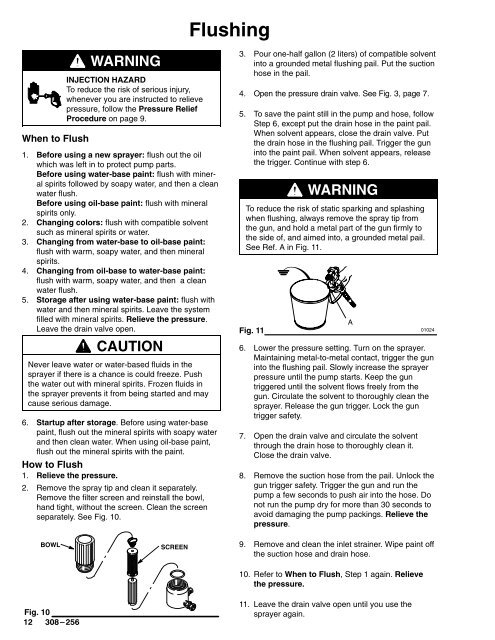
WARNING<br />
To reduce the risk of static sparking and splashing<br />
when flushing, always remove the spray tip from<br />
the gun, and hold a metal part of the gun firmly to<br />
the side of, and aimed into, a grounded metal pail.<br />
See Ref. A in Fig. 11.<br />
A<br />
Fig. 11 01024<br />
6. Lower the pressure setting. Turn on the sprayer.<br />
Maintaining metal-to-metal contact, trigger the gun<br />
into the flushing pail. Slowly increase the sprayer<br />
pressure until the pump starts. Keep the gun<br />
triggered until the solvent flows freely from the<br />
gun. Circulate the solvent to thoroughly clean the<br />
sprayer. Release the gun trigger. Lock the gun<br />
trigger safety.<br />
7. Open the drain valve and circulate the solvent<br />
through the drain hose to thoroughly clean it.<br />
Close the drain valve.<br />
8. Remove the suction hose from the pail. Unlock the<br />
gun trigger safety. Trigger the gun and run the<br />
pump a few seconds to push air into the hose. Do<br />
not run the pump dry for more than 30 seconds to<br />
avoid damaging the pump packings. Relieve the<br />
pressure.<br />
BOWL<br />
SCREEN<br />
9. Remove and clean the inlet strainer. Wipe paint off<br />
the suction hose and drain hose.<br />
10. Refer to When to Flush, Step 1 again. Relieve<br />
the pressure.<br />
Fig. 10<br />
<br />
11. Leave the drain valve open until you use the<br />
sprayer again.


