

Pro 501st Airless Paint Sprayer - Graco Inc.
Pro 501st Airless Paint Sprayer - Graco Inc.
Pro 501st Airless Paint Sprayer - Graco Inc.

Create successful ePaper yourself
Turn your PDF publications into a flip-book with our unique Google optimized e-Paper software.
Pressure Control<br />
WARNING<br />
INJECTION HAZARD<br />
To reduce the risk of serious injury,<br />
whenever you are instructed to relieve<br />
pressure, follow the Pressure Relief<br />
<strong>Pro</strong>cedure on page 9.<br />
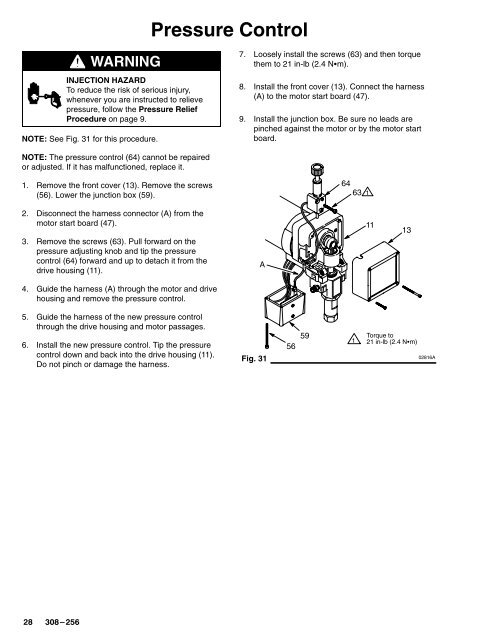
NOTE: See Fig. 31 for this procedure.<br />
7. Loosely install the screws (63) and then torque<br />
them to 21 in-lb (2.4 Nm).<br />
8. Install the front cover (13). Connect the harness<br />
(A) to the motor start board (47).<br />
9. Install the junction box. Be sure no leads are<br />
pinched against the motor or by the motor start<br />
board.<br />
NOTE: The pressure control (64) cannot be repaired<br />
or adjusted. If it has malfunctioned, replace it.<br />
1. Remove the front cover (13). Remove the screws<br />
(56). Lower the junction box (59).<br />
64<br />
63<br />
<br />
2. Disconnect the harness connector (A) from the<br />
motor start board (47).<br />
3. Remove the screws (63). Pull forward on the<br />
pressure adjusting knob and tip the pressure<br />
control (64) forward and up to detach it from the<br />
drive housing (11).<br />
A<br />
11<br />
13<br />
4. Guide the harness (A) through the motor and drive<br />
housing and remove the pressure control.<br />
5. Guide the harness of the new pressure control<br />
through the drive housing and motor passages.<br />
6. Install the new pressure control. Tip the pressure<br />
control down and back into the drive housing (11).<br />
Do not pinch or damage the harness.<br />
Fig. 31<br />
56<br />
59<br />
<br />
Torque to<br />
21 in-lb (2.4 Nm)<br />
02816A


